Supply System
Supply in WEGO WWII: Stalingrad is designed to be intuitive and low-maintenance - handled mostly by exception. If you’re on the defensive, you can largely ignore it. But when going on the offensive or planning large maneuvers, you’ll need to engage with it directly and strategically.
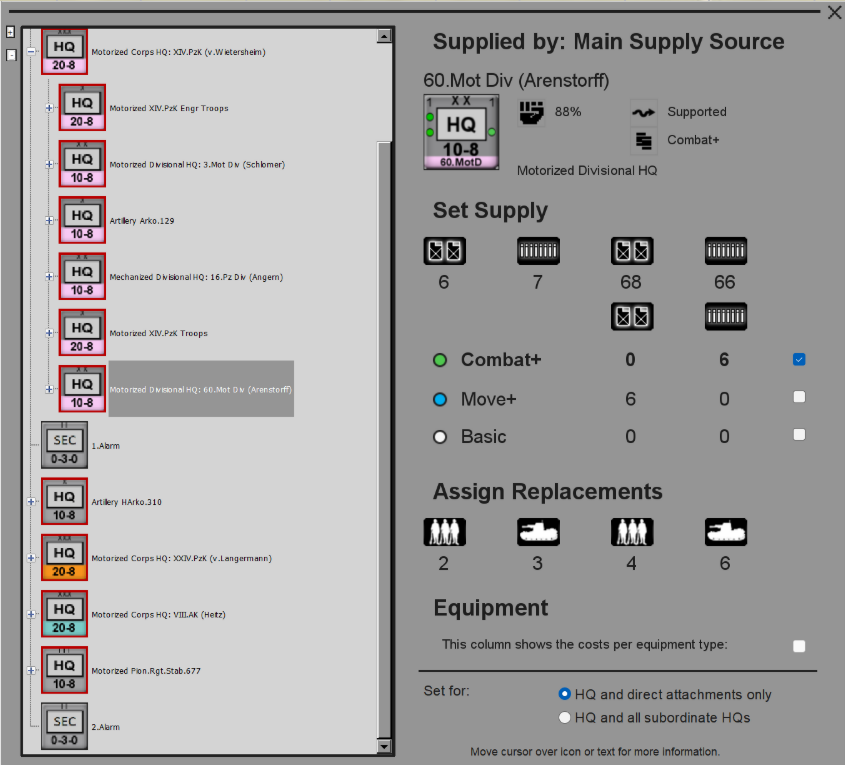
At the start of each turn, all HQs reset to Basic Supply. You can change supply to Move+, Combat+, or both, giving subordinate units more fuel (for extended movement) or ammo (for higher combat effectiveness). But this comes at a cost - if a unit is given Combat+ supply but does not use it, that supply is lost, so poor planning wastes resources.
Supply flows from Main Supply Sources, down through the HQ chain, via Lines of Communication (LOC). Units out of range are penalized, and supply effectiveness degrades if interdicted.
- Combat+ boosts attack performance.
- Move+ enables road movement and extended operations.
- Interdiction from enemy air/naval assets can disrupt delivery, but can be countered by friendly Counter-Air missions.
- Supply Depots and Airfields can keep isolated forces going, albeit at reduced effectiveness.
Whether you're pushing through open terrain or clinging to a battered city block, smart supply management is vital to keeping your forces in fighting shape.
Lines of Communication (LOC)
In WEGO WWII: Stalingrad, maintaining your Lines of Communication (LOC) is essential for keeping your units supplied and effective in combat. Every HQ and ground unit falls into one of four LOC states based on distance (in movement points) and whether a clear path exists back to supply:
- Supported – Fully in supply, with access to supply types (Combat+, Move+). Only supported units can use Road Movement.
- Extended Support – Still supplied, but too far for road movement. All supply types can be assigned, but mobility is reduced, and their readiness recovery rate is reduced.
- Isolated – Out of range from any HQ. Shock effects are halved, and supply options are severely limited.
- Encircled – Surrounded with no supply path at all. These units suffer halved shock effects and lose readiness every turn.
Managing LOCs—especially in fluid battles or deep advances—is key. Let your front outrun your supply lines, and your offensive may grind to a halt.
Shock Mechanics
Shock in WEGO WWII: Stalingrad represents the impact of high-mobility, high-intensity combat from armored and mechanized units. It shifts the odds in combat, simulating the advantage of speed, force, and surprise in open terrain.
- Armored units always have a Shock value of 4, regardless of tank model.
- Foot infantry reduce Shock effectiveness by slowing down the overall attack—tanks have to match their pace.
- Mechanized infantry and motorized units do not have shock but they don’t reduce it.
- Shock is only applied in open terrain, and not when attacking across rough hexsides like gullies.
Shock effectiveness is calculated by:
- Taking the highest Shock value among attacking units.
- Adjusting it based on the proportion of “Shock-capable” stacking size (i.e. units with Shock vs. total stacking).
- Halving Shock if units are understrength, low on readiness, or isolated/encircled. Units in extremely poor condition contribute no Shock.
Example: If a Shock 4 tank unit is attacking alongside infantry, and half the stacking comes from non-Shock units, then only half of the Shock is used - yielding a final Shock of 2. This can significantly alter the combat odds.
Anti-Tank Units:
- Standard AT guns neutralize up to 2 points of enemy Shock but don’t contribute to offensive Shock.
- Heavy German AT/AA units (e.g. 88mm) can attack with Shock 2, but only against tanks and under specific conditions (e.g. longer range, supporting other AT units).
Shock adds an extra layer of tactical planning—grouping fast units together maximizes their impact, while mixing them with slower infantry can blunt their edge.
Battle Types
Planned Attacks
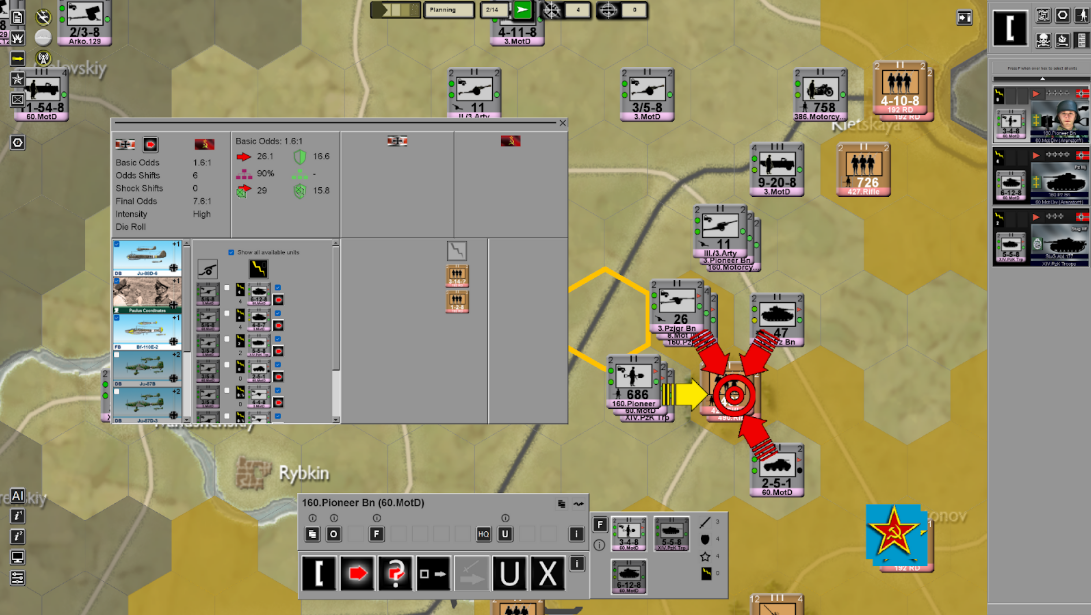
These are the cornerstone of your offensive strategy. When your units are adjacent to the enemy, you can launch a Planned Attack — a coordinated assault backed by Artillery, Air Support, and Command Support to tilt the odds in your favor.
You’ll see the expected combat odds before committing (or an estimate, if Fog of War is enabled), allowing you to make informed, strategic decisions. To launch a Planned Attack, simply move your units onto the target hex — the rest is in your hands.
Ad-hoc Attacks
Not every battle is planned in advance. Ad-hoc Attacks happen dynamically during movement — when a moving unit encounters enemy forces on the way to its destination. These engagements are unplanned and inherently more chaotic.
Because both sides may be moving simultaneously, you can never be entirely sure how the battle will unfold. The enemy might withdraw, reinforce, or shift positions, while your own units might be delayed by Command & Control penalties. In these situations, your units won’t have access to offensive support — but stationary defenders will benefit from their assigned artillery, air, or command bonuses.
Types of Ad-hoc Engagements
- Meeting Engagements
- When both sides move into the same area, chaos reigns. No terrain advantages apply, but unit quality becomes critical — higher-quality troops perform better in these unpredictable skirmishes, with their quality bonus doubled in the fight.
Ambushes
- If your units are using Road Movement and end up adjacent to an enemy, they’ll be caught in an ambush. Movement stops immediately, and the enemy strikes first — with no return fire from your side. Fast, risky, and potentially devastating.
- Overruns
- Got overwhelming force? If your units reach a 10:1 odds ratio during movement, they can overrun the enemy — wiping out the defenders and continuing their advance in a single, crushing blow. It’s rare, but when it happens, it’s spectacular.
Combine & Breakdown — Unit Flexibility Without the Clutter
In some games, excessive stacking made dense areas difficult to manage. For WEGO WWII: Stalingrad, we wanted to capture both tactical depth and clean battlefield visibility, especially at a scale of 2.5 km per hex.
The solution? Flexible unit representation.
You can switch between Regiments/Brigades represented by a single counter, or break them down into three Battalion-level units for finer control where it matters. This allows you to:
- Cover broad fronts with battalions when space is tight
- Consolidate into regiments to reduce clutter and streamline command
- Seamlessly switch between the two as the tactical situation demands
This system gives you the flexibility to scale your force structure without sacrificing clarity or control.
Command and Control — Leadership Matters
Units in WEGO WWII: Stalingrad don’t just follow orders instantly. They operate within a realistic Command & Control system, where timing, coordination, and leadership quality matter.
- Orders may be delayed depending on a unit’s distance from HQ and its command rating.
- Better commanders and shorter communication lines mean faster, more reliable execution.
- Units may hesitate, arrive late, or even misinterpret commands under pressure.
This adds an extra layer of realism — planning isn’t just about what to do, but when and how effectively it will happen.
Out on June 25th on Steam


