


[center]by JR Renaud[/center]
OVERVIEW
Welcome to this continuation of a series of introductory After Action Reports (AAR) for Strategic Command WWII: War in Europe (SC3)! If you have not read the first, I invite you to do so here and here; although of course not mandatory, it does set up the series, explain certain conventions, and so on, which will be omitted from now on unless there are new concepts to introduce.
This iteration showcases the scenario 1940 Attack on the West. Poland has fallen, and key German forces have been redeployed to the Western Theatre in readiness to blitz through France and the Low Countries! I will demonstrate certain game functions such as how to attach/detach units to HQs, order para-drops, and later on, how to ‘Operate’ units (a.k.a. strategic movement). We will also dabble a little in Production, Research, and Diplomacy. Naval warfare will get some attention too.
It should be noted before moving on that historical outcomes – at least following a strict chronology of events – are hard to achieve in SC3. Since Hubert Cater’s AI has been ‘trained’ not to make the same mistakes as in history (see his blog posts and recent interview), players should not expect to be able to follow in history’s footsteps, so to speak. Therefore, my goals are a little more modest, and I will have to do things differently if I expect similar results – i.e., victory!
Let’s get started!
CONVENTIONS
New abbreviations introduced in this AAR include:
DD =destroyer
BB =battleship
CA =heavy cruiser
CC =battlecruiser
CL =light cruiser
CV =carrier (fleet)
CVA =carrier (escort)
SS =submarine
AAR Notes
• v1.00.10b
• Scenario: 1940 Attack on the West
• Side: Axis (Italy AI controlled)
• Difficulty: Intermediate (0%)
• Goal: Conquer France by August 1940
0120 hrs 10 May 1940
Incoming Decoded Message
Guten Morgen, mein Freund
I am most pleased with your success in Fall Weiß, therefore I am trusting you to teach the French a lesson that will erase the shame of the Great War and their criminal Treaty of Versailles. Not only that, I have every confidence that you can manage the differences between Großadmiral Erich Raeder and Vizeadmiral Karl Dönitz over Plan Z. You will remind them that Plan Z was developed and approved more than two years ago, and so continuing to bicker over what ships to build serves no one, least of all the Vaterland.
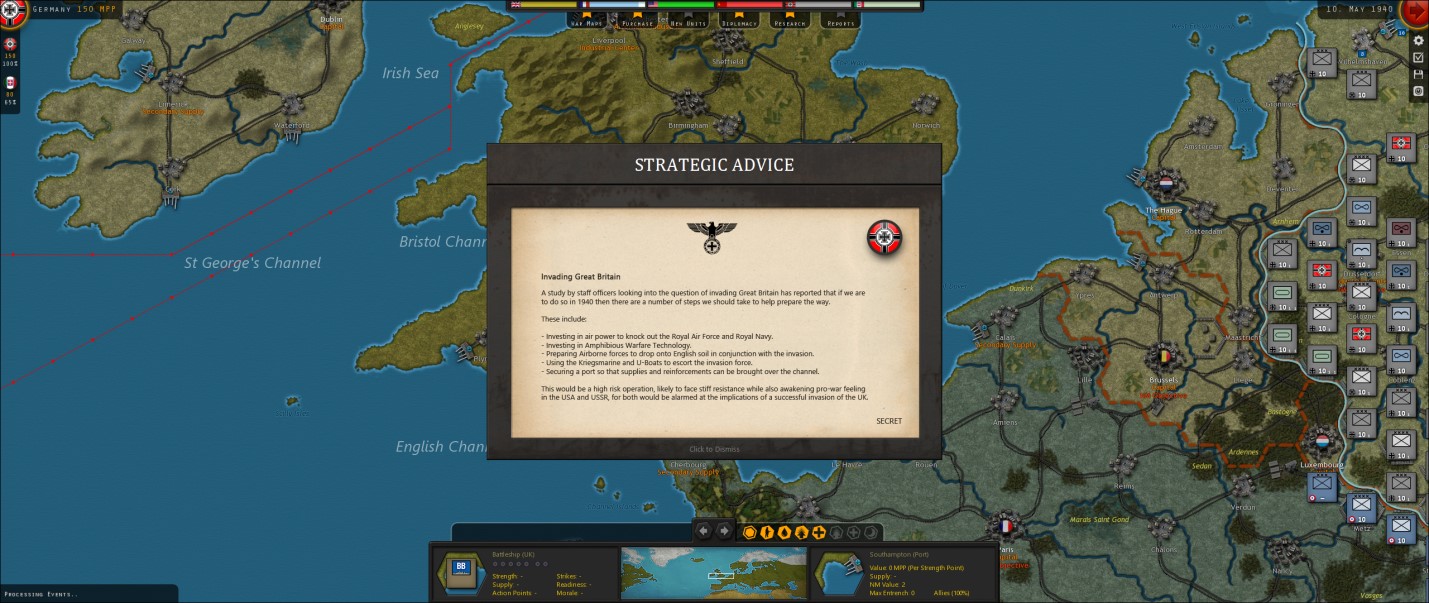
I also welcome your input into the political situation, as well as your thoughts on the technological challenges now faced by the Third Reich. For example, what do you think of Unternehmen Seelöwe, our plan to invade the English homeland?
Lastly, at your behest, our diplomats will deliver a Declaration of War to Luxembourg, Belgium, and The Netherlands; these petty peoples cannot be allowed to stand in the way of our glorious plunge through France and conquest of Great Britain. We will be masters of a Greater Europe, mein Freund!
Mit deutschem Gruß
UNTERNEHMEN SEELÖWE
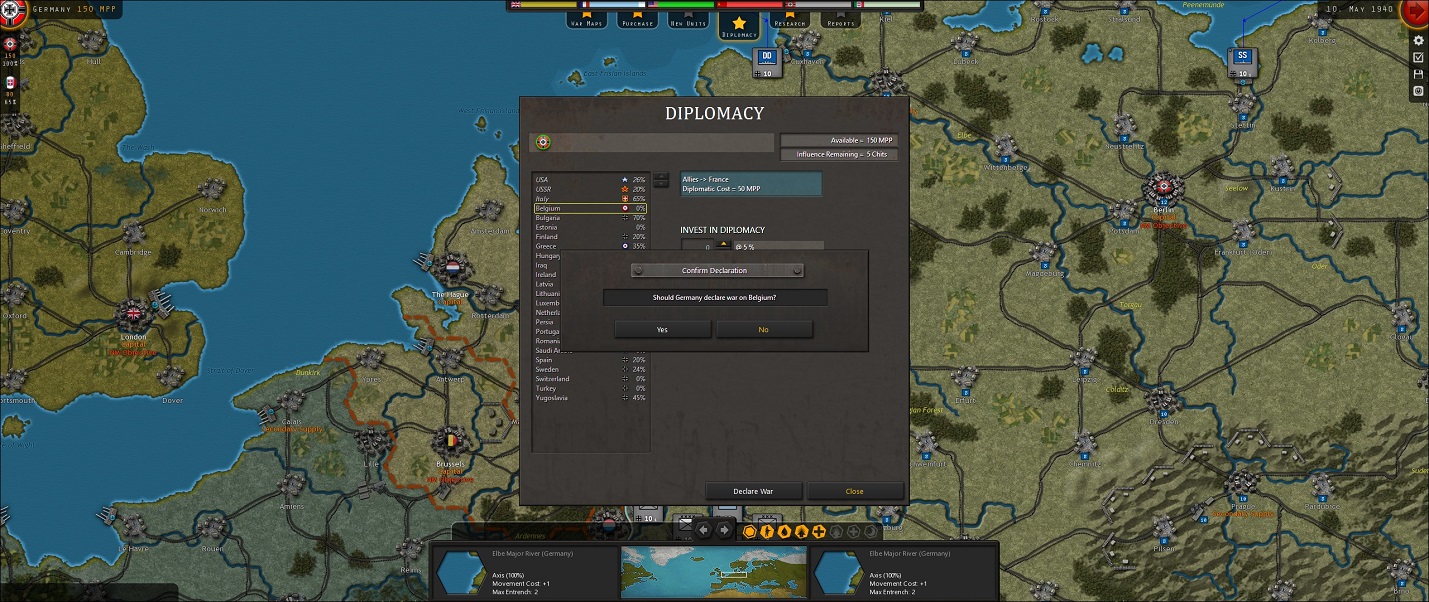
FIGURE 1 – DOW LOW COUNTRIES
Combat Readiness Report
Location: Oberkommando der Wehrmacht HQ
Present: Commander-in-Chief of all Wehrmacht Forces in the Field, plus Senior Staff
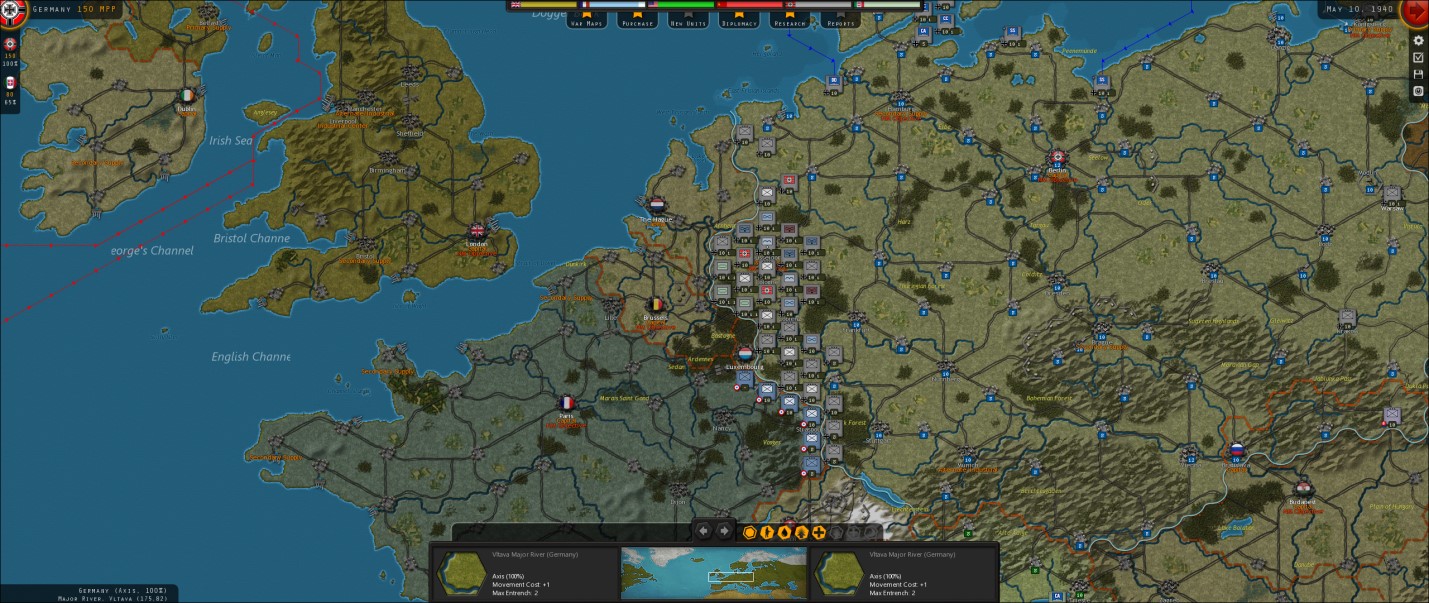
Generalfeldmarschall, for your approval: Declarations of war have been delivered to the Low Countries, and our forces are ready to invade. According to your directive, in the northern sector against the Netherlands, VIII Armeekorps has been detached from Generaloberst Fedor von Bock’s headquarters, and Kampfgruppe 1 Medium Bombers attached in place. Similarly, Generaloberst Georg von Kuchler has relinquished control of Schlachtgeschwader 2 Tactical Bomber Group, and instead III Panzerkorps, plus 6 Armee, have been placed under his command in the central sector. Also arrayed against Belgium and the Dutch, 7 Fallschirmjäger-division has been attached to Generaloberst Gerd von Rundstedt, who has taken over Luftflotte III and Kampfgruppe 51 . Since they will form a more or less static defence on the Westwall and thus have less need for higher leadership, 1 Armee and XVIII Armeekorps have been detached from von Rundstedt. These forces, along with II, V, VI, XII, XIII, XXVII, and XXX Armeekorps, as well as 12 Armee, occupying other positions along the Westwall, are of course at your disposal as well.
Finally, Generalfeldmarschall, Vizeadmiral Karl Dönitz has already committed U-30 to the Mid-Atlantic; its kommodore awaits orders via the Enigma code machine in the vicinity of coordinates 88,76. The remainder of the Kriegsmarine lies in port, pending liaison with Großadmiral Erich Raeder once the French harbours are opened to us – though, at your leisure, a report is available listing a great many naval assets due to come out of production soon, including the Bismarck, promised this coming August. Your advisors – including both Admirals Dönitz and Raeder, for once – agree that perhaps it would be better to wait, as the British Royal Navy alone greatly outnumbers us; combined with the French and other Allied fleets…
What are your orders, Herr Generalfeldmarschall?

FIGURE 2 – HQ SET MODE
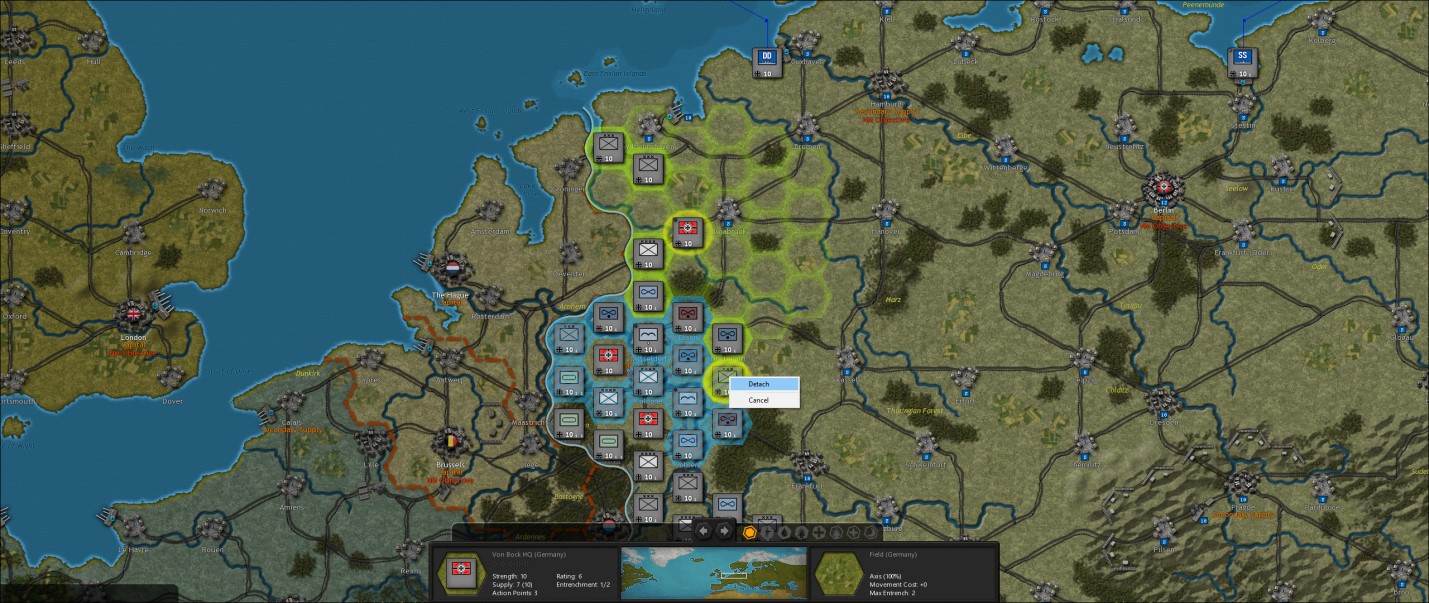
FIGURE 3 – UNIT DETACHMENT
Note #1
See Figure 1. Declarations of war are easily accomplished in SC3 via the Diplomacy tab at the top of the screen. Select the country and press the Declare War button at the bottom of the window. Note that it costs Military Production Points (MPP) to do this, so make sure you save enough and/or do it as the first action of your turn.
Also recommended to begin a turn – seeing that, once Action Points (AP) are spent, HQ attachment status cannot be changed – select an HQ (see Figure 2) and use the right-click menu to >Set Mode>Manual. Attached subordinate units are highlighted in green; the HQ’s range is further indicated in green. All eligible units (within range) that can be attached are outlined in blue. With the HQ still selected, right-click on a unit in green (see Figure 3) and right-click >Detach. Repeat steps to >Attach/Detach units up to an HQ’s limit (nominally five, modified by Research in Command and Control).
It might be noted that the number of units in this scenario exceed the total capacity of HQs, which often happens in SC3. Units do not have to be attached to an HQ, but in such case it is advisable to build more HQs and/or maximise Command and Control, as the latter provide invaluable assistance with stats such as Morale and Readiness.

PRODUCTION TABLE
Situational Report; General Orders
From: Oberkommando der Wehrmacht
To: All Armeegruppe Headquarters; Oberkommando der Marine
Meine Herren, the next phase of our glorious quest toward mastery of Europe is upon us! The Dutch appear woefully unprepared for the coming storm, the Belgians not much better. As for the French, well, they will soon see that their vaunted Maginot Line will serve them as much as a mud puddle impedes a duck.
Ja, meine Herren, we have the capability to completely bypass the forts and their garrisons in favour of a sweep through the Low Countries; we will outflank the Maginot defences and our troops will march beneath the Arc de Triomphe before the end of summer!
You have your orders.
0515 hrs 10 May 1940
Orders and Execution; Battle Reports
1. U-30 to raid Canada-UK convoys; U-30 sails to vicinity coord. 87,74 (see Figure 4).
a. N/A
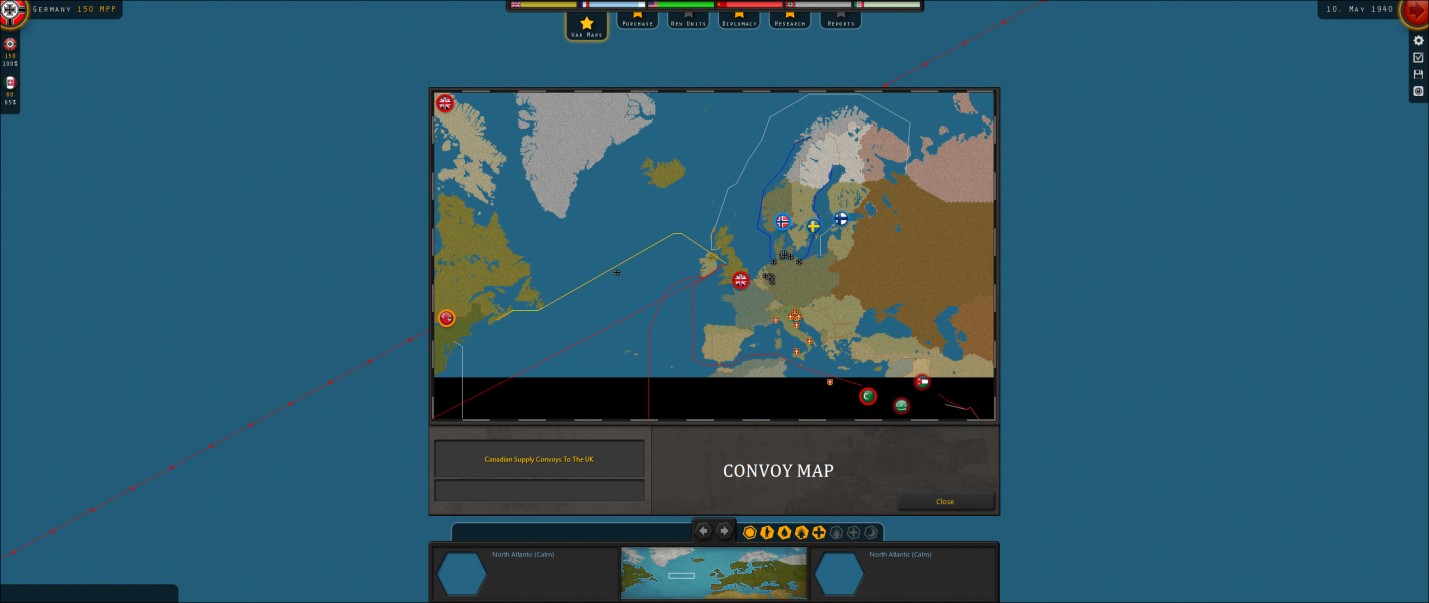
FIGURE 4 – CONVOY MAP
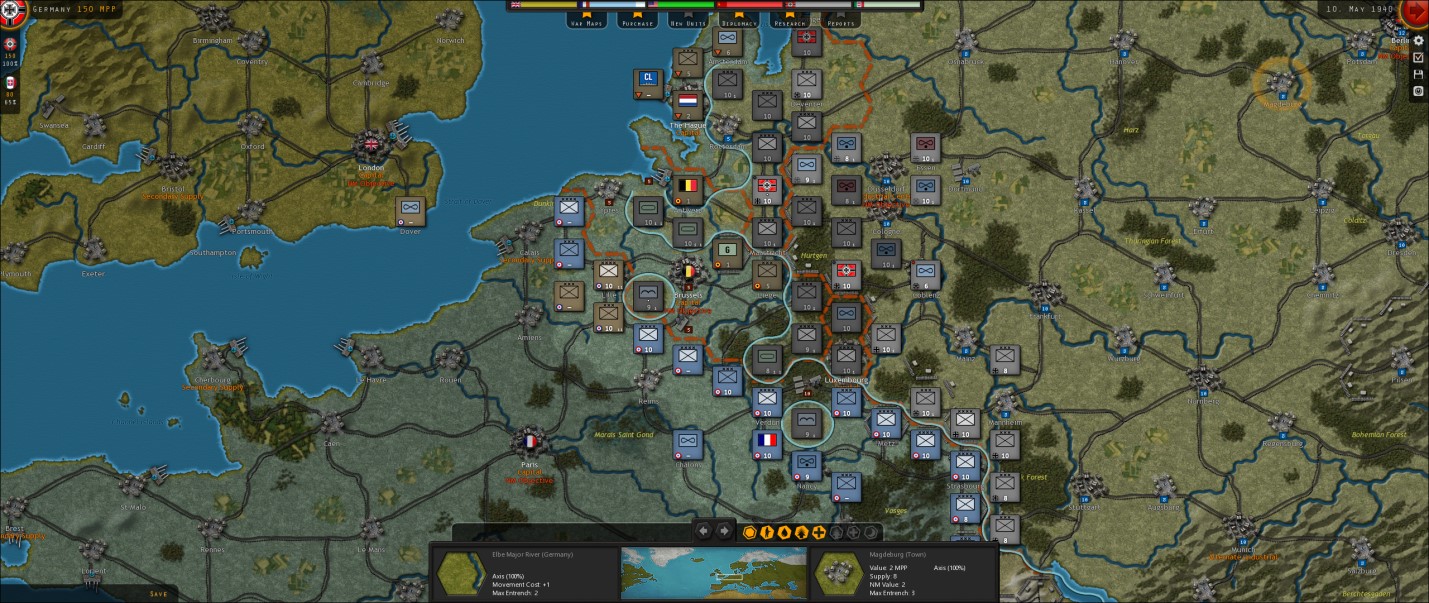
2. 18 Armee (160,76) moves to Arnhem (158,77); enemy army NW at coord. 157,76 revealed as Dutch Army; attack deferred.
a. N/A
3. SG 2 (159,77) bombs Dutch Army.
a. 20%; 30%, Readiness, Morale reduced.
4. I Armeekorps (160,74; S Wilhelmshaven) moves to Deventer (158,76); enemy fighter group revealed in Amsterdam (156,79); attacked deferred.
a. N/A
5. SG 1 (Dortmund; 162,78) bombs Dutch Army.
a. Nil; 30%, Readiness, Morale reduced.
6. 18 Armee attacks Dutch Army.
a. Nil; enemy destroyed.
7. X Armeekorps (159,73; SW Wilhelmshaven) moves to coord. 157,76 SW Deventer/I Ak; enemy HQ revealed in The Hague (155,76); enemy corps revealed at coord. 155,75 N The Hague; attack deferred.
a. N/A
8. KG 1 (Essen; 161, 77) bombs HQ The Hague; enemy light cruiser revealed in The Hague harbour.
a. Nil; 20% est.
9. IV Armeekorps (158,78) advances to coord. 156,76 between Rotterdam & Amsterdam; fighters in Amsterdam revealed as Dutch Luchtvaartbrigade, II Corps SW Amsterdam, Winkelman HQ in The Hague; IV Ak attacks Lucht.
a. Nil; 40%
10. St.G 2 (161,78) bombs Winkelman.
a. Nil; 10%
11. 9 Armee (Cologne; 160,79) moves to coord. 157,77; enemy HQ revealed in Antwerp (155,78); attack deferred.
a. N/A
12. 6 Armee (159,79) moves to Maastricht (159,79); attack deferred.
a. N/A
13. IV Panzerkorps (158,79) rolls to coord. 156, 79; King Leopold HQ revealed in Antwerp, 1st Garrison in Eben-Emael Fortress (156,80); IV Pz attacks King Leopold.
a. Nil; 40%
14. IV Panzerkorps blitzes to coord. 155,79 between Brussels & Antwerp; reveals 1st (Belg.) Fighters coord. 154,80, 1st (Belg.) Army Brussels, French army Lille (153,80); IV Pz clanks on to coord. 154,79; reveals French army at coord. 152,79, French corps 152,80; blitz attacks 1st Fighters (see Note #2).
a. Nil; 40%
Note #2
See Figure 5. In SC3, a ‘Blitz’ Attack is actually an attack executed after moving, as opposed to a ‘Prepared’ Attack, and both can be performed by most units – i.e., ‘blitzing’ is not restricted to tanks. Generally, Prepared Attacks are preferable, as units receive attack bonuses that are lost after movement. This is a trade-off for armour, though, since tanks have higher Action Points (AP) and Strikes (attacks), thus enabling classical armoured spearheads.
From here on I will use ‘Blitz’ or ‘Blitz Attack’ – e.g., capitalised – when I’m specifically referring to the game mechanic, while ‘blitzing’ et al. will be used descriptively. I trust this will not confuse.
In this example, IV Panzerkorps both blitzes through the countryside as well as Blitz Attacks King Leopold HQ and 1st Fighters along the way.

FIGURE 5 – IV PANZERKORPS ‘BLITZING’
15. 1 Fallschirmjäger-division (160,78) para-drops into coord. 154,81 SW Brussels; intercepted by fighters based at Dover (148,79); dealt with by escorts (Luftflotte I; 160,77); attacked deferred (see Note #3).
a. 1 FSJ nil, Luft. I nil; enemy est. 20%.
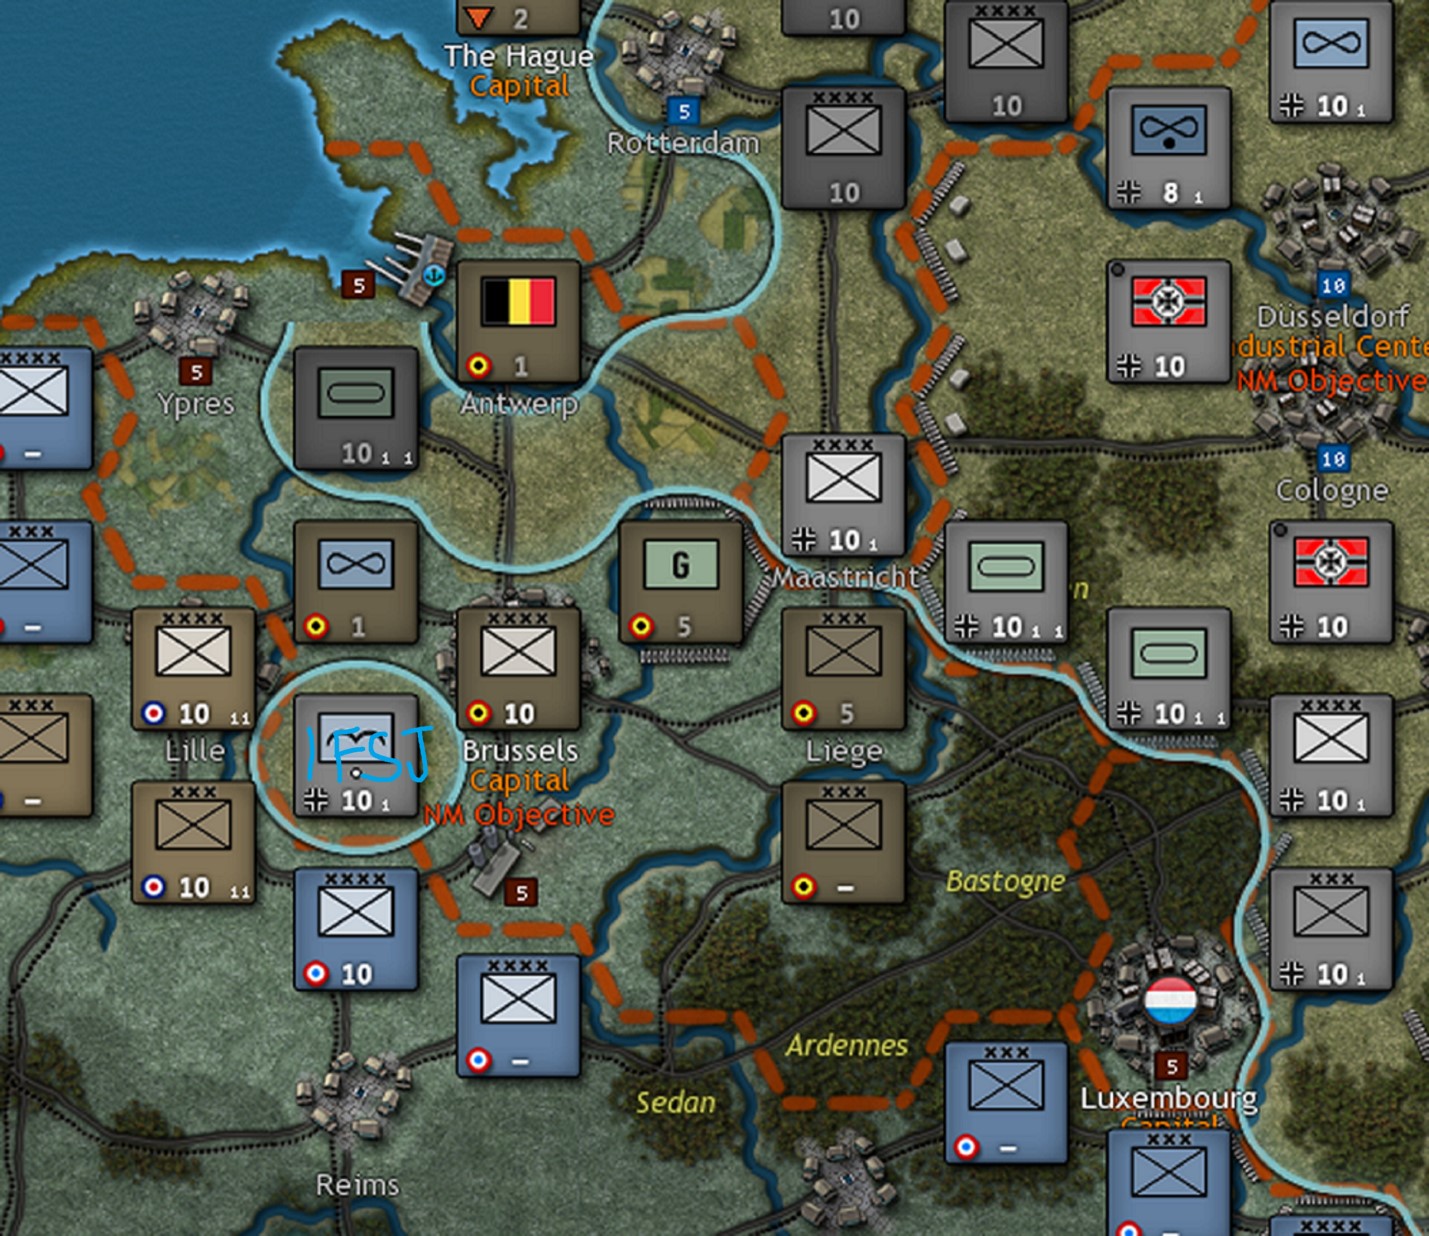
FIGURE 6 – 1FALLSCHIRMJÄGER-DIVISION PARA-DROPS DEEP BEHIND ENEMY LINES
Note #3
See Figure 6. Para-dropping is also simple in SC3: In this scenario, both 1st and 7th FSJ start the game Prepared – again, right-click menu >Set Mode>Prepare. A turn later they can be ‘dropped’ within their range (depends on researching Long Range Aircraft), the same way a move is ordered. In this example, 1 FSJ parachutes SW of Brussels – smack in the middle of four enemy armies and one corps! But this was kind of the point; I partly wanted to scout the enemy’s rear area as well as let them do what paratroopers do: seize objectives – in this case it will be the mines SE at Mons (155,81) – and disrupt enemy supply etc. Note that, as in this example, paratroops are subject to interception, and they can suffer landing casualties if dropped anywhere but in clear terrain.
In any event, I’d better fight through to them quickly, or they could be slaughtered!
16. 6 Armee attacks 1 Garrison (Eben-Emael; 156,80).
a. Nil; 40%, Readiness, Morale, Entrenchment reduced.
17. III Panzerkorps advances to coord. 155,79 between Antwerp & Brussels; attack deferred (see Note #4).
a. N/A
Note #4
See Figure 7. Although I have mentioned elsewhere – and many readers will already know – that it isn’t usually wise to attack urban terrain with tanks, this is a favourable attack for III Panzerkorps. Combined with 1 FSJ (at the same odds), their combined assault should reduce 1st Army to under 5 Strength, which eliminates its Zone of Control (ZoC) and will thus allow additional penetration of the enemy lines (more AP are required to enter an enemy ZoC). I will, however, defer III’s attack until after 1 FSJ’s, which will further soften up enemy Readiness and Morale (and usually Entrenchment) ahead of my panzers.
As it happened, both attacks were quite fortunate: 1 FSJ inflicted 4 damage while taking 1, and III Pz knocked off another 4 without taking any in return; using its second Strike, III Pz eliminated the enemy. This leaves me with a difficult choice, actually: I could take V Panzerkorps into the Ardennes Forest toward Sedan – my original plan – or have it follow III Pz, where it can probably get rid of the Eben-Emael Garrison. This would then allow it to occupy the fortress and attack 1st Army in Brussels, likely eliminating it and increasing the chance for a link-up with 1 FSJ next turn. Hmmm…

FIGURE 7 – III PANZERKORPS BLITZES TO BRUSSELS
18. 1 Fallschirmjäger-division attacks 1st Army (Brussels).
a. 10%; 40%, Readiness, Morale reduced.
19. III Panzerkorps attacks 1st Army.
a. Nil; 40%
b. Nil; enemy destroyed.
20. 12 Armee (161,82) marches into Luxembourg (159,82); French army revealed in Verdun (157,83), XI Corps in Briey Mine (158,83), VI Corps in Maginot Fort at 159,83; attack deferred.
a. N/A
21. KG 51a (162,80) bombs XI Corps; intercepted by enemy fighters from Châlons (155,84); escorts (Luftflotte III; 161,80) intervene.
a. Escorts 20 %, KG 51 20%; interceptors 20%;
b. KG 51 20%; XI Co 20%, Readiness, Morale, Entrenchment reduced.
22. 12 Armee attacks XI Corps.
a. 10%; 10%, Readiness, Morale reduced.
23. 4 Armee (160,81) moves to Bastogne (158,82); II Corps (Belgium) identified coord. 157,81 S Liege; 4 Ar attacks II Co.
a. 10%; 40%, Readiness, Morale, Entrenchment reduced.
24. V Panzerkorps rumbles into Ardennes (157,82); 2 Army (France) identified at Verdun (157,83), II Corps (France) at coord. 156,83, French army at coord. 155,82, French HQ coord. 157,84 S Verdun; V Pz attacks XI Co.
a. 10%; 20%, Readiness, Morale reduced.
b. 10%; enemy destroyed.
25. XXVII Armeekorps marches to coord. 158,81 SE Liège (157,80); attacks II Corps.
a. Nil; enemy destroyed.
26. 7 Fallschirmjäger-division para-drops into coord. 158,84 N Nancy; Gamelin HQ (France) identified coord. 157,84, Grp de Bombardement 6 (France) coord. 158,85 (Nancy), French corps SE Nancy (159,85); attack ? (see Note #5).
Note #5
See Figure 8. Once again, SC3 presents us with an interesting choice. While 7 FSJ could attack any one of the adjacent enemy units, only against 6 Grp de Bombard. will it have any chance of success without risking disproportional casualties; VI Corps, 2nd Army, and even Gamelin HQ are too strong and/or entrenched too deeply (odds are 2-1, 2-0, 1-2, respectively). An assault on Gamelin may be worthwhile – HQs are worthy targets to deny the enemy their aforementioned benefits – but damaging and forcing the bombers farther behind the frontlines seems a better choice. Either way, even though further advancement to coord. 159,84, between Nancy and Metz is available, the chance of being cut off there is too high. Besides, occupying the Briey Mine (north) to deny the enemy plugging that hole is probably the wiser course. Note, however, that attacking now will mean no remaining AP to advance anywhere. What to do…?
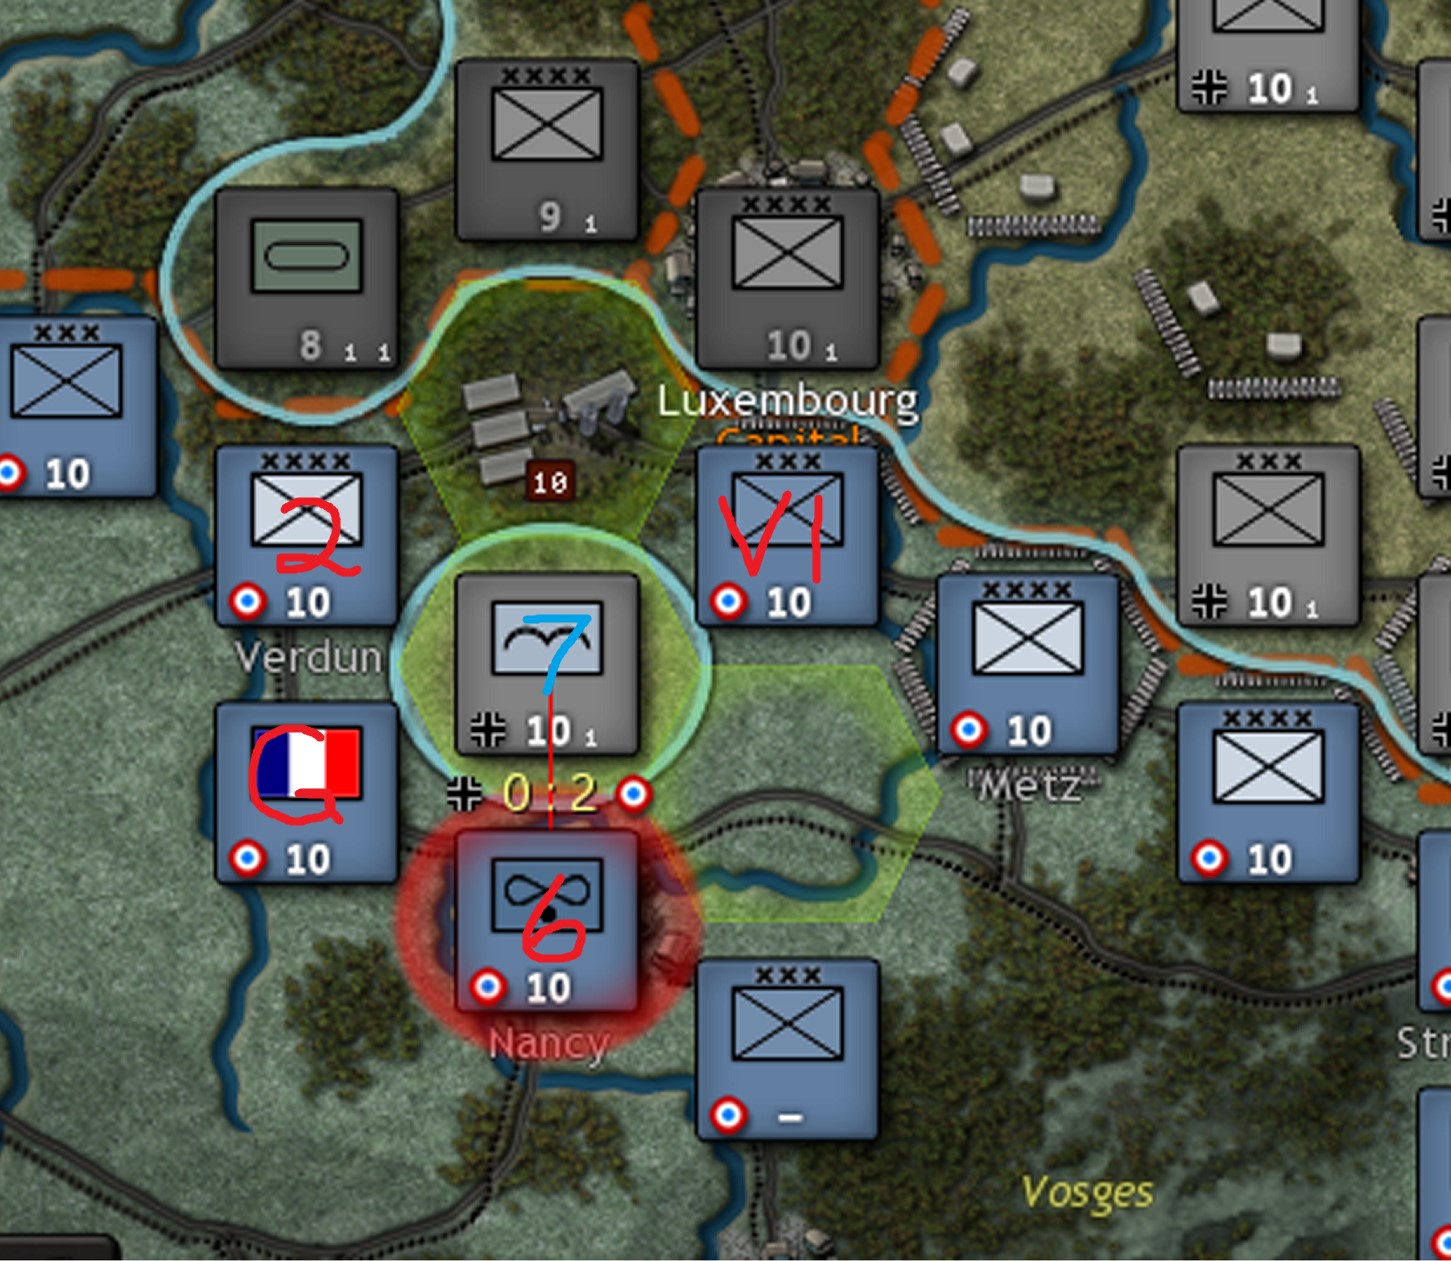
FIGURE 8 – 7 FALLSCHIRMJÄGER-DIVISION DROPS IN ON THE FRENCH FOR CAFÉ
a. 10%; 10%
27. Luftflotte III (161,80) Grounded for R&R.
a. N/A
28. VIII Armeekorps redeploys to coord. 158,79 N Hürtgen Forest.
a. N/A
29. Von Kuchler HQ redeploys to coord. 157,78 N Maastricht.
a. N/A
30. Von Rundstedt HQ redeploys to coord. 159,80 SE Hürtgen Forest.
a. N/A
31. XIII Armeekorps redeploys to Westwall Fort at coord. 160,82.
a. N/A
32. II Armeekorps redeploys to coord. 159,79 SW Cologne.
a. N/A
33. Von Bock HQ redeploys to coord. 158,75 S Groningen.
a. N/A
34. KG 51a redeploys to coord. 159,78 W Dusseldorf/Cologne.
a. N/A
35. Luftflotte IV (162,82) scouts to coord. 156,85; no enemy units revealed; redeploys to coord. 159,81 N Luxembourg.
a. N/A
36. SG 1 redeploys to coord. 160,80 S Cologne.
a. N/A
37. Luftflotte I (160,77; N Dusseldorf) attacks 1st Fighters (Belg.) at 154,80; intercepted by Dover fighter group; redeploys to coord. 158,78 NE von Kuchler.
a.10%; interceptors 30%, 1st Fight. Shattered.
38. END REPORT
ALL (NOT QUITE) QUIET ON THE WESTERN FRONT
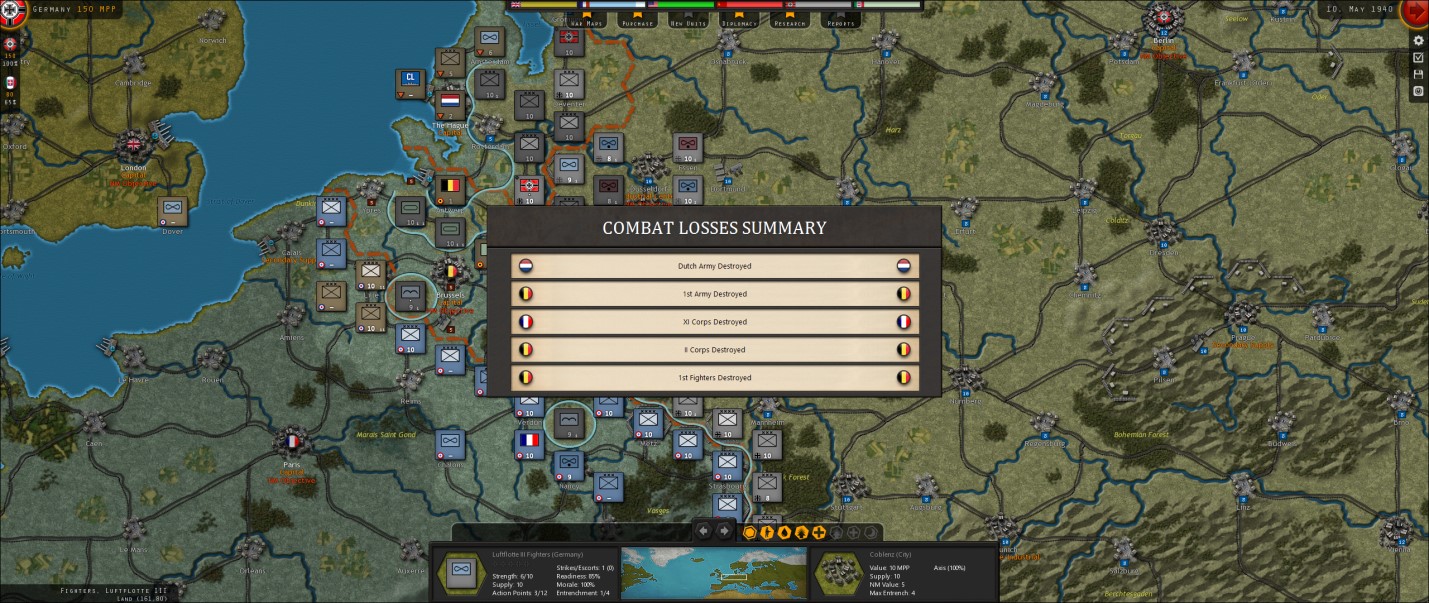
ENEMY LOSSES REPORT
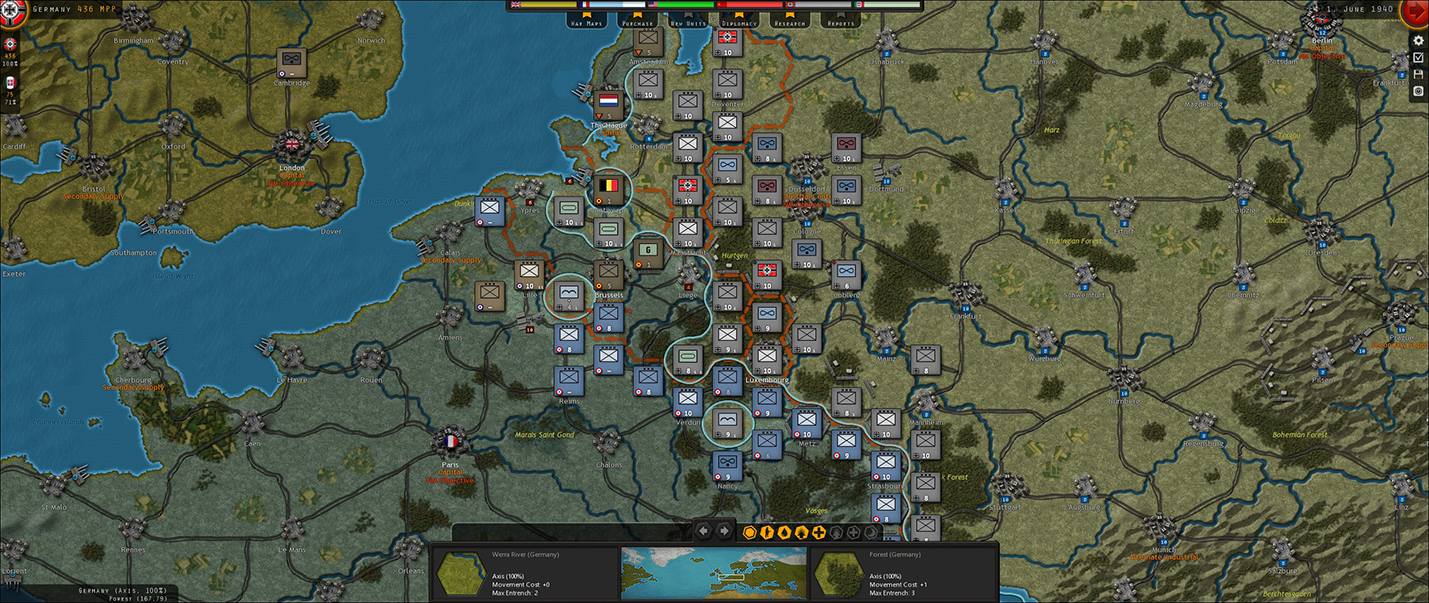
WESTERN FRONT – 01 JUNE 1940
0305 hrs 01 June 1940
Outgoing Coded Message
Mein Führer,
I appreciate your words of confidence. Know that this phase of the conflict to retake Elsaß-Lothringen progresses satisfactorily. I am confident that our troops will force both Holland and the Belgians to their knees within the next two weeks at most, and the fall of our old enemy, France, will not take much longer. They will submit!
Although the enemy thinks they have closed both breaches in their defensive lines opened up thanks to our Fallschirmjägers, it will not be for long. Generalmajor Kurt Student’s Zuerst-division has unfortunately suffered many casualties – alas, mein Führer, these are the fortunes of war. Their sacrifice will be honoured as we avenge every affront heaped upon us by the enemy since the time of von Moltke der Jüngere!
As for your solicitation of advice regarding our research endeavours, mein Führer, I am most humbled. Might I suggest that our efforts be directed toward ensuring that our forces remain at full strength – as far as practicable – and outfitted with the latest weaponry as well as supplies and equipment needed to maximise operational command and control.
I have also suggested to Admirals Dönitz and Raeder – as I respectfully submit to you, Geerht Führer – that in my opinion we cannot hope to match the Allied surface fleet, and therefore Plan Z should perhaps be modified. I agree with Vizeadmiral Dönitz that a focus on unterseeboote and surface raiders, plus naval bombers and advanced long-range fighters to protect them, may be best. Along with investment in amphibious landing tactics and logistics, these focuses would also serve Unternehmen Seelöwe.
I realise it is a lot to ask; our resources are not unlimited, I know. So, as always I leave the final decisions to you, mein Führer.
Respektvoll,
Karl von Spieler
Generalfeldmarschall
Oberkommando der Wehrmacht
[To be continued in Pt.2]
