


EDIT: Please note that the PDF version of this complete with the graphical images is currently going through the play-testers proofing process (as of 12/20/2010. As soon as it is finalized we will find a way to get it to you. Don
Okay, several have shown some interest in an online tutorial/operational/strategy/tactics/diary so what will follow is a series of posts within this thread to hopefully do just that.
Currently I am using the Road to Leningrad as a starting point and am in the process of turn 1. I have not yet finished writing this thing but I am up to 27 pages of text thus far with 110 imagines. When done if there is an interest I can turn the work on my hard drive into a PDF document, but in the mean time I will post within this thread sections of what I have written.
I asked the other testes to help out while you wait for sections to arrive or if one section generates questions, since in order to finish this I might not be available for Q&A.
Hopefully, everyone can get a little something out of this, and at the very least the absolute newbie can learn the basics to play this wonderful game or I have wasted the last 48 hours of my life on this silly thing.
So with out further ado shall we begin posting?
Operational Boot Camp (tutorial)
Moderators: Joel Billings, Sabre21
Operational Boot Camp (tutorial)

Beta Tester for: War in the East 1 & 2, WarPlan & WarPlan Pacific, Valor & Victory, Flashpoint Campaigns: Sudden Storm, Computer War In Europe 2
SPWW2 & SPMBT scenario creator
RE: Operational Boot Camp (tutorial)
Operational Boot Camp (or what the hell I am going to do now?)
Welcome Generals, I hope your ride was comfortable, please have a seat and no smoking in here. Before we release you to command your armies, army groups, corps and divisions, yes that will also include motorized and panzer units, but only limited but sufficient skills on aircraft will be taught today.
You have all been equipped with a proper field manual and a small field guide these are key references that will greatly assist you as you develop and hone your skills further and are a wealth of information. Both of these documents are fully searchable and go into great details on various subjects so please utilize these.
First we are going to cover some basics, you are encouraged to follow along the presentation will be explained by an old war veteran and he has his own style that he has developed and always encourages the younger generals to break the mold and think on their feet, so this will not necessarily be a click this button and do this action all of the time, you can find that kind of information in the field guide in the later sections of this training, also there will only be some interface detail explanations, again more details will be found in your field manuals. What this presentation will be is more like a diary of the old man and what he likes to do when presented with a scenario or campaign and how he looks at things and organizes and executes his missions and runs his show. Without further ado please welcome Field Marshall Burkhalter.
“Good morning gentlemen, I know that your impatiently awaiting to begin pushing buttons, moving units, flying the Luftwaffe, and dreaming of destroying Soviet forces, but please don't be Dummkopf's like Oberst Klink, or you'll end up guarding prisoners of war for the duration!”
“Okay, now listen very carefully, this War in the East is large and complex, don't kid yourself, while you can get away with just pointing and clicking and beating up on the AI (GAI, Gary's Artificial Intelligence) don't get all carried away and develop bad habits, otherwise as Oberst Klink found out last year when he challenged Field Marshall Johnson (code named Sabre21) to a kriegs game, he was promptly crushed and sent packing to the rear. Now my aide General Lazov will get you setup for the first of my diary type entries.”
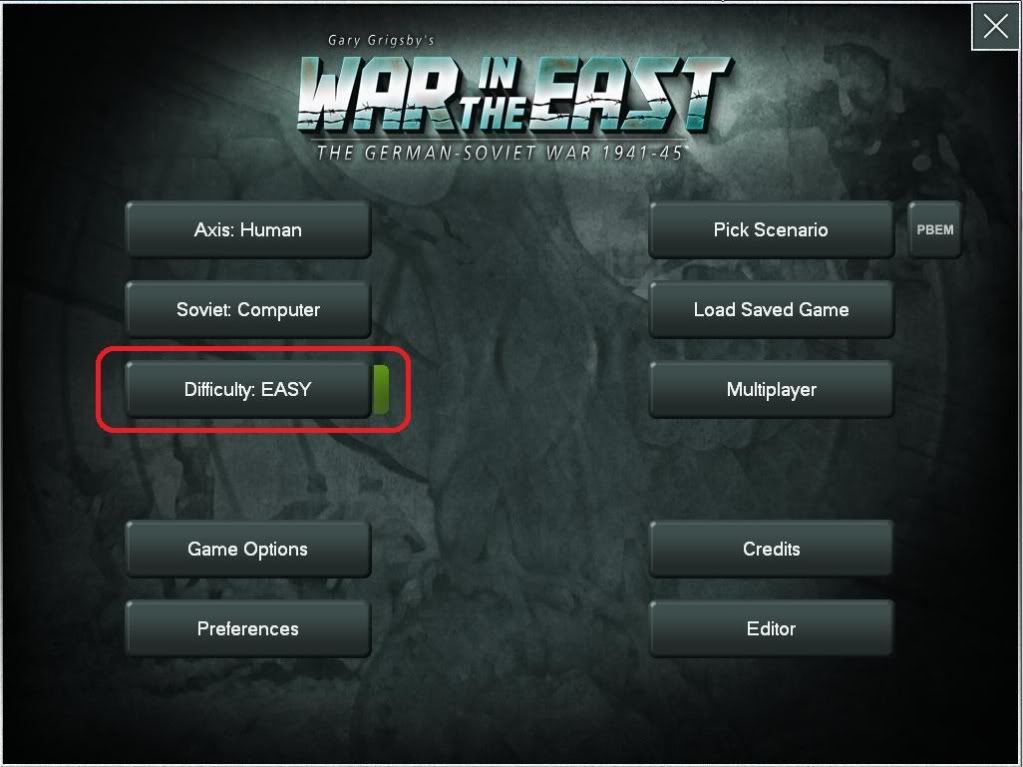
Greetings, okay, first things first, after the game loads and you get through the intro videos (you can skip these by hitting the space bar) you be at the main screen, for this operational boot camp please setup the game as follows, you can cycle through the difficulty levels by simply clicking on the big button as this screen shot shows, please set this to Easy for now.
Next, right under that button is the game options button go ahead and click that, this will present you with the game options that you can set, please set yours up like this:
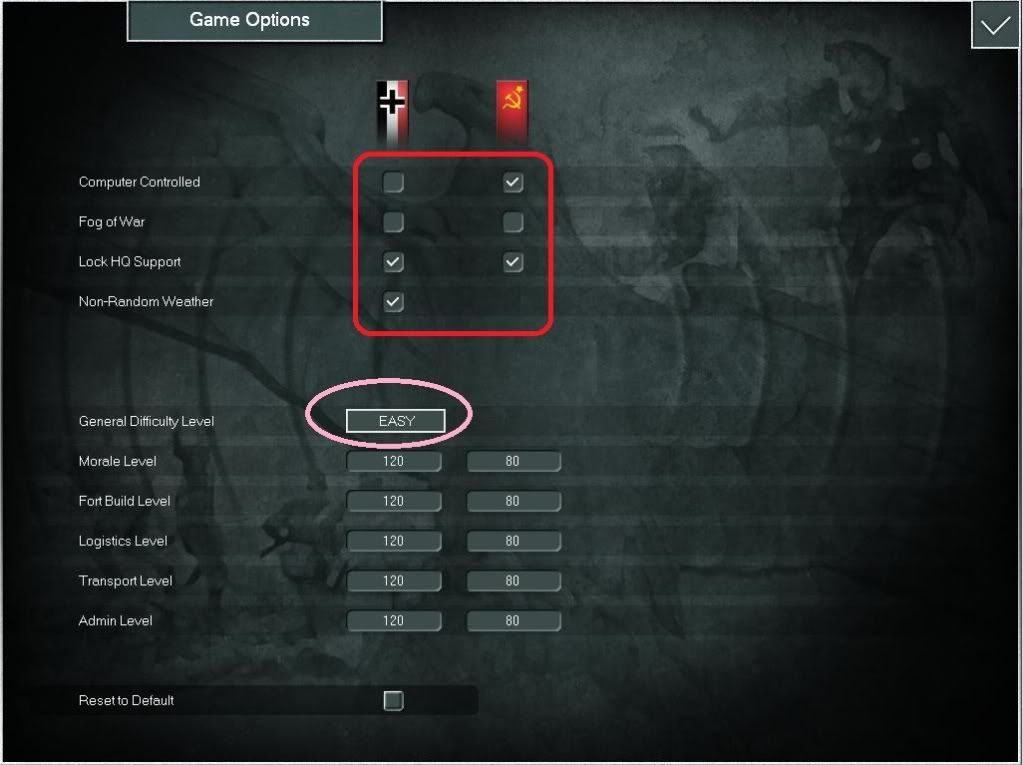
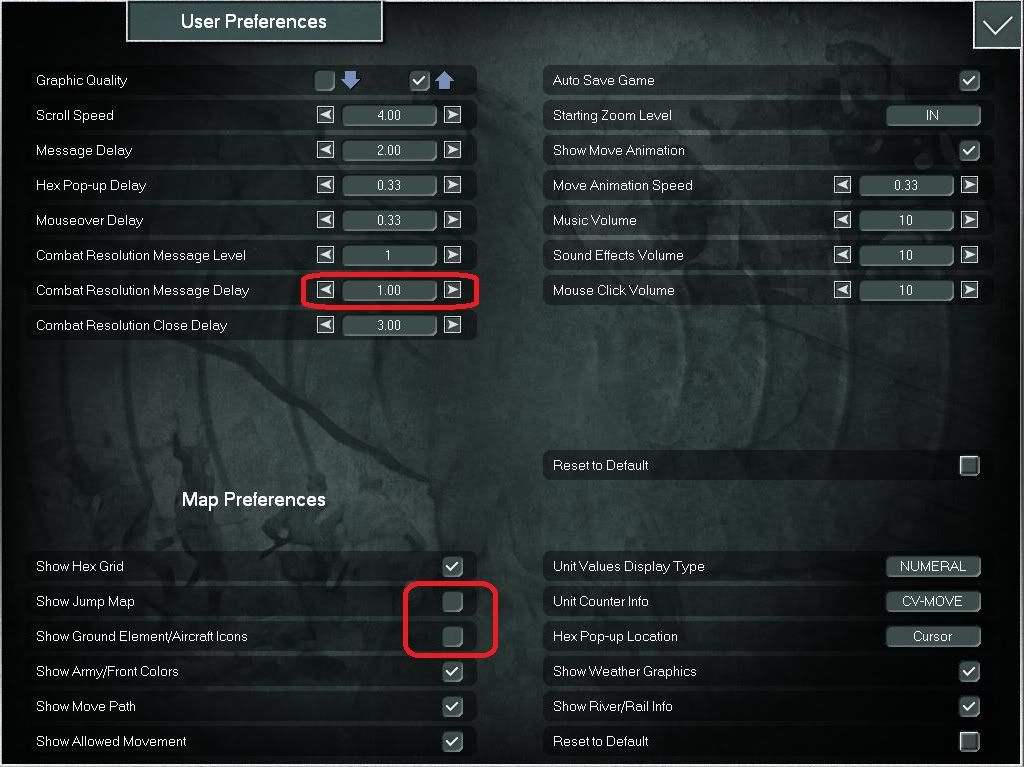
When done click the big check mark in the upper right hand corner. Now under the Game Options button is a Preferences button go ahead and click that. Here you can set this to however you like, for me I like what you see selected, but be warned that you may like to see the jump map and the ground elements icon dialog box so add or subtract to suit your tastes, this is what mine looks like:
Alright go ahead and click the check mark in the upper right to save your settings and get back to the main menu.
Now you can select a scenario to play, to do so simply click the big button labeled Pick Scenario, this will take you to the scenario list, for this exercise please select the Road to Leningrad scenario, this is only 17 turns long and has limited amount of Axis (all Germans in this case) units to maneuver, your screen should look something like this:
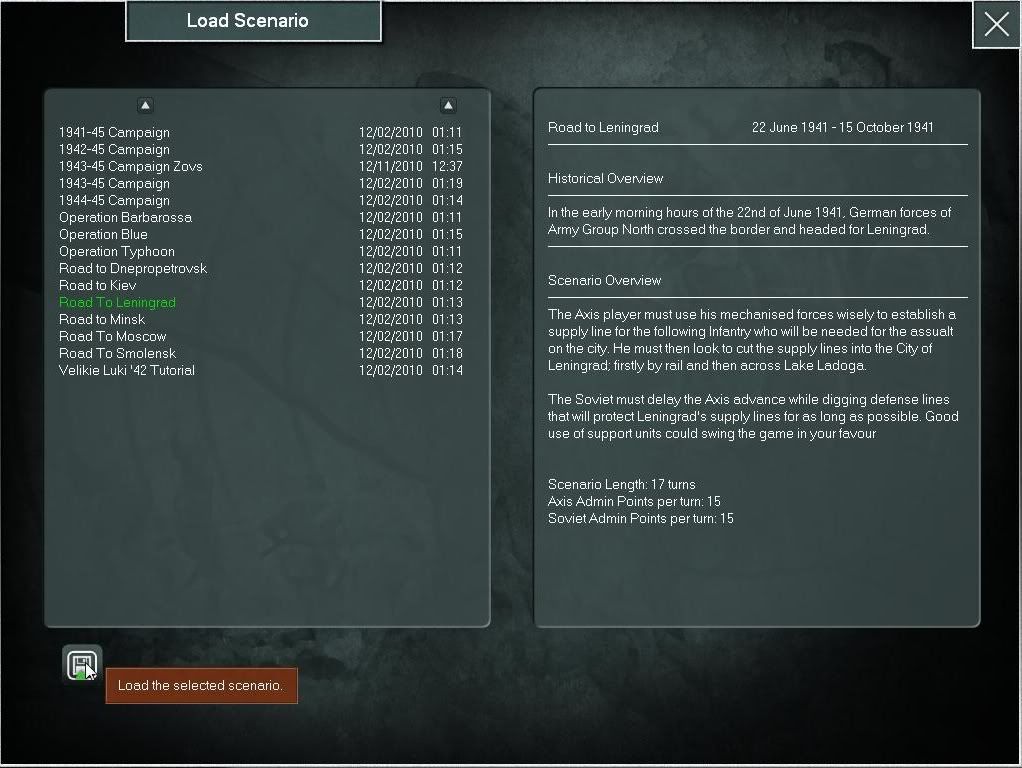
To select this scenario just click the little button on the lower left hand side it looks like a little disk and when you hover over it should display the message above, go ahead and click it.
After a few moments the map will load centered in windowed mode, for this exercise I recommend that you switch to full screen. To do so all you need to do is click on the windows maximize button, with my monitor this is a section of how it looks on my end:

Introductions (or who is the guy anyway?)
Everyone does things differently and WitE is no exception, what works for me may not work for you, also you should have a basic understand of how the game engine works, what all the buttons do and how to move around in the interface. I'll touch on these when needed, but in order for me to get into the real playing mind set and get at the why’s of what I do or how I do it, don't want to spend too much time on these, most are already covered in one degree or another in one of the field manuals (as herr general described above).
Another bit of warning, I started testing this game around November of last year and after Andy kicked my ass I learned quite a bit from him, so nothing will teach you more than playing a human opponent, that being said Gary has done a tremendous job of designing and developing the AI (or GAI as Bob so lovingly calls her, I like to call them Fritz and Ivan depending on whom I am playing against) and I also understand the value of playing against the AI or if you can’t find a human to play against whatever reason.
Oh, forgot about my warning sorry, I am doing this to hopefully help you out and you'll see some of the same type of semantics as the tutorial, well that is because I wrote the first half of that thing but life events prevented me from finishing and completing it on time, so this can sort of be considered where I wanted to go with it. Also, it's nearing Christmas time, I have a wife and kids (and a dumb dog) and it's snowing, the bottom line is I am doing this for fun and trying to get you to laugh a bit and with regards to the game and how to best play it. I am okay with sharing most of my secrets (not all cause I do love playing the Soviets in 1943 and beyond so I’d like to save a few if we should meet in a challenge online) anyway I am digressing, what I am really trying to say is I may not get it all right or correct and if I make a mistake or miss something or not use the “optimal” gambit, and if I do that I apologize up front so please don't be too harsh with me, life is too short.
Let me pause here for a second, I realize that some of you might want to jump ahead to the section entitled The Big Picture and take a look at that first; however, since I am doing this with an online forum and Photobucket that can’t be done and I ask you to please be patient or skip over these sections if they are too elementary for you. Suffice it to say that the next section is primarily setting the visual clues for the details, the Big Picture section is a great way to begin any scenario to get a look at the lay of the land, where the victory cities lie and develop a basic plan.
the formatting got all screwed up.
Welcome Generals, I hope your ride was comfortable, please have a seat and no smoking in here. Before we release you to command your armies, army groups, corps and divisions, yes that will also include motorized and panzer units, but only limited but sufficient skills on aircraft will be taught today.
You have all been equipped with a proper field manual and a small field guide these are key references that will greatly assist you as you develop and hone your skills further and are a wealth of information. Both of these documents are fully searchable and go into great details on various subjects so please utilize these.
First we are going to cover some basics, you are encouraged to follow along the presentation will be explained by an old war veteran and he has his own style that he has developed and always encourages the younger generals to break the mold and think on their feet, so this will not necessarily be a click this button and do this action all of the time, you can find that kind of information in the field guide in the later sections of this training, also there will only be some interface detail explanations, again more details will be found in your field manuals. What this presentation will be is more like a diary of the old man and what he likes to do when presented with a scenario or campaign and how he looks at things and organizes and executes his missions and runs his show. Without further ado please welcome Field Marshall Burkhalter.
“Good morning gentlemen, I know that your impatiently awaiting to begin pushing buttons, moving units, flying the Luftwaffe, and dreaming of destroying Soviet forces, but please don't be Dummkopf's like Oberst Klink, or you'll end up guarding prisoners of war for the duration!”
“Okay, now listen very carefully, this War in the East is large and complex, don't kid yourself, while you can get away with just pointing and clicking and beating up on the AI (GAI, Gary's Artificial Intelligence) don't get all carried away and develop bad habits, otherwise as Oberst Klink found out last year when he challenged Field Marshall Johnson (code named Sabre21) to a kriegs game, he was promptly crushed and sent packing to the rear. Now my aide General Lazov will get you setup for the first of my diary type entries.”
Greetings, okay, first things first, after the game loads and you get through the intro videos (you can skip these by hitting the space bar) you be at the main screen, for this operational boot camp please setup the game as follows, you can cycle through the difficulty levels by simply clicking on the big button as this screen shot shows, please set this to Easy for now.
Next, right under that button is the game options button go ahead and click that, this will present you with the game options that you can set, please set yours up like this:
When done click the big check mark in the upper right hand corner. Now under the Game Options button is a Preferences button go ahead and click that. Here you can set this to however you like, for me I like what you see selected, but be warned that you may like to see the jump map and the ground elements icon dialog box so add or subtract to suit your tastes, this is what mine looks like:
Alright go ahead and click the check mark in the upper right to save your settings and get back to the main menu.
Now you can select a scenario to play, to do so simply click the big button labeled Pick Scenario, this will take you to the scenario list, for this exercise please select the Road to Leningrad scenario, this is only 17 turns long and has limited amount of Axis (all Germans in this case) units to maneuver, your screen should look something like this:
To select this scenario just click the little button on the lower left hand side it looks like a little disk and when you hover over it should display the message above, go ahead and click it.
After a few moments the map will load centered in windowed mode, for this exercise I recommend that you switch to full screen. To do so all you need to do is click on the windows maximize button, with my monitor this is a section of how it looks on my end:
Introductions (or who is the guy anyway?)
Everyone does things differently and WitE is no exception, what works for me may not work for you, also you should have a basic understand of how the game engine works, what all the buttons do and how to move around in the interface. I'll touch on these when needed, but in order for me to get into the real playing mind set and get at the why’s of what I do or how I do it, don't want to spend too much time on these, most are already covered in one degree or another in one of the field manuals (as herr general described above).
Another bit of warning, I started testing this game around November of last year and after Andy kicked my ass I learned quite a bit from him, so nothing will teach you more than playing a human opponent, that being said Gary has done a tremendous job of designing and developing the AI (or GAI as Bob so lovingly calls her, I like to call them Fritz and Ivan depending on whom I am playing against) and I also understand the value of playing against the AI or if you can’t find a human to play against whatever reason.
Oh, forgot about my warning sorry, I am doing this to hopefully help you out and you'll see some of the same type of semantics as the tutorial, well that is because I wrote the first half of that thing but life events prevented me from finishing and completing it on time, so this can sort of be considered where I wanted to go with it. Also, it's nearing Christmas time, I have a wife and kids (and a dumb dog) and it's snowing, the bottom line is I am doing this for fun and trying to get you to laugh a bit and with regards to the game and how to best play it. I am okay with sharing most of my secrets (not all cause I do love playing the Soviets in 1943 and beyond so I’d like to save a few if we should meet in a challenge online) anyway I am digressing, what I am really trying to say is I may not get it all right or correct and if I make a mistake or miss something or not use the “optimal” gambit, and if I do that I apologize up front so please don't be too harsh with me, life is too short.
Let me pause here for a second, I realize that some of you might want to jump ahead to the section entitled The Big Picture and take a look at that first; however, since I am doing this with an online forum and Photobucket that can’t be done and I ask you to please be patient or skip over these sections if they are too elementary for you. Suffice it to say that the next section is primarily setting the visual clues for the details, the Big Picture section is a great way to begin any scenario to get a look at the lay of the land, where the victory cities lie and develop a basic plan.
the formatting got all screwed up.
Beta Tester for: War in the East 1 & 2, WarPlan & WarPlan Pacific, Valor & Victory, Flashpoint Campaigns: Sudden Storm, Computer War In Europe 2
SPWW2 & SPMBT scenario creator
RE: Operational Boot Camp (tutorial)
On with the Show (or diary of a madman)
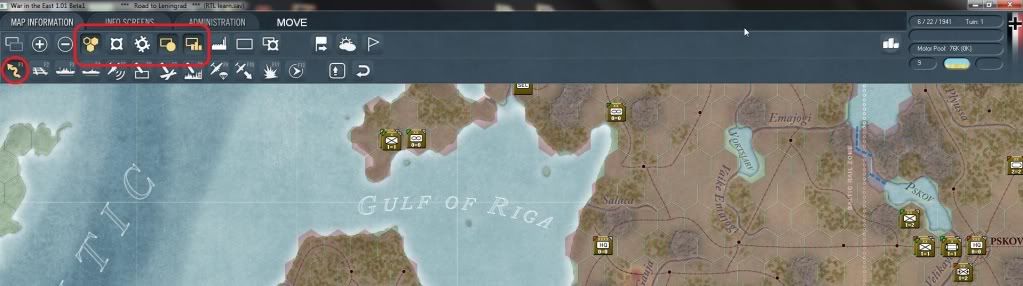
After any scenario or campaign loads (or I am starting/continuing a new turn) what I like to do is to setup the interface so that I can read the map visually. To do so what I do is click various information buttons to give me the info I need most of the time. Taking these one at a time the first one I like to set is the toggle enemy hexes on or off (please excuse this screen shot somehow the show admin buttons is showing) if you click this button your screen should look something like this:

Next I like to set the toggle unit modes on/off to on, I turn this on because at a glance I like to see which of my units may be in reserve mode, refit mode, static mode or those that may get withdrawn from play. If you select this button your screen should look something like so:
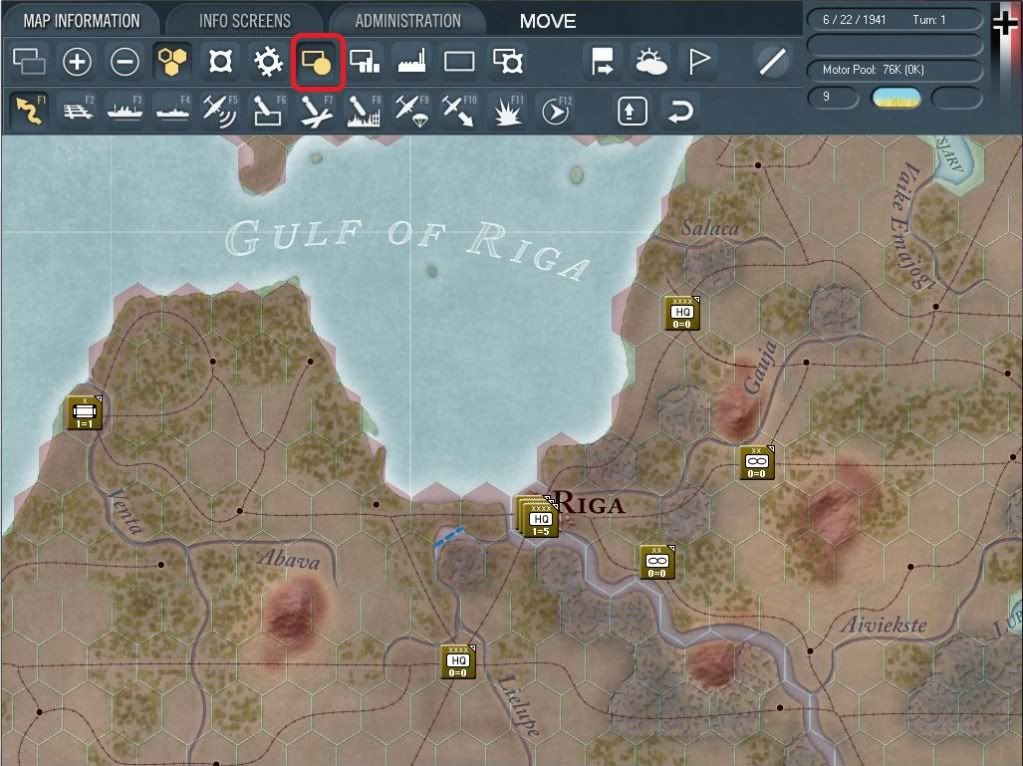
Next I like to toggle on the supply status, again at a glance I can see which units are out of supply. Now this may seem counter intuitive to you and you may need to switch between the two modes so you're not confused on which units are in supply and which ones are in certain other modes, but for me after spending hundreds (if not quite at least a thousand, or so it seems) playing this thing I detect at a glance (somehow) which units are in which mode or status, hopefully by the end of this thing that may make more sense. Use it (these toggled modes) as a visual warning that something is amiss with your units (sort of, that is to say that again I can tell when units are in command, out of supply and which are in reserve or refitting, probably from playing as the Soviets in 43 with so many units across the front). If you choose this your screen may look like so:
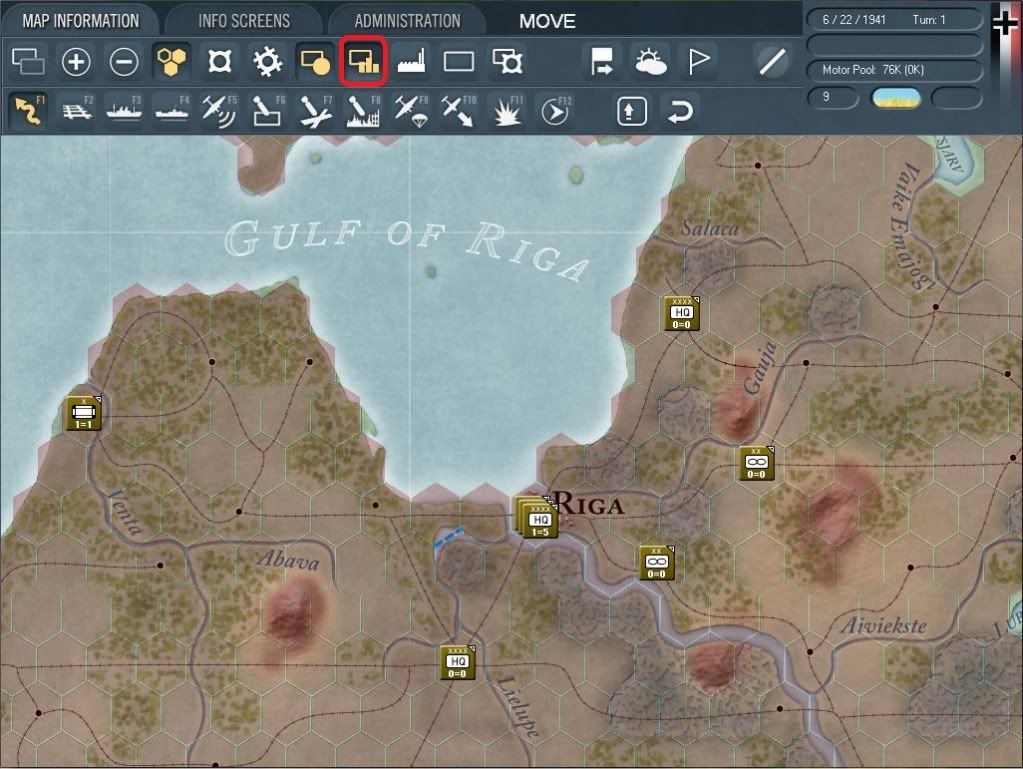
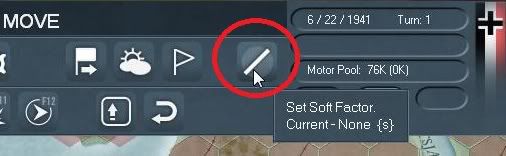
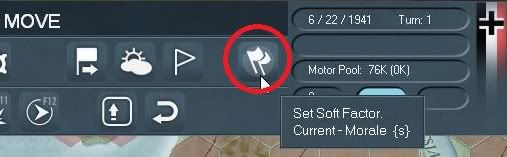
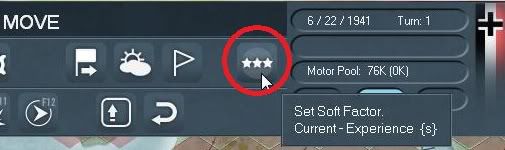
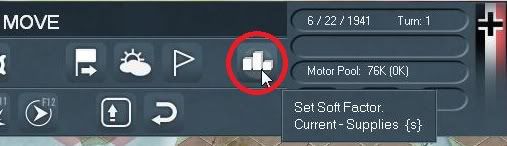
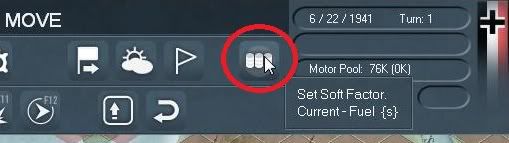
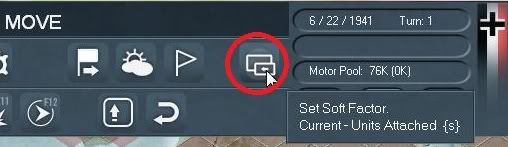
As you might have guessed I am a visual guy (goes back to my face to face board war gaming days I guess) and here is no exception, I love the soft factors (5.1.3). What are soft factors, well these are more visual clues that you can cycle through. Your mileage may vary but I like to set a soft factor and then scan the map to see who or what is affecting my units and their statuses. To access and cycle through these factors over on the right hand side of the screen (or menu) next to the general information and city box (we'll get to this later) you'll see a button that is generally off by default. By clicking on this button it cycles through the soft factors which are; Morale, Experience, Supplies, Fuel, Units attached and back to no soft factors.
Personally on startup, I am more interested in Supplies and Fuel during normal movement and combat. Very generally all units consume supplies; however, supplies don't have as much as an impact on mechanized units as do the fuel consumption, likewise non-mechanized units don't require much fuel. We’ll get into this later in more detail, suffice it to say that by using these to soft factors it's really a good idea to keep an eye on your units as you move and fight with them so they don't burnt out (fatigue), take too many losses or run out of supplies or fuel.
Just cycling through these for you here:
Morale
Experience
Supplies
Fuel
Units attached
Okay, you can do what you want I am going to leave my soft factor set to Supplies.
Next lets briefly click on the Info Screen tab. Again, what I typically do is to cycle through the information and the very first button is the show OOB button it looks like this:
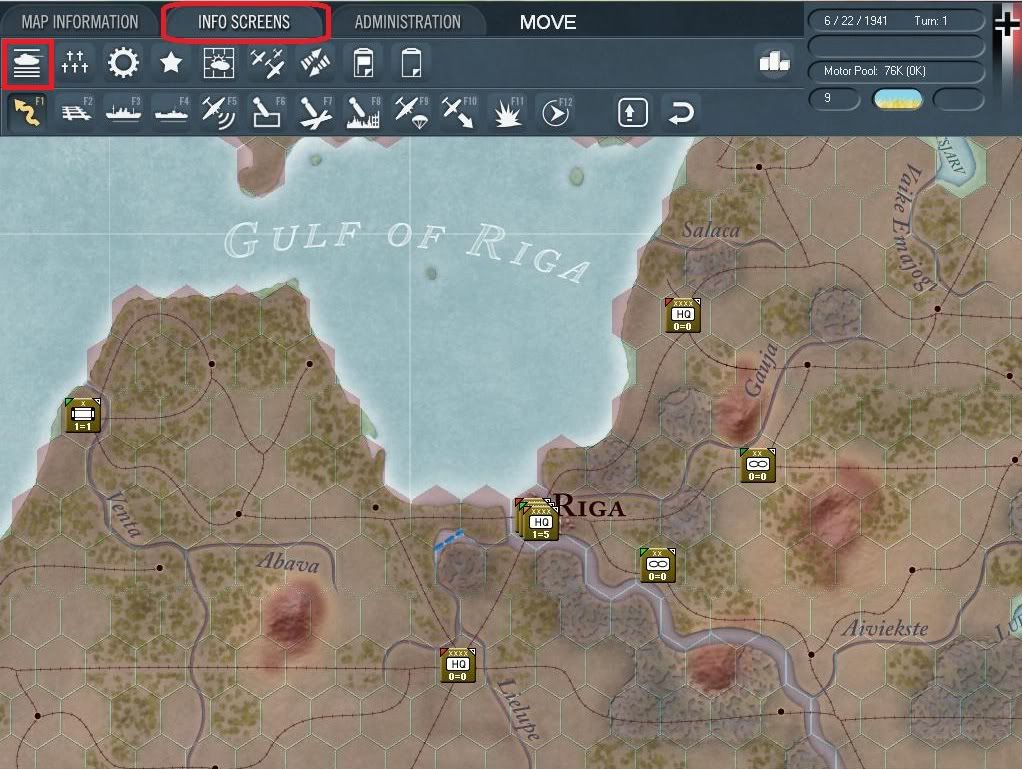
Note: In these screen shots the red circles or squares usually mean for you to select or click on something, the gold circle or squares means I want to point some information out to you and pink circles or squares are to help breakup or identify various other pieces of information that I am trying to convey).
Go ahead and click that OOB button, doing so will bring up the OOB screen (5.4.1). This essentially is a tool to view at a glance your entire OOB. You can use the left side by clicking the plus (+) signs to see more info and you can go directly to a unit in question by selecting it with the blue text link. On the right hand side is a global by country high level overview of the four basic elements; men, artillery, AFV, and aircraft by totals. As you can see in the image the left column represents the total units in that category and on the right hand side the total ready units.
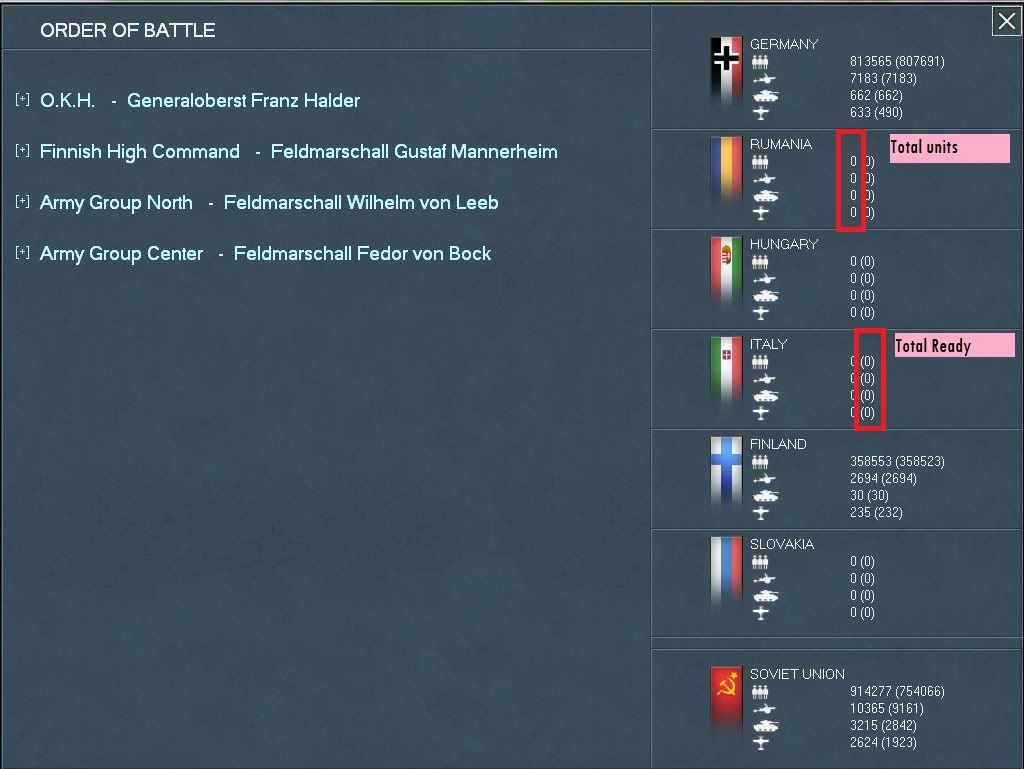
So for example, if we take a look at the Germany one and further look at the aircraft line this indicates that Germany has 633 aircraft total of which only 490 are ready for action. These may be damaged, in training or in some other status.
Go ahead and close that and then click on the show losses button.
Clicking that brings up total losses screen (5.4.2). It should look like this:
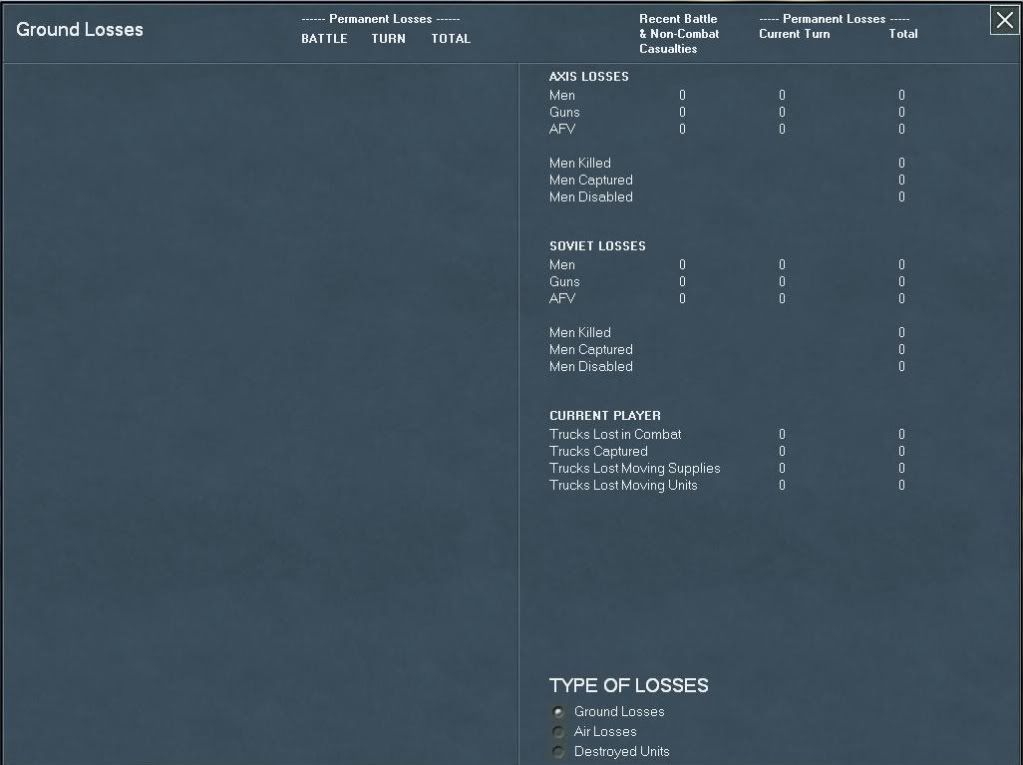
Since this is the start of a scenario that takes place on 22 June this screen is empty, other scenarios and campaigns that begin after 22 June 1941 will have some losses built into them to reflect the historical losses and to add in stuff for manpower and equipment rebuilds. Generally, at the start (and sometimes at the end) of each turn I like to review the losses to see how good or bad I or the other guy is doing.
Okay go ahead and close that window and now click on the show victory screen (5.4.5) here:
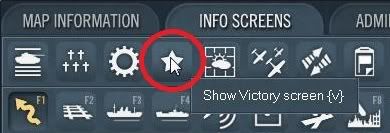
Clicking that brings us to the victory screen. Besides showing (which you won’t see yet) the current victory point levels there is some hidden information here for you to utilize. Two things should stand out, 1) which cities you need to take and 2) which cities the Soviets need to hang on to. Also in this screen show below is the victory points scored from losses, will cover this more in dept a little later on.
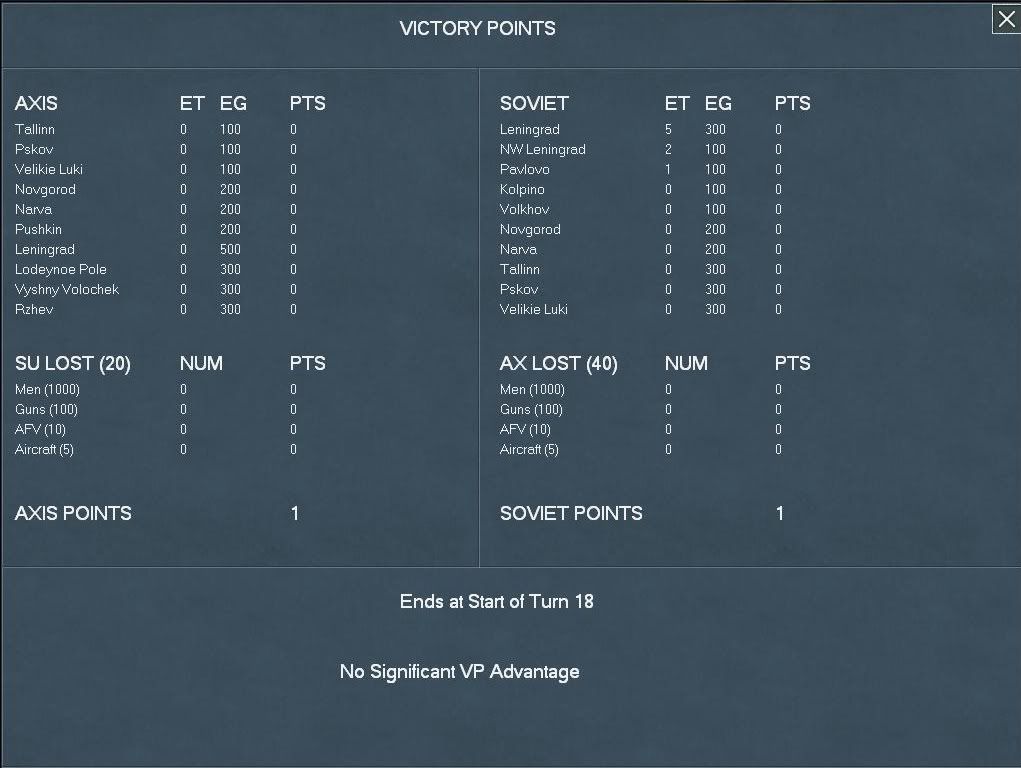
As we can see the further east we go as the Axis the more points we get for those eastern cities with the ultimate prize being Leningrad. For the Soviet side his most important objectives are hanging on to Leningrad, NW Leningrad and Pavlovo, each game turn he holds these cities he scores victory points. I don't know why both sides have 1 VP to start with; you'll have to ask someone else.
Okay, a couple of other points we won't go into the details of these yet but the next two items are critical in my opinion for further detailed information. These are the show commanders report screen (5.4.9):

And the show event log (5.4.12):
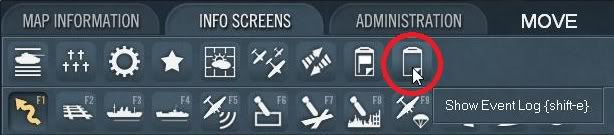
I usually use the event log at the very beginning of each turn to see the replacements to units, arriving units, supply status and a host of other interesting bits. Pav (one of the developer) did an absolutely tremendous job on this thing. Later on when I need it well cover it in more detail, but I use this all the time for massive amounts of information.
All rightly then, that covers most of the basics and the default or standard setup and mind set I use. The following screen shot shows my layout and how I like to view and see things. Please note that for release cut 1.01 the beta patch Pav added in font substitutions. I kind of went wild and created and tested about 15 or so font layouts. Primarily one of the main reason your screen and mine may differ is because I am using the config file and I changed all my fonts to use Microsoft Sans Serif, this is pretty close to the old SPI type of board war game font used in the 1970s (I guess that shows my age, lol) of which I am rather fond and comfortable with. I also like an English/Russian/Cyrillic type of font I downloaded from the internet. You can find out more from this link:
Pav's Font thread
This is just a cross-section of my map layout:
After any scenario or campaign loads (or I am starting/continuing a new turn) what I like to do is to setup the interface so that I can read the map visually. To do so what I do is click various information buttons to give me the info I need most of the time. Taking these one at a time the first one I like to set is the toggle enemy hexes on or off (please excuse this screen shot somehow the show admin buttons is showing) if you click this button your screen should look something like this:
Next I like to set the toggle unit modes on/off to on, I turn this on because at a glance I like to see which of my units may be in reserve mode, refit mode, static mode or those that may get withdrawn from play. If you select this button your screen should look something like so:
Next I like to toggle on the supply status, again at a glance I can see which units are out of supply. Now this may seem counter intuitive to you and you may need to switch between the two modes so you're not confused on which units are in supply and which ones are in certain other modes, but for me after spending hundreds (if not quite at least a thousand, or so it seems) playing this thing I detect at a glance (somehow) which units are in which mode or status, hopefully by the end of this thing that may make more sense. Use it (these toggled modes) as a visual warning that something is amiss with your units (sort of, that is to say that again I can tell when units are in command, out of supply and which are in reserve or refitting, probably from playing as the Soviets in 43 with so many units across the front). If you choose this your screen may look like so:
As you might have guessed I am a visual guy (goes back to my face to face board war gaming days I guess) and here is no exception, I love the soft factors (5.1.3). What are soft factors, well these are more visual clues that you can cycle through. Your mileage may vary but I like to set a soft factor and then scan the map to see who or what is affecting my units and their statuses. To access and cycle through these factors over on the right hand side of the screen (or menu) next to the general information and city box (we'll get to this later) you'll see a button that is generally off by default. By clicking on this button it cycles through the soft factors which are; Morale, Experience, Supplies, Fuel, Units attached and back to no soft factors.
Personally on startup, I am more interested in Supplies and Fuel during normal movement and combat. Very generally all units consume supplies; however, supplies don't have as much as an impact on mechanized units as do the fuel consumption, likewise non-mechanized units don't require much fuel. We’ll get into this later in more detail, suffice it to say that by using these to soft factors it's really a good idea to keep an eye on your units as you move and fight with them so they don't burnt out (fatigue), take too many losses or run out of supplies or fuel.
Just cycling through these for you here:
Morale
Experience
Supplies
Fuel
Units attached
Okay, you can do what you want I am going to leave my soft factor set to Supplies.
Next lets briefly click on the Info Screen tab. Again, what I typically do is to cycle through the information and the very first button is the show OOB button it looks like this:
Note: In these screen shots the red circles or squares usually mean for you to select or click on something, the gold circle or squares means I want to point some information out to you and pink circles or squares are to help breakup or identify various other pieces of information that I am trying to convey).
Go ahead and click that OOB button, doing so will bring up the OOB screen (5.4.1). This essentially is a tool to view at a glance your entire OOB. You can use the left side by clicking the plus (+) signs to see more info and you can go directly to a unit in question by selecting it with the blue text link. On the right hand side is a global by country high level overview of the four basic elements; men, artillery, AFV, and aircraft by totals. As you can see in the image the left column represents the total units in that category and on the right hand side the total ready units.
So for example, if we take a look at the Germany one and further look at the aircraft line this indicates that Germany has 633 aircraft total of which only 490 are ready for action. These may be damaged, in training or in some other status.
Go ahead and close that and then click on the show losses button.
Clicking that brings up total losses screen (5.4.2). It should look like this:
Since this is the start of a scenario that takes place on 22 June this screen is empty, other scenarios and campaigns that begin after 22 June 1941 will have some losses built into them to reflect the historical losses and to add in stuff for manpower and equipment rebuilds. Generally, at the start (and sometimes at the end) of each turn I like to review the losses to see how good or bad I or the other guy is doing.
Okay go ahead and close that window and now click on the show victory screen (5.4.5) here:
Clicking that brings us to the victory screen. Besides showing (which you won’t see yet) the current victory point levels there is some hidden information here for you to utilize. Two things should stand out, 1) which cities you need to take and 2) which cities the Soviets need to hang on to. Also in this screen show below is the victory points scored from losses, will cover this more in dept a little later on.
As we can see the further east we go as the Axis the more points we get for those eastern cities with the ultimate prize being Leningrad. For the Soviet side his most important objectives are hanging on to Leningrad, NW Leningrad and Pavlovo, each game turn he holds these cities he scores victory points. I don't know why both sides have 1 VP to start with; you'll have to ask someone else.
Okay, a couple of other points we won't go into the details of these yet but the next two items are critical in my opinion for further detailed information. These are the show commanders report screen (5.4.9):
And the show event log (5.4.12):
I usually use the event log at the very beginning of each turn to see the replacements to units, arriving units, supply status and a host of other interesting bits. Pav (one of the developer) did an absolutely tremendous job on this thing. Later on when I need it well cover it in more detail, but I use this all the time for massive amounts of information.
All rightly then, that covers most of the basics and the default or standard setup and mind set I use. The following screen shot shows my layout and how I like to view and see things. Please note that for release cut 1.01 the beta patch Pav added in font substitutions. I kind of went wild and created and tested about 15 or so font layouts. Primarily one of the main reason your screen and mine may differ is because I am using the config file and I changed all my fonts to use Microsoft Sans Serif, this is pretty close to the old SPI type of board war game font used in the 1970s (I guess that shows my age, lol) of which I am rather fond and comfortable with. I also like an English/Russian/Cyrillic type of font I downloaded from the internet. You can find out more from this link:
Pav's Font thread
This is just a cross-section of my map layout:
Beta Tester for: War in the East 1 & 2, WarPlan & WarPlan Pacific, Valor & Victory, Flashpoint Campaigns: Sudden Storm, Computer War In Europe 2
SPWW2 & SPMBT scenario creator
RE: Operational Boot Camp (tutorial)
I'll help with answering questions when needed, great that you're doing this Don.
SSG tester
WitE Alpha tester
Panzer Corps Beta tester
Unity of Command scenario designer
WitE Alpha tester
Panzer Corps Beta tester
Unity of Command scenario designer
RE: Operational Boot Camp (tutorial)
Can we start yet? (or come on quit teasing me and give me some meat!)
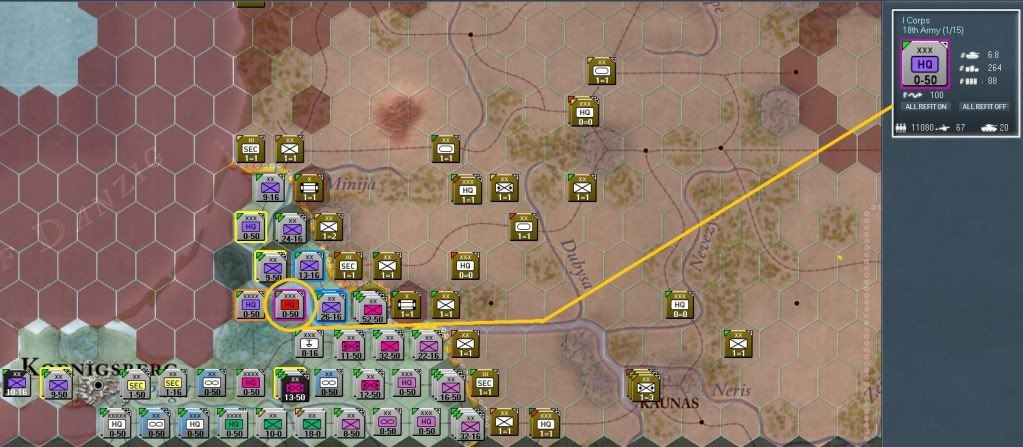
Okay, what I do next is to scan the map visually, I am trying to find out both where my units are and where his are to get a kind of big picture (in a full campaign I zoom out one more level to get a bigger overview). We talk more about this later but for now scroll down and to the left to find your units, your screen should look like this:
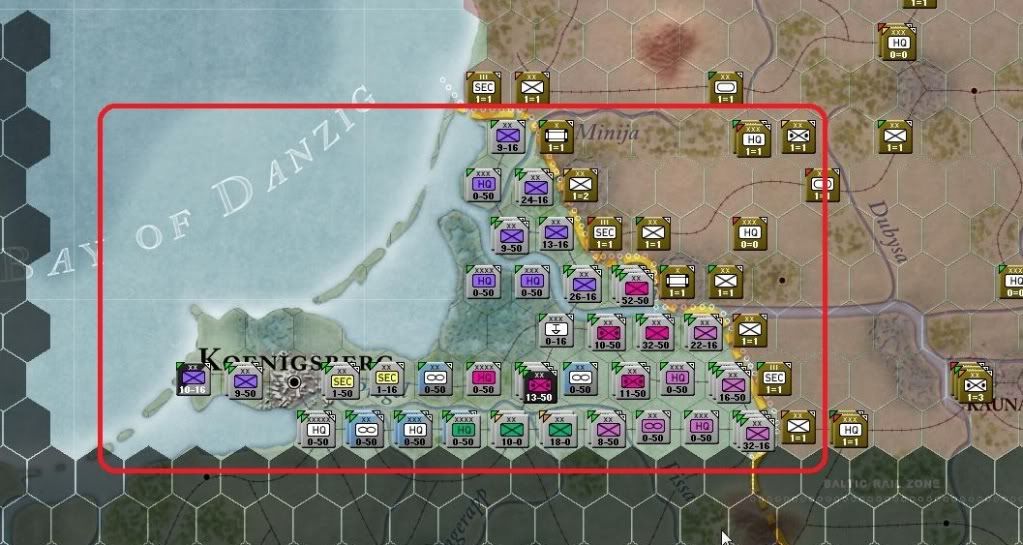
Lots of different colors and shades going on here right, well there is a couple of things to notice; the map or terrain that the German units are in looks like a normal map, but there is also a red and gray shaded area. The red shaded area is Soviet controlled and the dark gray shaded area is off map or out of limits for both sides. Now go ahead and hover your mouse over those white on grey HQ units that have a XXXX on them just southeast of Koenigsbeg.
Your screen should look something like this:

This little hex pop-up window (5.2.1) tells us a bit more about the hex just hovered over. What we can tell at a glance is that the terrain is clear, the hex grid number for the hex is x41, y49 there is a minor river on the NW and NE hex sides, there is rail lines that cross four of the hex sides indicated by the terms E SE SW NW, and this is an Axis Rail net (or friendly to us and usable for rail movement and supply). We can see two units in this hex indicated by the text UNIT #2 Army Group North and UNIT # 1 O.K.H., that does not mean units in the hex are # 1 or 2, it instead is the internal ID of that particular unit created in the scenario editor.
To the right of each unit you'll see some combat unit information, basically for HQ units this is: CU = Combat units attached, SU = Non-construction type Support units attached, MP = Current movement points, SP = Supply Path where number is distance to nearest railhead. There are other items that can be viewed such as victory objectives and fortification levels, more information will be said later if needed or you can check the manual. Go ahead and click on this stack of HQ units your screen should look like:
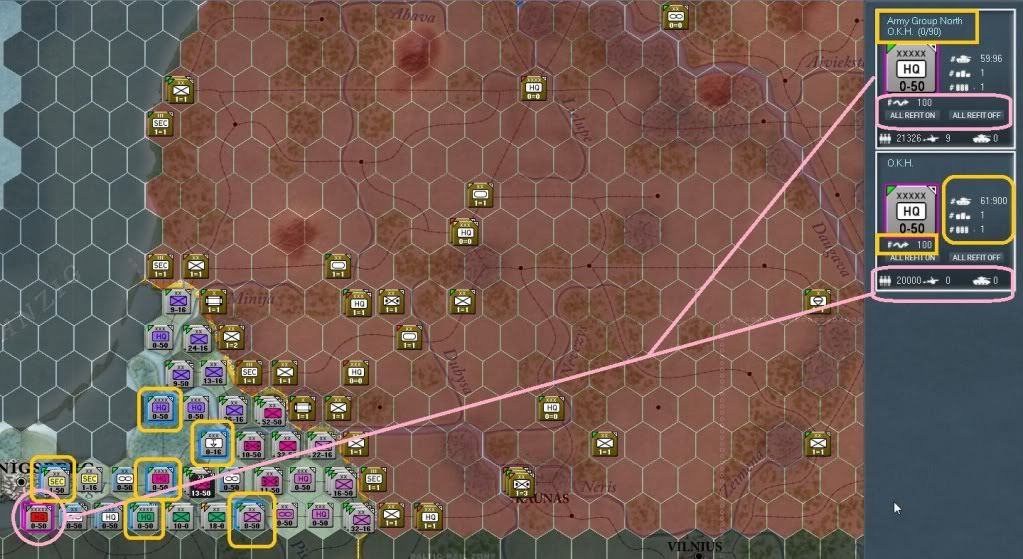
Okay, the pink circle just indicates that I selected the hex as can also be noticed by the unit panel (5.2.3) on the right showing the two HQ units in that hex. The gold rounded rectangles on the left indicate units attached directly to one or both of these HQ (if one were to deselect one of the HQ units - by left clicking on the one you don't want selected in the left hand unit bar, then only those units assigned to the selected HQ units will 'light" up on the unit bar.
Over on the unit bar you'll first see that the pink line is coming from the selected hex (no this is not in the game this is Don's attempt at graphic painting 101 and I know it sucks but it’s the best I can do) to the unit panel window, in this case since the hex contains two units both are selected, indicated by the white bordering box.
Starting with the top unit in the unit panel notice the gold rectangle around the name of the unit "Army Group North" (AGN from now on)? That first line is the unit itself, the second line on the first box says "O.K.H (0/90)" this means that AGN (the top unit) is directly assigned to the O.K.H. HQ. The 0/90 means that this unit AGN is 0 hexes from its assigned higher HQ unit. Each HQ unit has what I call a command radius (7.6), which is an over simplification, it's really a logistical and combat support as well as command and control (C2) type of range. Basically if you move out of this range (7.6.2.2) then the unit will have a red square around it (red is always bad) indicating it will not get the logistic and combat support it needs to operate at full capacity.
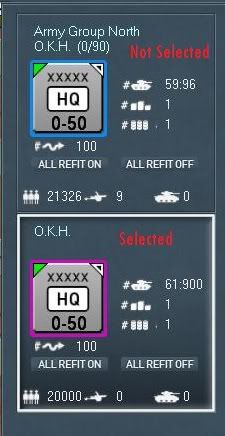
Directly under that is an image of the counter (marker or unit) with a purple rectangle around it, indicating it is currently selected and ready for orders. Now for you first test, left click someplace in the Army Group North unit box, this will deselect the just clicked unit and put a blue rectangle around it, in this case since AGN is stacked with (or in the same hex as) its higher HQ, in this case O.K.H. which is still selected and purple, meaning that AGN is a subordinate of O.K.H. Let's take a look.
Underneath the unit counter (reference the last two images) you'll see an arrow with a squiggly line and the text 100; this is the percentage of the units movement point that has been expended to this point. If you were to move the O.K.H. (only) unit to Koenigsberg (NW one hex) this number should show 94 after you move it, indicating this unit has spent 6% of its movement points (or has 94% left).
Under that text is a button that can be clicked to set the refit status (ALL REFIT ON) of the units directly reporting to that HQ unit. If you click it then a message will pop up indicating this, and after you clicked it and hover the mouse over that same button it will state "Turn formation refit status ON", likewise the button to the right of that is ALL REFIT OFF which does the opposite.
Please note that there is a lot of info in the manual on this and I'll get to it if it should come up again but for those that are curious check out 18.3 in the manual. To put it to you shortly, when playing as the Soviets in 1943 and on there are no Corps HQ units, the Soviets have Army HQ units and Front HQ units, well if you can imagine an Army that has 7 to 12 divisions/corps you can imagine how useful this could be.
Let’s jump back to the overview screen shot again:
In this screen shot we can see the pink lines on the unit in the map are drawn to the unit bar panel on the right, the O.K.H. unit has two gold items and one pink, look for the gold rounded rectangle in the unit bar on the right there are three icons. First off we see a pound sign with a tank icon, under that a pound sign with a supply icon and a pound sign with the fuel icon. The tank icon on HQ units is the number of command points of units attached and the capacity of command for this HQ unit. For HQ units the supply icon indicates the number of ground support units and the fuel icon represents the fuel dumps at this HQ. These three values represent different things for combat units and I'll cover those when we get to them.
Okay the last thing on this screen shot is the last round rectangle item in pink this has from left to right the total number of men, artillery and AFV (all types) in this unit. In our example we can see that O.K.H. has about 20,000 men and that is it, while AGN has about 21,326 men, 9 artillery pieces and 0 AFV. Before proceeding further let me show you another screen shot, first you'll need to click the name on the AGN counter so that it brings up the unit detail window (5.4.13):
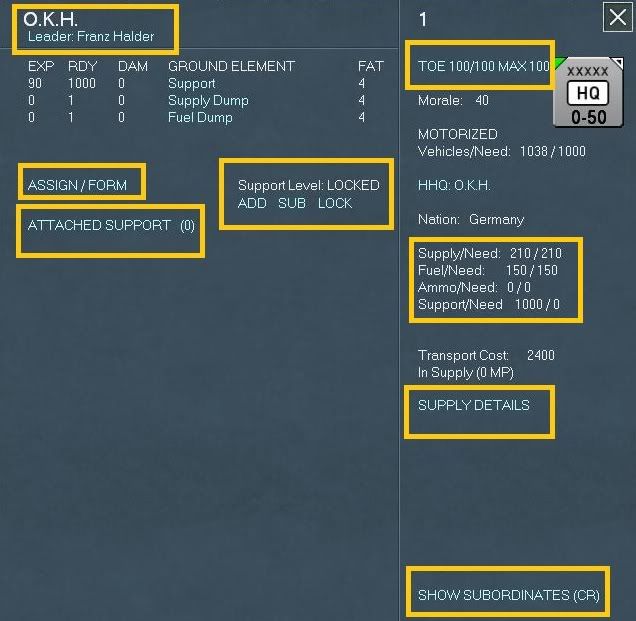
Okay, this is pretty well documented in the manual (5.4.13) but I'll try to point out some other things here as well as when we need to use them.
Up in the left (the first gold rectangle) is the unit name and the leader that currently is leading the unit (in our case Franz Halder), we can assign a new leader but for now let's not and just get through this walk through. Most of these items hopefully will be self explanatory or explained well enough in the manual. So I am not sure how much I need to get into this section other then what I'll try to explain in my walk through.
For me the most important parts are the Assign/Form, Support level, and TOE followed by TOE, Supply and Supply Details. Lastly, and also very import is the Show Subordinates (CR) link.
By cycling through the Assign/Form on the HQ unit detail window we can pick a support unit (if any are available) to assign to this HQ, in our case there is none, well cross this path a little later. As you can see the Attached Support list shows 0 (as shown in parentheses) support units assigned. Go ahead and click the Attached Support link to switch to Attached Units.
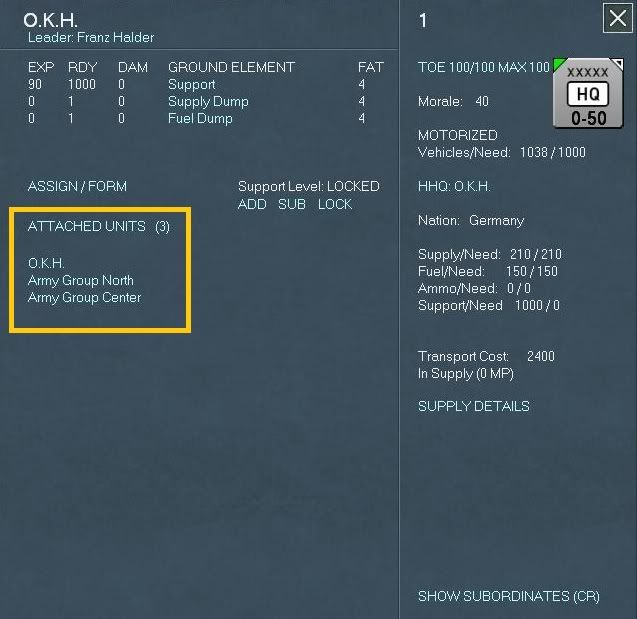
As you can see from this screen there are 3 units assigned, O.K.H. is assigned to itself (it and the STAVAKA are the highest level HQ) and AGN and AGC are also assigned.
For this exercise go ahead and click the text labeled Army Group North.
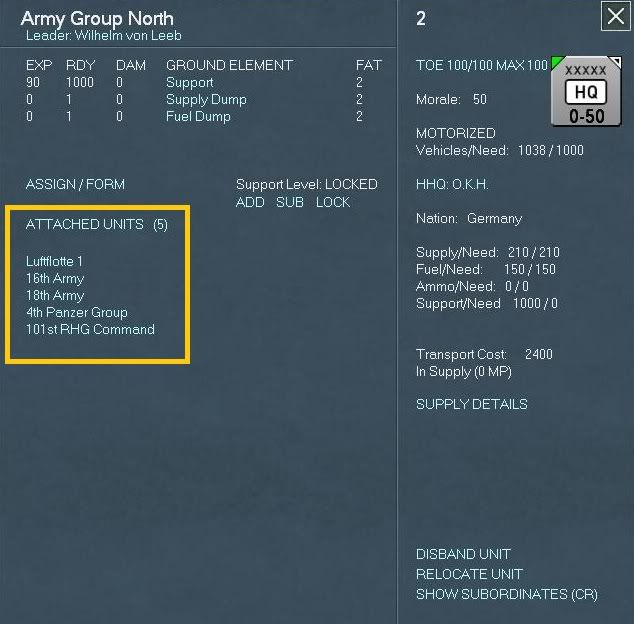
This brings us directly to Army Group North's unit detail window. From here we can see much of the same but this time we can see that AGN has 5 units attached. Go ahead and click on the 16th Army text, this in turn will take you to the 16th Army unit detail window which happens to have 5 units attached per below:
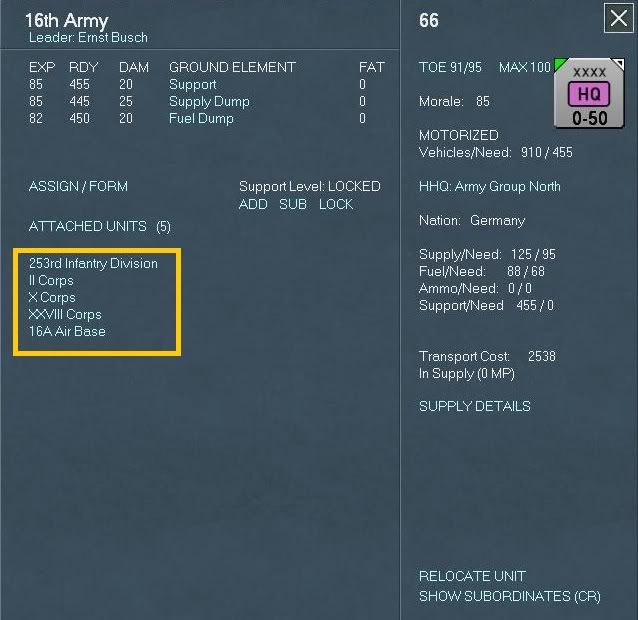
Click the Attached Units text to see the Attached Support units, your screen should show something like this:
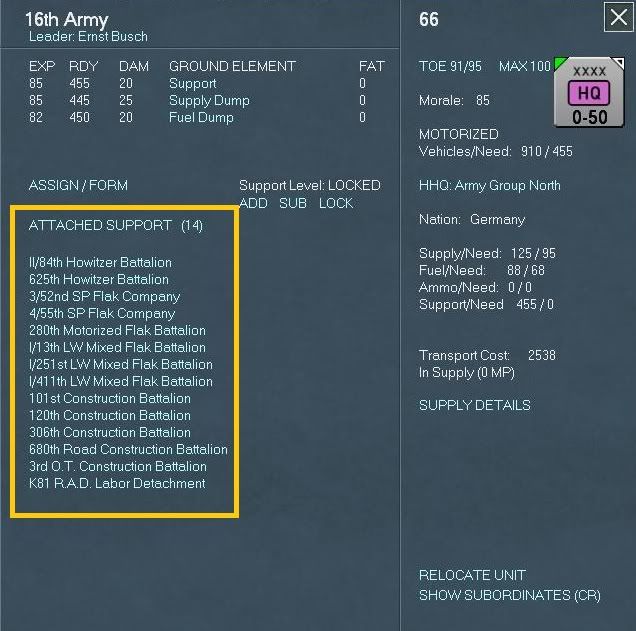
As you can see there are 14 attached support units in the 16th Army HQ. For now click on the Attached Support text to cycle back to the attached units and notice that to the right of the Assign/Form text is the text that says Support level: LOCKED.
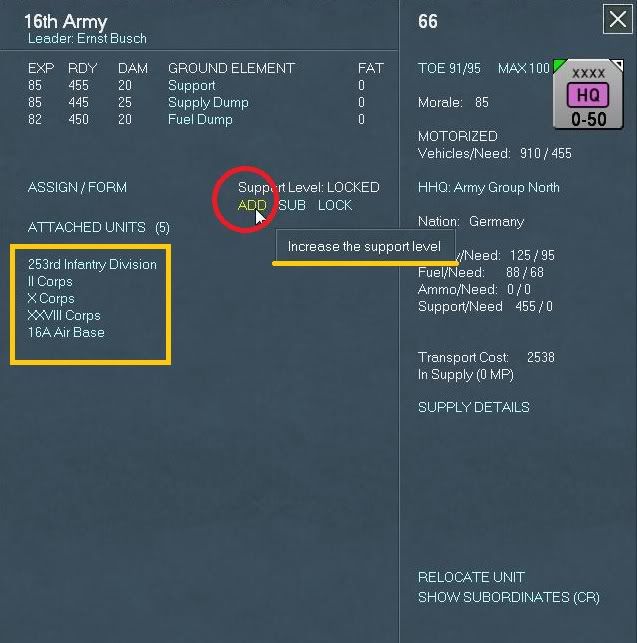
In this image if we click the ADD text (signified by the red circle) the support level will be upped from locked to 1 and increase the support level that this HQ draws from AGN. In the simplest terms this HQ will try to draw support units from its higher HQ and fill them out. So if the support level is set to 1 then the automation of the game that handles supplies and logistics and refits will do their thing and the assignment of support units will be attempted to fill this based on this level, in this case 1. To put it another way we want to assign 1 AA, 1 Engineer, 1 Assault Gun (or 1 of whatever) to this formation. Again, this is a very basic explanation, but suffice it to say that your front line units that you're going to be using in the next upcoming offensive can be set to pull the max or most of support units.
Note also that you can leave everything locked and the game system will try it’s best to send support units on offensive or defensive missions. Unlocking this just allows you more freedom of action to configure your armies to suit your needs.
Now my best practices (what I discovered during my testing) is that I like to set my HQ that are doing all the busy work to get support units for each attached unit. So in our example we have 3 Corps HQ units and to ADD the support level up to 3, we need to click on the ADD three times. When done your screen should look like this:

Again, this is the way I have found to run things that work best for me, you my find a better way, or you may not want to deal with this and that is okay, you can just leave it to Locked and the system does a pretty good job of allocating resources for you, the choice is yours.
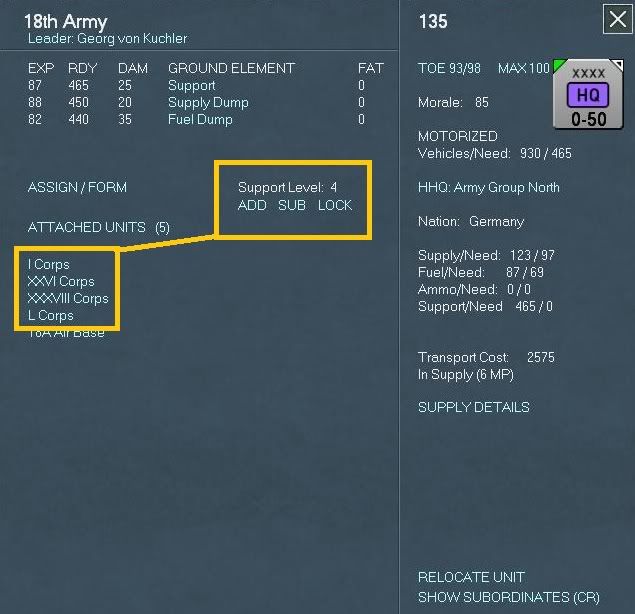
Now go ahead and click the X to close out this window, this will take you back to AGN, go ahead and click on the 18th Army text. Same thing here lets set our support level to 4 this time though since we have four corps HQs.
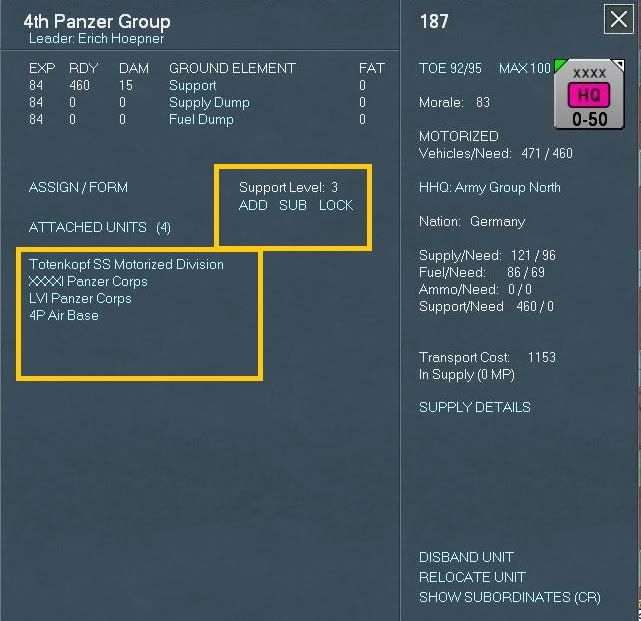
When you're done go ahead and click the X and then when you're in the AGN unit detail window go ahead and click on the 4th Panzer Group text to get to the 4th Panzer Group HQ unit detail window. You'll see you have only two panzer corps and an army level attached unit (the Totenkopf SS Motorized division). Since this is one of the spearheads go ahead and increase the support level to 3, when done your screen should look like this:
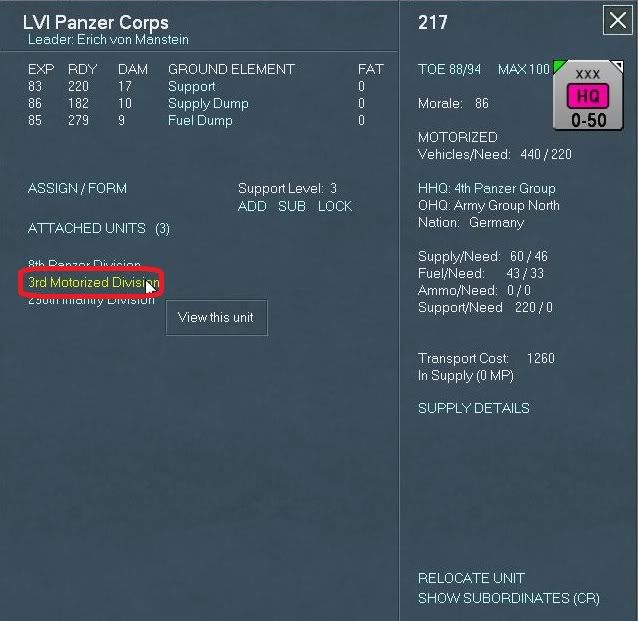
Now let's click on the XXXXI Panzer Corps HQ text. Again, this will bring us directly to the XXXXI Panzer Corps HQ unit detail window.
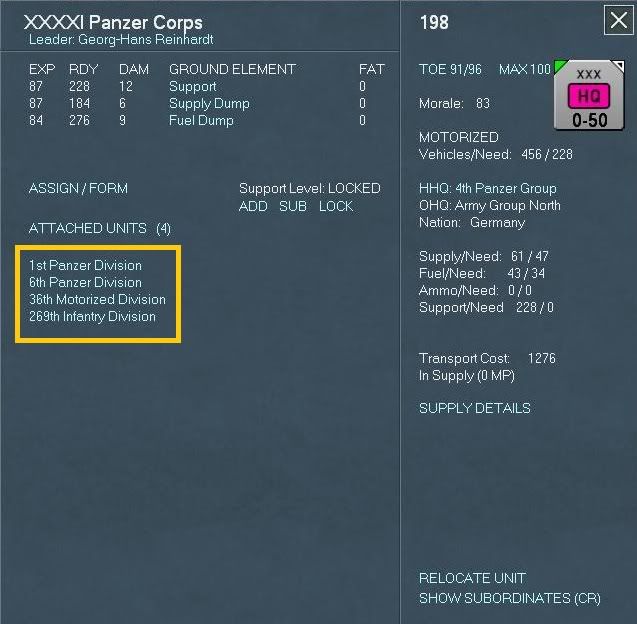
Now we're getting to some of the meat on the bones here. Take a look at this unit detail screen, the attached units are the 1st and 6th Panzer Division, the 36th Motorized Division and the 269th Infantry Divisions (from now on that's a lot to type so bear with me when I abbreviate with things like PzD for panzer division or MD for motorized division or ID for infantry divisions, I'll try to be clear).
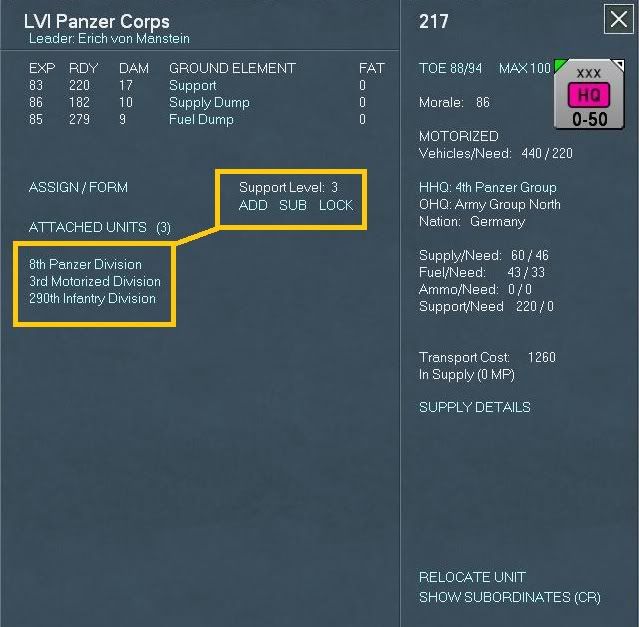
Go ahead and set the support level to 4 for the XXXXI PzC, when done click the X which will take you back to the 4th PzG now go ahead and click on the LVI PzC and go ahead and set the support level to 3 for this HQ.
When done click the X and then from the 4th PzG unit detail window click on the 4P Air Base text.
Notice this is a bit different then the land unit HQs, also if you click on the Attached Units text nothing happens this is normal. Here you'll see the attached units and the amount of aircraft elements in each that are assigned to this air base. The Assign button will assign aircraft from your national reserve (5.4.19). Clicking on one of the attached air group units will bring the tactical air display up. We'll come back to this later (or in another advanced tutorial section or you can visit section 8 of the manual if you'd like). For now close those windows out to get back to the 4th PzG unit display window and then from here click on the XXXXI PzC text to bring back up the XXXXI PzC unit display window.
Looking at the gold rectangle and further within it the pink rectangle hover your mouse over the 36th MID (motorized infantry division) you'll notice it turn yellow go ahead and click that text, this will bring up the 36th MID unit display detail window. A lot of the details here are covered in the manual but let me point out the following from this screen shot:
Under the combat unit name (36th MID) on the left hand side you'll see across the top the following: EXP (Experience), RDY (Ready), DAM (Damage), GROUND ELEMENT, FAT (Fatigue). So basically with the 36 MID the first ground element unit listed is a Sdkfz-231 Armored Car with 0 fatigue and damage , there are 10 ready units with an experience level of 85. To the right in the gold rectangle on top you'll see the text TOE 100/100 in this case the left side is actual the right side is ready. Max TOE can be set from 50-100% this is indicates the replacement the unit can take. Units in static mode, security units etc. can be set lower then units either building up for an offensive or those that are in the front lines fighting it out.
The Motorized indicates whether a unit is motorized or not, in this case the 36th MID is motorized this is also indicated by the number of vehicles versus the needed amount. You'll need to keep an eye on motorized and other units especially HQ as you move them around on the map these will suffer attrition.
Under that we have a clickable text link, this allows you to reassign this unit to another HQ unit, note that this will cost AP to do so and sometimes due to a myriad of other possibilities the list may be empty.
The next gold rectangle is basically the logistics side of things; hopefully this will be self explanatory enough. Construction value is the number used to increase the fortification in a hex (not sure if this is a die roll to roll under to add a certain value to the hex or a percentage added to the hex if the unit passes that roll). Transportation cost is the amount to use strategic rail, naval, air or amphibious movement. In supply shows the number of MP to the closes railhead. Supply Details brings up a unit supply detail window which provides a lot of information on the supply of this unit, we'll come back to this later on or next turn when it may make a little more sense.
Okay for this exercise we need to learn how to assign a unit from a higher HQ. Go ahead and click the ASSIGN/FORM inside the red rectangle.
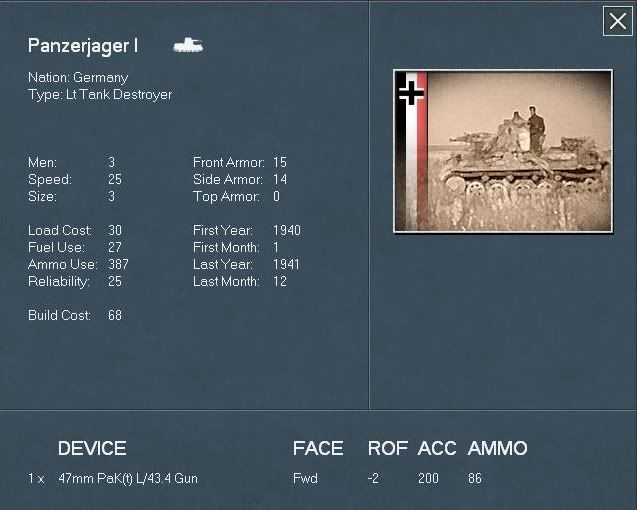
After clicking that text link the Pick Support Unit Type displays, here will be a list of all the available units to attach to this unit. For combat units the max is three units. Go ahead and click the TOE text link and this will bring up the TOE unit detail window, here we can see for a 41 Jagdpanzer battalion the default OOB is 27 light tank destroyers and 10 support squads. On the right we can see the actual ground unit detail, in this case a Panzerjager I.
After looking at the above go ahead and click the X to leave this view. Now that you’re back at the Pick Support Unit Type display, using your mouse hover over the third item down, the 41 Jagdpanzer battalion. As the red rectangle shows click the text link to select this unit to assign it to the 36th MID, your screen should look like this:
After selecting that support unit the Pick Support Unit Type will change to reflect that choice. Go ahead and close this window by clicking the X, your screen should look like this before you close it:
After closing that you're screen should look like this:
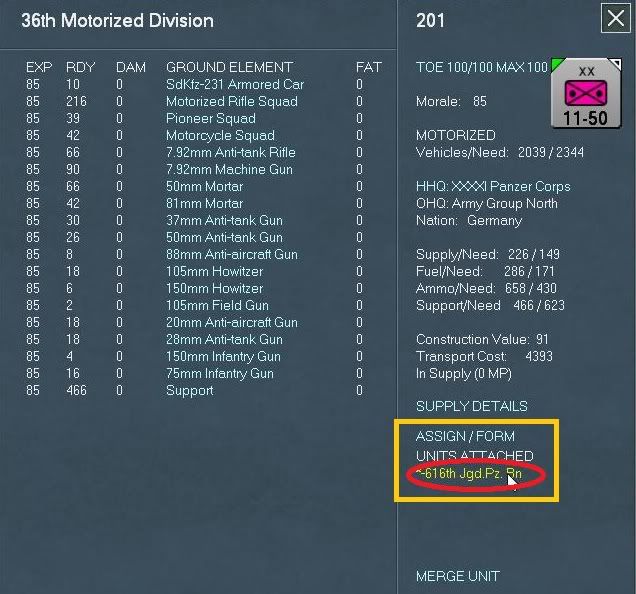
Notice from this screen shot in the gold rectangle area, the just selected unit will be listed, in this case the 616 Jgd. Pz.Bn. The * means this unit was just assigned and can't be reassigned till next turn. For now go ahead and click the text link for 616th JPB this will take you to the support unit detail window:
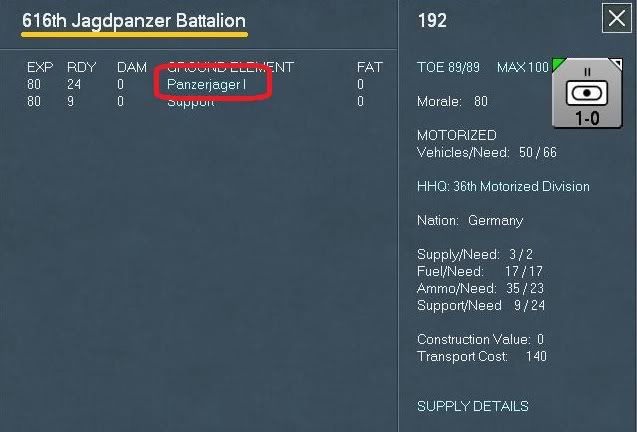
As you can see the unit has 80 experience points with 24 ready Panzerjager I with no fatigue. If you click the Panzerjager I text link it will display the ground element detail screen.
Go ahead and click the X to leave that screen and then go ahead and click the X to leave the 36th MID detail. The interface kicks you out and your now looking at the map with the O.K.H. HQ selected as the following screen shot shows:
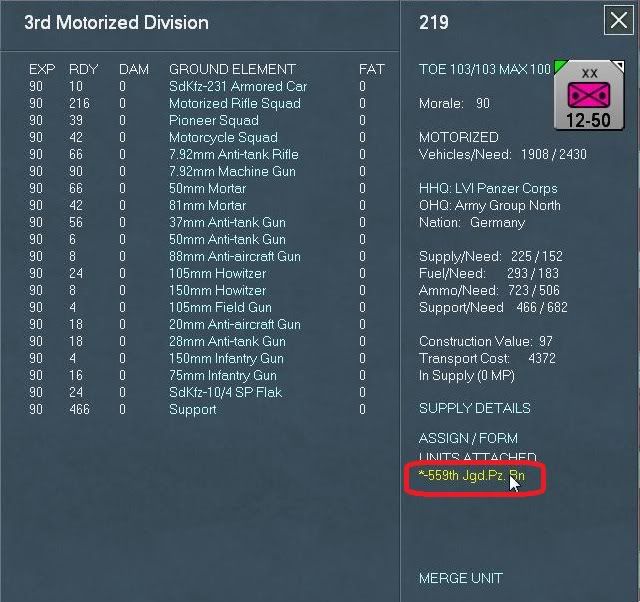
Go ahead and click the text of the top unit from the unit bar or AGN text to bring up the Show unit details window and then drill down into the 4th PzG HQ, and select the LVI PzC and hover your mouse over the 3rd MID, your screen should look like this:
Go ahead and click this text to bring up the 3rd MID unit detail window and click the ASSIGN/FORM text to select a panzerjager battalion. Your screen should now look like this:
As you can see the newly attached unit is the 559th Jdg.PzBn. Click on the 559th text to bring up the ground element detail window. Here we can see that the 559 is only at 89% TOE, just because you can assign or attached units does not mean that they will arrive at full 100% TOE (especially with some of the Soviet units, where you may create one but you may have to wait one or more turns for it to 'fill out'). Your screen should look like this:
Okay, now time for some home work, close this window and close the others until you get back to the AGN HQ unit display window. Now its your turn go ahead and drill down into both the 16th and 18th Armies and down into each infantry corps HQ and set (or not if you don't want to) the support levels from one to four depending on how many active divisions in that Corps and meet me back here.
Okay, what I do next is to scan the map visually, I am trying to find out both where my units are and where his are to get a kind of big picture (in a full campaign I zoom out one more level to get a bigger overview). We talk more about this later but for now scroll down and to the left to find your units, your screen should look like this:
Lots of different colors and shades going on here right, well there is a couple of things to notice; the map or terrain that the German units are in looks like a normal map, but there is also a red and gray shaded area. The red shaded area is Soviet controlled and the dark gray shaded area is off map or out of limits for both sides. Now go ahead and hover your mouse over those white on grey HQ units that have a XXXX on them just southeast of Koenigsbeg.
Your screen should look something like this:
This little hex pop-up window (5.2.1) tells us a bit more about the hex just hovered over. What we can tell at a glance is that the terrain is clear, the hex grid number for the hex is x41, y49 there is a minor river on the NW and NE hex sides, there is rail lines that cross four of the hex sides indicated by the terms E SE SW NW, and this is an Axis Rail net (or friendly to us and usable for rail movement and supply). We can see two units in this hex indicated by the text UNIT #2 Army Group North and UNIT # 1 O.K.H., that does not mean units in the hex are # 1 or 2, it instead is the internal ID of that particular unit created in the scenario editor.
To the right of each unit you'll see some combat unit information, basically for HQ units this is: CU = Combat units attached, SU = Non-construction type Support units attached, MP = Current movement points, SP = Supply Path where number is distance to nearest railhead. There are other items that can be viewed such as victory objectives and fortification levels, more information will be said later if needed or you can check the manual. Go ahead and click on this stack of HQ units your screen should look like:
Okay, the pink circle just indicates that I selected the hex as can also be noticed by the unit panel (5.2.3) on the right showing the two HQ units in that hex. The gold rounded rectangles on the left indicate units attached directly to one or both of these HQ (if one were to deselect one of the HQ units - by left clicking on the one you don't want selected in the left hand unit bar, then only those units assigned to the selected HQ units will 'light" up on the unit bar.
Over on the unit bar you'll first see that the pink line is coming from the selected hex (no this is not in the game this is Don's attempt at graphic painting 101 and I know it sucks but it’s the best I can do) to the unit panel window, in this case since the hex contains two units both are selected, indicated by the white bordering box.
Starting with the top unit in the unit panel notice the gold rectangle around the name of the unit "Army Group North" (AGN from now on)? That first line is the unit itself, the second line on the first box says "O.K.H (0/90)" this means that AGN (the top unit) is directly assigned to the O.K.H. HQ. The 0/90 means that this unit AGN is 0 hexes from its assigned higher HQ unit. Each HQ unit has what I call a command radius (7.6), which is an over simplification, it's really a logistical and combat support as well as command and control (C2) type of range. Basically if you move out of this range (7.6.2.2) then the unit will have a red square around it (red is always bad) indicating it will not get the logistic and combat support it needs to operate at full capacity.
Directly under that is an image of the counter (marker or unit) with a purple rectangle around it, indicating it is currently selected and ready for orders. Now for you first test, left click someplace in the Army Group North unit box, this will deselect the just clicked unit and put a blue rectangle around it, in this case since AGN is stacked with (or in the same hex as) its higher HQ, in this case O.K.H. which is still selected and purple, meaning that AGN is a subordinate of O.K.H. Let's take a look.
Underneath the unit counter (reference the last two images) you'll see an arrow with a squiggly line and the text 100; this is the percentage of the units movement point that has been expended to this point. If you were to move the O.K.H. (only) unit to Koenigsberg (NW one hex) this number should show 94 after you move it, indicating this unit has spent 6% of its movement points (or has 94% left).
Under that text is a button that can be clicked to set the refit status (ALL REFIT ON) of the units directly reporting to that HQ unit. If you click it then a message will pop up indicating this, and after you clicked it and hover the mouse over that same button it will state "Turn formation refit status ON", likewise the button to the right of that is ALL REFIT OFF which does the opposite.
Please note that there is a lot of info in the manual on this and I'll get to it if it should come up again but for those that are curious check out 18.3 in the manual. To put it to you shortly, when playing as the Soviets in 1943 and on there are no Corps HQ units, the Soviets have Army HQ units and Front HQ units, well if you can imagine an Army that has 7 to 12 divisions/corps you can imagine how useful this could be.
Let’s jump back to the overview screen shot again:
In this screen shot we can see the pink lines on the unit in the map are drawn to the unit bar panel on the right, the O.K.H. unit has two gold items and one pink, look for the gold rounded rectangle in the unit bar on the right there are three icons. First off we see a pound sign with a tank icon, under that a pound sign with a supply icon and a pound sign with the fuel icon. The tank icon on HQ units is the number of command points of units attached and the capacity of command for this HQ unit. For HQ units the supply icon indicates the number of ground support units and the fuel icon represents the fuel dumps at this HQ. These three values represent different things for combat units and I'll cover those when we get to them.
Okay the last thing on this screen shot is the last round rectangle item in pink this has from left to right the total number of men, artillery and AFV (all types) in this unit. In our example we can see that O.K.H. has about 20,000 men and that is it, while AGN has about 21,326 men, 9 artillery pieces and 0 AFV. Before proceeding further let me show you another screen shot, first you'll need to click the name on the AGN counter so that it brings up the unit detail window (5.4.13):
Okay, this is pretty well documented in the manual (5.4.13) but I'll try to point out some other things here as well as when we need to use them.
Up in the left (the first gold rectangle) is the unit name and the leader that currently is leading the unit (in our case Franz Halder), we can assign a new leader but for now let's not and just get through this walk through. Most of these items hopefully will be self explanatory or explained well enough in the manual. So I am not sure how much I need to get into this section other then what I'll try to explain in my walk through.
For me the most important parts are the Assign/Form, Support level, and TOE followed by TOE, Supply and Supply Details. Lastly, and also very import is the Show Subordinates (CR) link.
By cycling through the Assign/Form on the HQ unit detail window we can pick a support unit (if any are available) to assign to this HQ, in our case there is none, well cross this path a little later. As you can see the Attached Support list shows 0 (as shown in parentheses) support units assigned. Go ahead and click the Attached Support link to switch to Attached Units.
As you can see from this screen there are 3 units assigned, O.K.H. is assigned to itself (it and the STAVAKA are the highest level HQ) and AGN and AGC are also assigned.
For this exercise go ahead and click the text labeled Army Group North.
This brings us directly to Army Group North's unit detail window. From here we can see much of the same but this time we can see that AGN has 5 units attached. Go ahead and click on the 16th Army text, this in turn will take you to the 16th Army unit detail window which happens to have 5 units attached per below:
Click the Attached Units text to see the Attached Support units, your screen should show something like this:
As you can see there are 14 attached support units in the 16th Army HQ. For now click on the Attached Support text to cycle back to the attached units and notice that to the right of the Assign/Form text is the text that says Support level: LOCKED.
In this image if we click the ADD text (signified by the red circle) the support level will be upped from locked to 1 and increase the support level that this HQ draws from AGN. In the simplest terms this HQ will try to draw support units from its higher HQ and fill them out. So if the support level is set to 1 then the automation of the game that handles supplies and logistics and refits will do their thing and the assignment of support units will be attempted to fill this based on this level, in this case 1. To put it another way we want to assign 1 AA, 1 Engineer, 1 Assault Gun (or 1 of whatever) to this formation. Again, this is a very basic explanation, but suffice it to say that your front line units that you're going to be using in the next upcoming offensive can be set to pull the max or most of support units.
Note also that you can leave everything locked and the game system will try it’s best to send support units on offensive or defensive missions. Unlocking this just allows you more freedom of action to configure your armies to suit your needs.
Now my best practices (what I discovered during my testing) is that I like to set my HQ that are doing all the busy work to get support units for each attached unit. So in our example we have 3 Corps HQ units and to ADD the support level up to 3, we need to click on the ADD three times. When done your screen should look like this:
Again, this is the way I have found to run things that work best for me, you my find a better way, or you may not want to deal with this and that is okay, you can just leave it to Locked and the system does a pretty good job of allocating resources for you, the choice is yours.
Now go ahead and click the X to close out this window, this will take you back to AGN, go ahead and click on the 18th Army text. Same thing here lets set our support level to 4 this time though since we have four corps HQs.
When you're done go ahead and click the X and then when you're in the AGN unit detail window go ahead and click on the 4th Panzer Group text to get to the 4th Panzer Group HQ unit detail window. You'll see you have only two panzer corps and an army level attached unit (the Totenkopf SS Motorized division). Since this is one of the spearheads go ahead and increase the support level to 3, when done your screen should look like this:
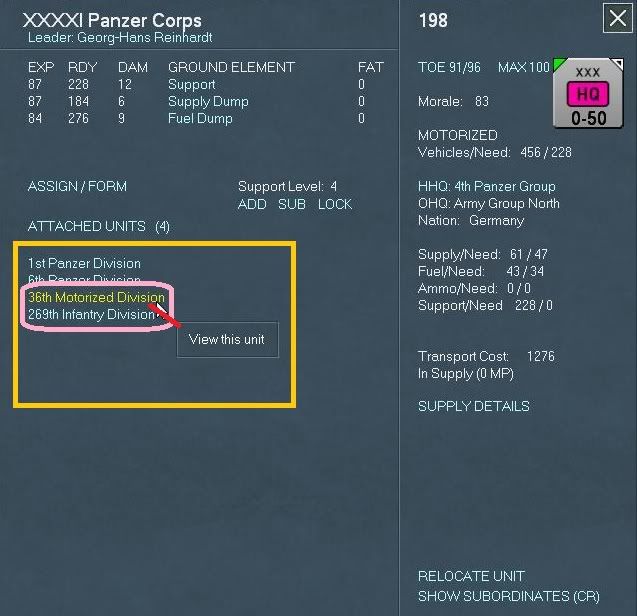
Now let's click on the XXXXI Panzer Corps HQ text. Again, this will bring us directly to the XXXXI Panzer Corps HQ unit detail window.
Now we're getting to some of the meat on the bones here. Take a look at this unit detail screen, the attached units are the 1st and 6th Panzer Division, the 36th Motorized Division and the 269th Infantry Divisions (from now on that's a lot to type so bear with me when I abbreviate with things like PzD for panzer division or MD for motorized division or ID for infantry divisions, I'll try to be clear).
Go ahead and set the support level to 4 for the XXXXI PzC, when done click the X which will take you back to the 4th PzG now go ahead and click on the LVI PzC and go ahead and set the support level to 3 for this HQ.
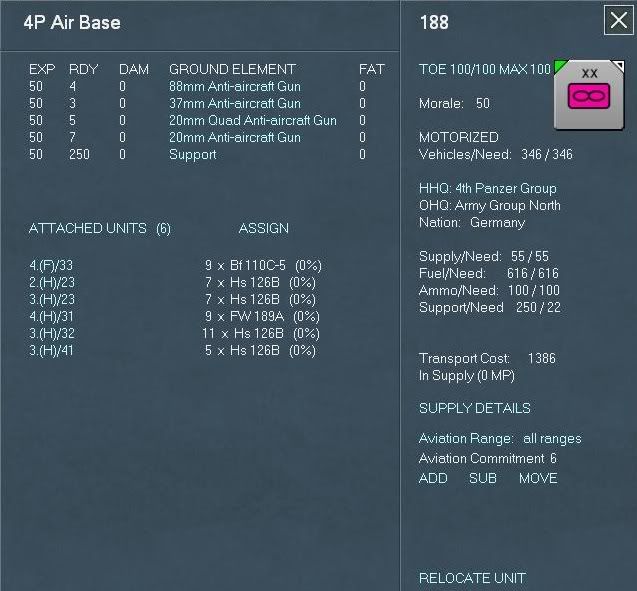
When done click the X and then from the 4th PzG unit detail window click on the 4P Air Base text.
Notice this is a bit different then the land unit HQs, also if you click on the Attached Units text nothing happens this is normal. Here you'll see the attached units and the amount of aircraft elements in each that are assigned to this air base. The Assign button will assign aircraft from your national reserve (5.4.19). Clicking on one of the attached air group units will bring the tactical air display up. We'll come back to this later (or in another advanced tutorial section or you can visit section 8 of the manual if you'd like). For now close those windows out to get back to the 4th PzG unit display window and then from here click on the XXXXI PzC text to bring back up the XXXXI PzC unit display window.
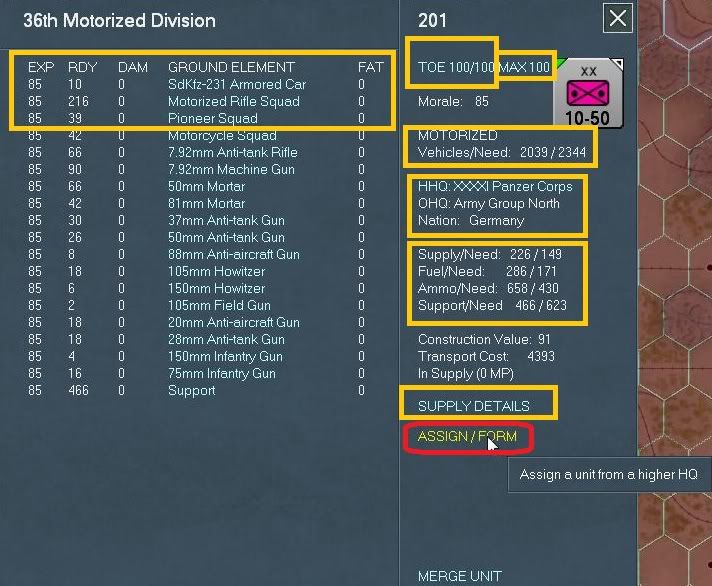
Looking at the gold rectangle and further within it the pink rectangle hover your mouse over the 36th MID (motorized infantry division) you'll notice it turn yellow go ahead and click that text, this will bring up the 36th MID unit display detail window. A lot of the details here are covered in the manual but let me point out the following from this screen shot:
Under the combat unit name (36th MID) on the left hand side you'll see across the top the following: EXP (Experience), RDY (Ready), DAM (Damage), GROUND ELEMENT, FAT (Fatigue). So basically with the 36 MID the first ground element unit listed is a Sdkfz-231 Armored Car with 0 fatigue and damage , there are 10 ready units with an experience level of 85. To the right in the gold rectangle on top you'll see the text TOE 100/100 in this case the left side is actual the right side is ready. Max TOE can be set from 50-100% this is indicates the replacement the unit can take. Units in static mode, security units etc. can be set lower then units either building up for an offensive or those that are in the front lines fighting it out.
The Motorized indicates whether a unit is motorized or not, in this case the 36th MID is motorized this is also indicated by the number of vehicles versus the needed amount. You'll need to keep an eye on motorized and other units especially HQ as you move them around on the map these will suffer attrition.
Under that we have a clickable text link, this allows you to reassign this unit to another HQ unit, note that this will cost AP to do so and sometimes due to a myriad of other possibilities the list may be empty.
The next gold rectangle is basically the logistics side of things; hopefully this will be self explanatory enough. Construction value is the number used to increase the fortification in a hex (not sure if this is a die roll to roll under to add a certain value to the hex or a percentage added to the hex if the unit passes that roll). Transportation cost is the amount to use strategic rail, naval, air or amphibious movement. In supply shows the number of MP to the closes railhead. Supply Details brings up a unit supply detail window which provides a lot of information on the supply of this unit, we'll come back to this later on or next turn when it may make a little more sense.
Okay for this exercise we need to learn how to assign a unit from a higher HQ. Go ahead and click the ASSIGN/FORM inside the red rectangle.
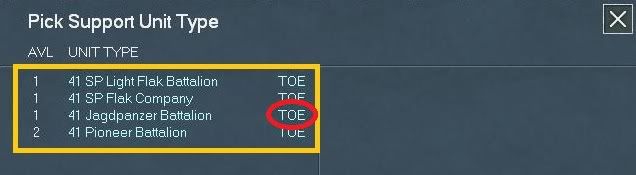
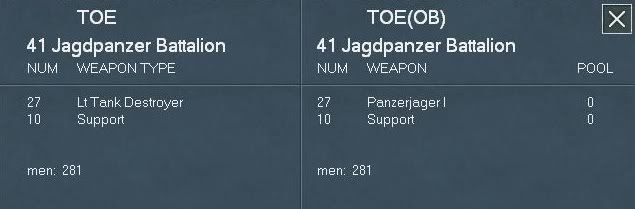
After clicking that text link the Pick Support Unit Type displays, here will be a list of all the available units to attach to this unit. For combat units the max is three units. Go ahead and click the TOE text link and this will bring up the TOE unit detail window, here we can see for a 41 Jagdpanzer battalion the default OOB is 27 light tank destroyers and 10 support squads. On the right we can see the actual ground unit detail, in this case a Panzerjager I.
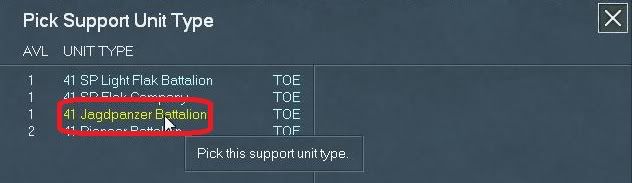
After looking at the above go ahead and click the X to leave this view. Now that you’re back at the Pick Support Unit Type display, using your mouse hover over the third item down, the 41 Jagdpanzer battalion. As the red rectangle shows click the text link to select this unit to assign it to the 36th MID, your screen should look like this:
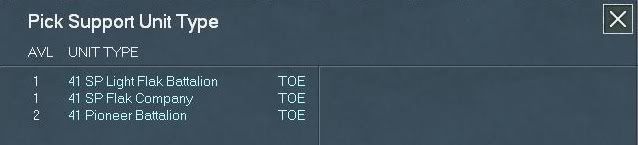
After selecting that support unit the Pick Support Unit Type will change to reflect that choice. Go ahead and close this window by clicking the X, your screen should look like this before you close it:
After closing that you're screen should look like this:
Notice from this screen shot in the gold rectangle area, the just selected unit will be listed, in this case the 616 Jgd. Pz.Bn. The * means this unit was just assigned and can't be reassigned till next turn. For now go ahead and click the text link for 616th JPB this will take you to the support unit detail window:
As you can see the unit has 80 experience points with 24 ready Panzerjager I with no fatigue. If you click the Panzerjager I text link it will display the ground element detail screen.
Go ahead and click the X to leave that screen and then go ahead and click the X to leave the 36th MID detail. The interface kicks you out and your now looking at the map with the O.K.H. HQ selected as the following screen shot shows:
Go ahead and click the text of the top unit from the unit bar or AGN text to bring up the Show unit details window and then drill down into the 4th PzG HQ, and select the LVI PzC and hover your mouse over the 3rd MID, your screen should look like this:
Go ahead and click this text to bring up the 3rd MID unit detail window and click the ASSIGN/FORM text to select a panzerjager battalion. Your screen should now look like this:
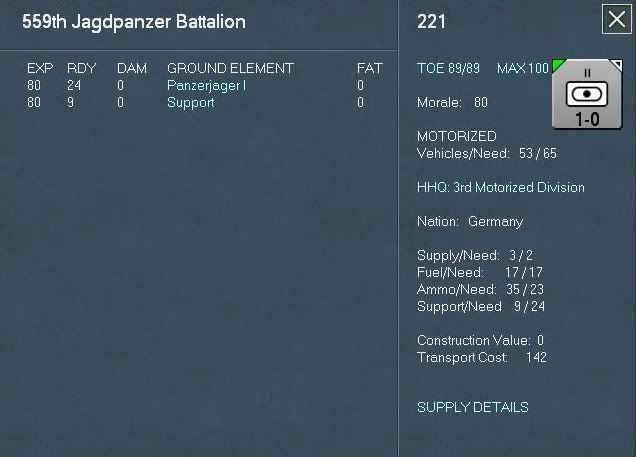
As you can see the newly attached unit is the 559th Jdg.PzBn. Click on the 559th text to bring up the ground element detail window. Here we can see that the 559 is only at 89% TOE, just because you can assign or attached units does not mean that they will arrive at full 100% TOE (especially with some of the Soviet units, where you may create one but you may have to wait one or more turns for it to 'fill out'). Your screen should look like this:
Okay, now time for some home work, close this window and close the others until you get back to the AGN HQ unit display window. Now its your turn go ahead and drill down into both the 16th and 18th Armies and down into each infantry corps HQ and set (or not if you don't want to) the support levels from one to four depending on how many active divisions in that Corps and meet me back here.
Beta Tester for: War in the East 1 & 2, WarPlan & WarPlan Pacific, Valor & Victory, Flashpoint Campaigns: Sudden Storm, Computer War In Europe 2
SPWW2 & SPMBT scenario creator
RE: Operational Boot Camp (tutorial)
Sir I am ready to fight (or what the hell are you talking so long for?)
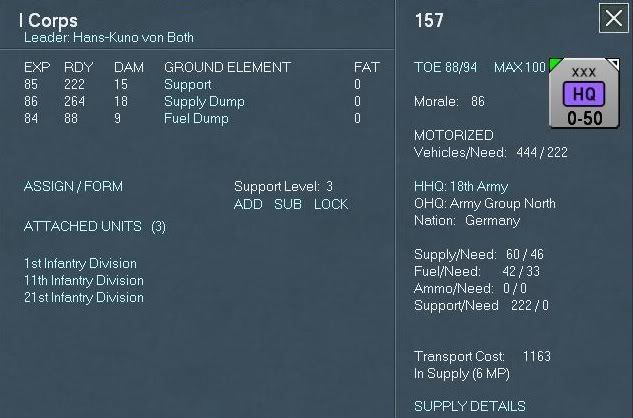
Okay, we still have a little bit more to review in this next screen shot so go ahead and select the 18th Army your screen should look like this:
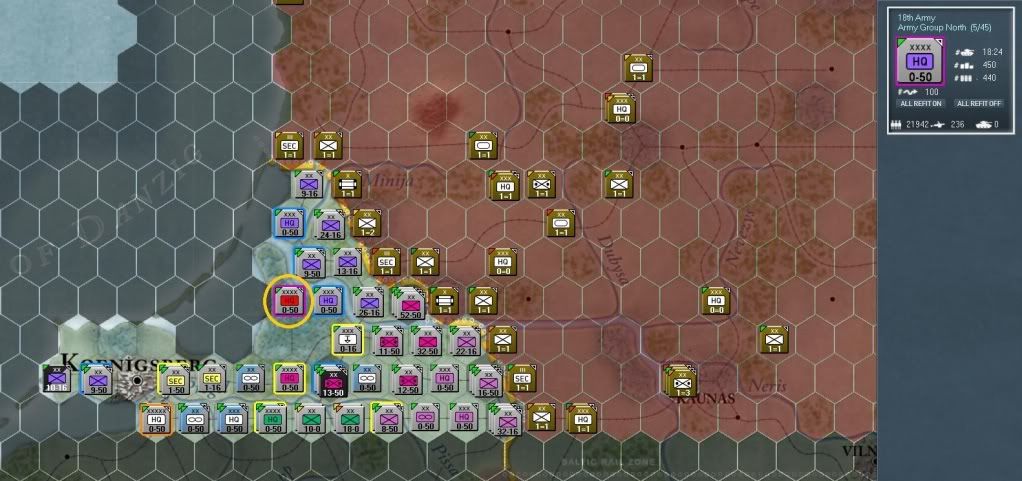
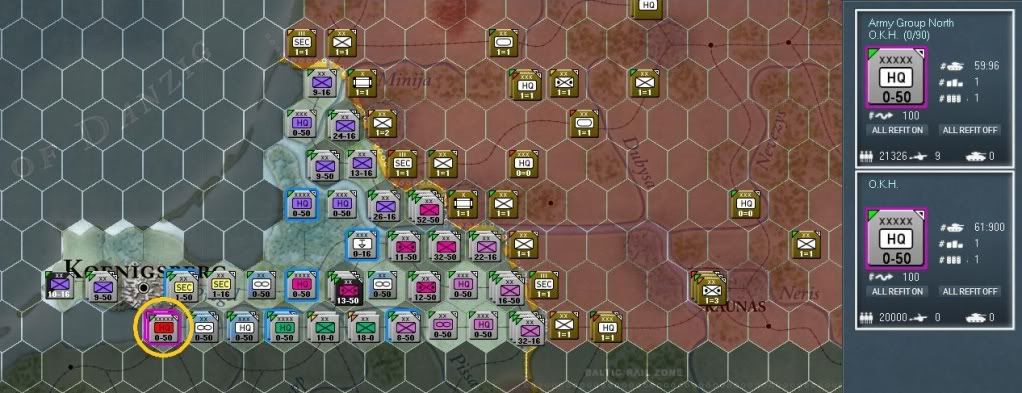
In the lower left within the gold circle is the 18th Army HQ selected signified by the purple outline, note that the hexes outlined in blue are subordinate units of the 18th Army; the HQ due East is the I Corps HQ, the one NE is the XXXVIII Corps HQ stacked with the 58th ID. Twenty miles due North you'll find the XXVI Corps HQ. Now those yellow outlines, those are peer units, in this case either another Corps HQ unit or an 18th Army attached unit, so twenty miles southeast you can see FBD 4 (a railroad repair unit) sitting on a rail hex waiting to repair rail lines. Due south 20 miles is the 4th Panzer Group. Lastly the unit outlined in orange 50 miles southwest (10 miles SE of Koenigsberg) is the O.K.H. HQ unit of which the 18th Army is assigned to.
Now getting back to the 18th Army HQ let's look at one more thing.
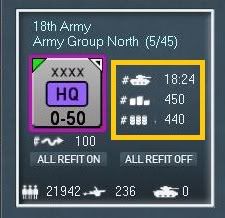
We have already talked about this, but the AFV icon equals the command points, for the 18th Army HQ this is 18 units’ assigned units out of 24 that it can command. Essentially each combat unit has a size and depending on its size it costs various CP to have that unit attached to a HQ unit. You can reference these values for yourself in the manual in sections 7.6.2.1 and 7.6.2.2, but each brigade cost 1 CP, each division cost 2 CP for the Axis. Each HQ unit has a type, such as Corps, Army, Army Group, Front, MD or High command each based on date and time and type can effectively command a certain amount of CP.
Next is the supply icon which represents supply dumps, in this case 450 supply dump ground elements. Lastly, is the fuel supply in this HQ, in this case its 440 fuel dumps, now to bring this full circle let's look again at the 18th Army HQ detail display.
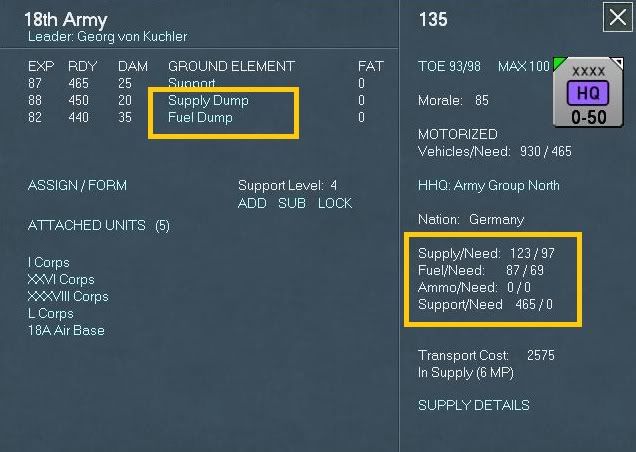
I highlighted in gold rectangles the Supply Dump and Fuel Dumps and you can see the ready versus damaged elements. On the right side we can now understand (hopefully) that this HQ needs 97 supply points and has 123 and has 87 fuel points and needs 69, same with the Support unit except that it has 465 and needs 0.
Go ahead and click the Supply Details text link so we can look at this in a little more detail.
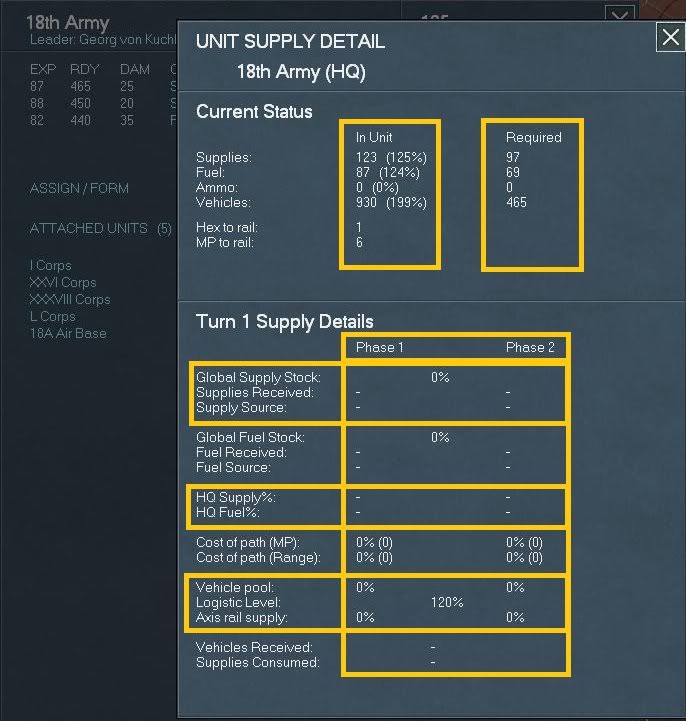
Hopefully this is all pretty self explanatory, and I'll try to point out anything that may not be. Easiest to understand is the Current Status, basically you have in unit and required, also hex to rail and MP to railhead. Now only HQ that can distribute supplies will have what you see in the screen shot, all of these have about as much information as I know about them and I really hate logistics so I'll leave this part for now, but if you're really into supply and logistics a lot I recommend your read manual section 5.4.26.2.
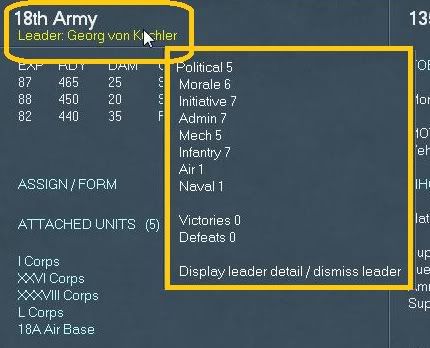
Leaders are import for many reasons and eventually I'll get to those, but for now when you hover the mouse over the leaders name right under the Army (or unit's) name a pop-up will display showing you the currently leaders specs. For now we are not going to dismiss anyone so let's move on.
Okay, from the 18th Army HQ unit display select the I Corps HQ and then select the 1st ID in the unit detail display. What we are going to do now is just review a standard German Infantry division an its supply details. Go ahead and review the details of the 1st ID.
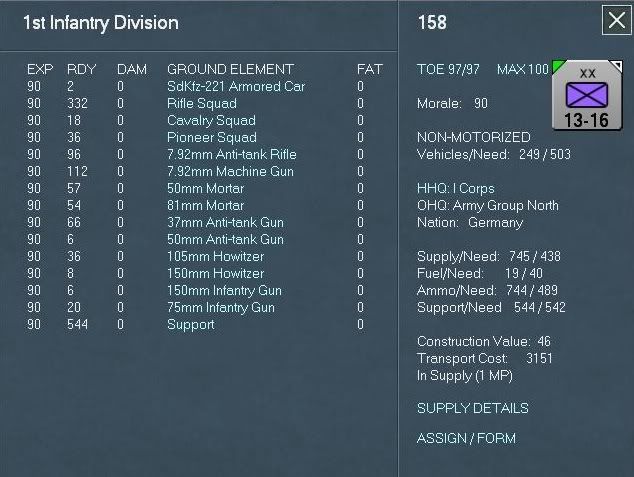
Now go ahead and click on the Supply Details text link and review the supply details of this unit:
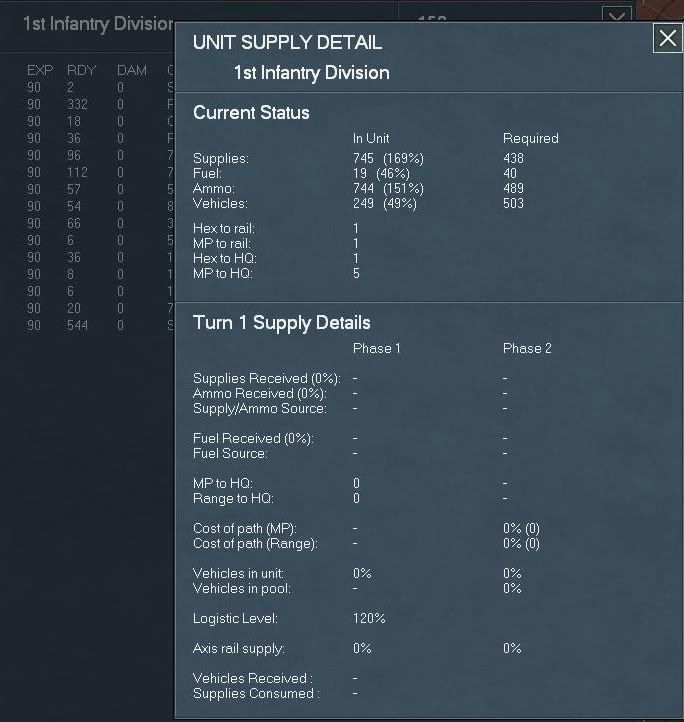
As you can see the unit is loaded up on supplies, but we need to keep an eye on this as turn’s progress.
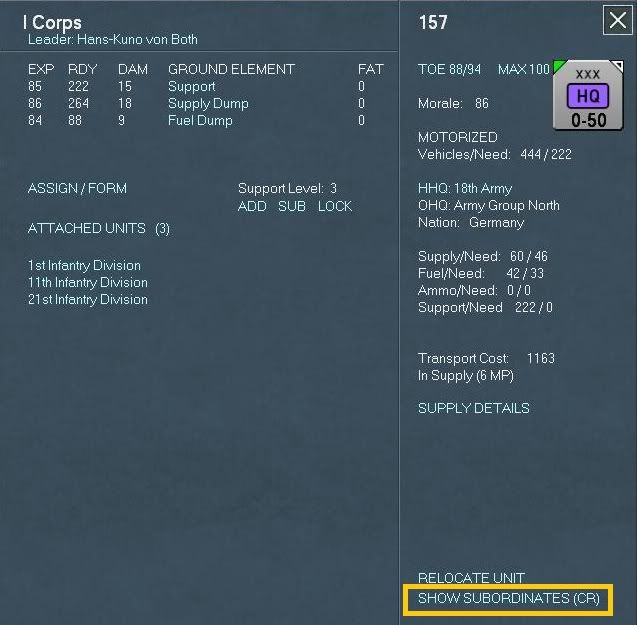
When you're ready close out the 1st ID detail display and when your back on the I Corps HQ detail display down in the right go ahead and click Show Subordinates (CR) to pull up the Commanders Report for just this HQ's formation.
Here we see the CR in action, the white units are on map and the green units are off map (or attachments), each item across the top is clickable so you can slice and dice or sort the data in a myriad of ways.
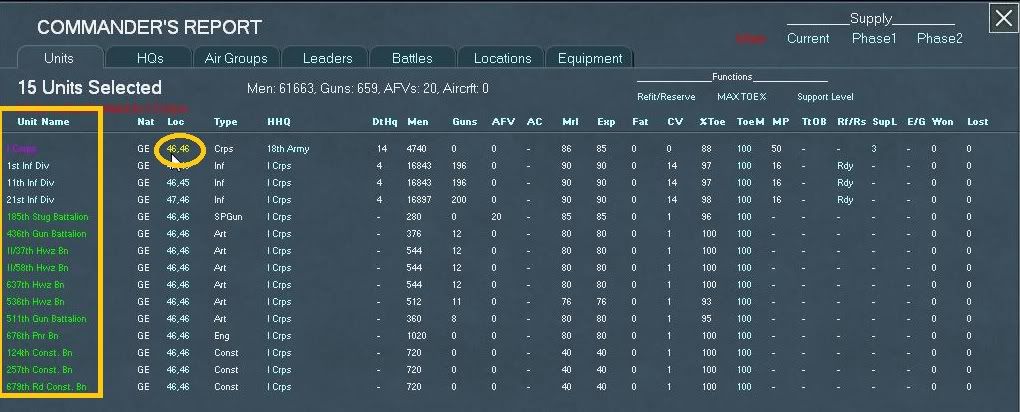
Note that when you hover over the Location (hex coordinates) the text will turn yellow and you can click it to go directly to that unit. Go ahead and select the I Corps HQ when ready. When you do the report automatically sends you to the map with the I Corps HQ detail window selected:
Go ahead and click the X to close this window. After you do that you'll have the I Corps HQ unit selected and the subordinate units and peers will have a colored rectangle around them giving you a visual at a glance.
Okay, I promised you earlier that I would explain the General Info and City display.

Hopefully most of this makes sense, but we have the Turn Date and Number, City name if we click on a city, Motor Pool (20.1.4), the first number is the total operational vehicles and the second is the need or total number of vehicles that would be need to bring the pool up to 100%. If less than a third then this will turn yellow if less than a quarter then it will turn red. Next we have the Admin Points and this will shrink or grow as time and usage go on and finally we have the Weather and Ice Levels.
That takes care of some of the basics, how I set up my interface for action, some of my thoughts and should get you hopefully a good walk around so that you feel comfortable.
Okay, we still have a little bit more to review in this next screen shot so go ahead and select the 18th Army your screen should look like this:
In the lower left within the gold circle is the 18th Army HQ selected signified by the purple outline, note that the hexes outlined in blue are subordinate units of the 18th Army; the HQ due East is the I Corps HQ, the one NE is the XXXVIII Corps HQ stacked with the 58th ID. Twenty miles due North you'll find the XXVI Corps HQ. Now those yellow outlines, those are peer units, in this case either another Corps HQ unit or an 18th Army attached unit, so twenty miles southeast you can see FBD 4 (a railroad repair unit) sitting on a rail hex waiting to repair rail lines. Due south 20 miles is the 4th Panzer Group. Lastly the unit outlined in orange 50 miles southwest (10 miles SE of Koenigsberg) is the O.K.H. HQ unit of which the 18th Army is assigned to.
Now getting back to the 18th Army HQ let's look at one more thing.
We have already talked about this, but the AFV icon equals the command points, for the 18th Army HQ this is 18 units’ assigned units out of 24 that it can command. Essentially each combat unit has a size and depending on its size it costs various CP to have that unit attached to a HQ unit. You can reference these values for yourself in the manual in sections 7.6.2.1 and 7.6.2.2, but each brigade cost 1 CP, each division cost 2 CP for the Axis. Each HQ unit has a type, such as Corps, Army, Army Group, Front, MD or High command each based on date and time and type can effectively command a certain amount of CP.
Next is the supply icon which represents supply dumps, in this case 450 supply dump ground elements. Lastly, is the fuel supply in this HQ, in this case its 440 fuel dumps, now to bring this full circle let's look again at the 18th Army HQ detail display.
I highlighted in gold rectangles the Supply Dump and Fuel Dumps and you can see the ready versus damaged elements. On the right side we can now understand (hopefully) that this HQ needs 97 supply points and has 123 and has 87 fuel points and needs 69, same with the Support unit except that it has 465 and needs 0.
Go ahead and click the Supply Details text link so we can look at this in a little more detail.
Hopefully this is all pretty self explanatory, and I'll try to point out anything that may not be. Easiest to understand is the Current Status, basically you have in unit and required, also hex to rail and MP to railhead. Now only HQ that can distribute supplies will have what you see in the screen shot, all of these have about as much information as I know about them and I really hate logistics so I'll leave this part for now, but if you're really into supply and logistics a lot I recommend your read manual section 5.4.26.2.
Leaders are import for many reasons and eventually I'll get to those, but for now when you hover the mouse over the leaders name right under the Army (or unit's) name a pop-up will display showing you the currently leaders specs. For now we are not going to dismiss anyone so let's move on.
Okay, from the 18th Army HQ unit display select the I Corps HQ and then select the 1st ID in the unit detail display. What we are going to do now is just review a standard German Infantry division an its supply details. Go ahead and review the details of the 1st ID.
Now go ahead and click on the Supply Details text link and review the supply details of this unit:
As you can see the unit is loaded up on supplies, but we need to keep an eye on this as turn’s progress.
When you're ready close out the 1st ID detail display and when your back on the I Corps HQ detail display down in the right go ahead and click Show Subordinates (CR) to pull up the Commanders Report for just this HQ's formation.
Here we see the CR in action, the white units are on map and the green units are off map (or attachments), each item across the top is clickable so you can slice and dice or sort the data in a myriad of ways.
Note that when you hover over the Location (hex coordinates) the text will turn yellow and you can click it to go directly to that unit. Go ahead and select the I Corps HQ when ready. When you do the report automatically sends you to the map with the I Corps HQ detail window selected:
Go ahead and click the X to close this window. After you do that you'll have the I Corps HQ unit selected and the subordinate units and peers will have a colored rectangle around them giving you a visual at a glance.
Okay, I promised you earlier that I would explain the General Info and City display.
Hopefully most of this makes sense, but we have the Turn Date and Number, City name if we click on a city, Motor Pool (20.1.4), the first number is the total operational vehicles and the second is the need or total number of vehicles that would be need to bring the pool up to 100%. If less than a third then this will turn yellow if less than a quarter then it will turn red. Next we have the Admin Points and this will shrink or grow as time and usage go on and finally we have the Weather and Ice Levels.
That takes care of some of the basics, how I set up my interface for action, some of my thoughts and should get you hopefully a good walk around so that you feel comfortable.
Beta Tester for: War in the East 1 & 2, WarPlan & WarPlan Pacific, Valor & Victory, Flashpoint Campaigns: Sudden Storm, Computer War In Europe 2
SPWW2 & SPMBT scenario creator
RE: Operational Boot Camp (tutorial)
Up, up and away (or it's about time dude!)
Now we are ready for some action, but wait I'd like to suggest something to you, it's a very good idea at the start of your turn after you have reviewed yours and your opponents disposition of forces, and examined and setup analyzed your interface and forces to perform Air Recon as part of your first action. For this exercise I told you to deselect FOW, but even with no FOW or with it on and you can physically see the unit that is adjacent to your units, your actually units may not be so fortunate.
If we were to reference section 13 of the manual we would discover what Detection Level (DL) is. Without going into too much detail I am just going to quote the manual here:
"Each unit on the map is automatically assigned a detection level from one to ten, based on factors to include distance from enemy units, covering terrain (6.2.1) and the results of air reconnaissance. A higher detection level will increase the effectiveness of ground and air combat against that unit.
Unit detection levels will change over time and can be influenced by player actions. During the logistics phase, an airbase unit will have its DL decline by one, while non-airbase units will have their DL decline by Die(5). The DL levels of enemy combat units that are adjacent may then increase. Adjacent enemy combat units compare scouting values for the different units to determine changes in DL levels."
So how do we do this? Well what you need to do is to select the Air Recon button (or F5) and then to the left of the AI button click the button with the aircraft on it, part of the screen looks like this:

Red circle means click that first, red square means click that to review the air doctrine, close that when you're done looking at the default levels, if you want more info please check the manual at this point.
Now for our purposes just take a mental note of that gold square around that AI button were going to come back to him in a moment. For now we need to analyze the general situation. To do so click on the Info Screens and then select the OOB, the screen shot below is just a cut-away so we can at a glance see what were up against.
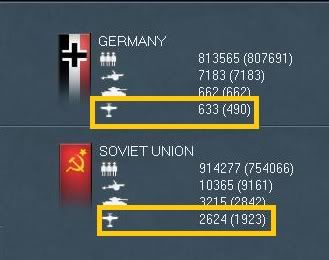
Since this is just a small scenario and were are basically in charge of AGN we can see we only have about 633 total planes with 490 of these ready. There are some in Finland but Finland is frozen right now.
Our Soviet GAI player has 2,624 of which only 1,923 are ready.
Are you ready for some fun? Almost there, first close out the OOB screen and double check the Losses Screen to make sure there are no air losses yet, yours should look like this:

Okay, good no losses now we can begin. Remember the previous screens shot (remember to get back there you need to click the Map Information tab) and once Air Recon is selected go ahead and click on the AI button to let the AI figure out the best usage of the air recon units.
Well that was anti climatic wasn't it? I don't know about you but I only got one mission. Really this makes sense because we are playing with FOW off. Now it’s time to take over the reins. To manually conduct these types of mission all you need to do is be in Air Recon mode and then scan the map and right click on the hex you want to air recon.
Go ahead and hover your mouse over Kaunas and right click to perform an Air Recon mission. Once it's done all the Soviet areas should have turn a darker grey indicating usually (but not always) that the air doctrine is kicking in and no more units can be flown to the target.
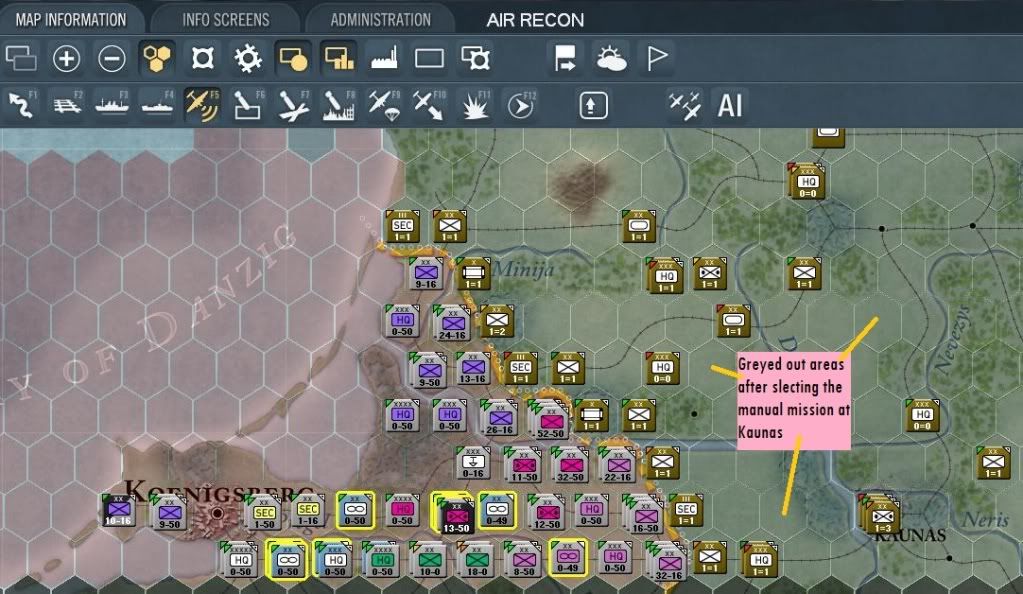
Now, go ahead and select the normal mode move (F1) and then click the Show battles report (F11).
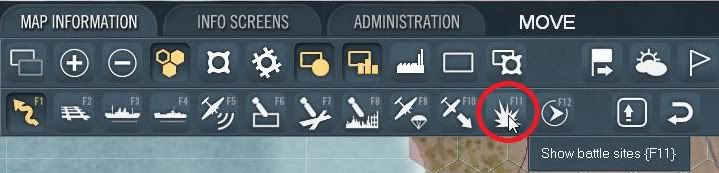
Once you click that button the map will display all the battles so far, in this case we have two the air recon missions showing:
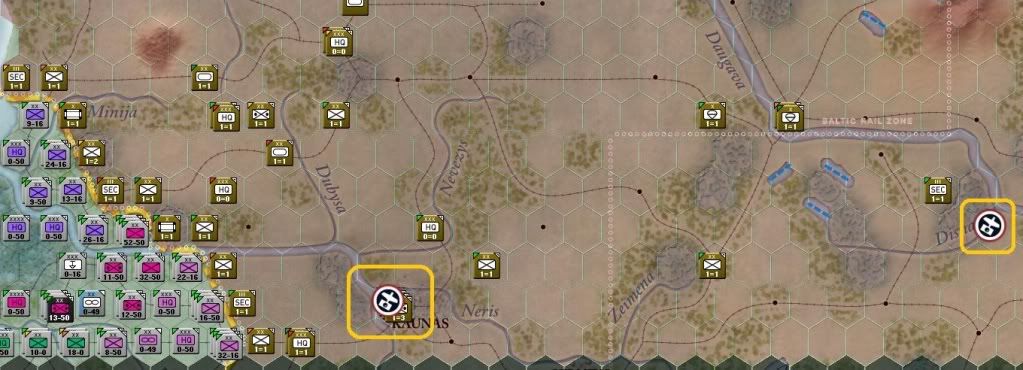
Now take your mouse and hover over the battle marker and a pop-up window will display with a summary and if you click on the battle marker then a combat resolution window will display. In the following screen show you can see both show the losses of the missions.
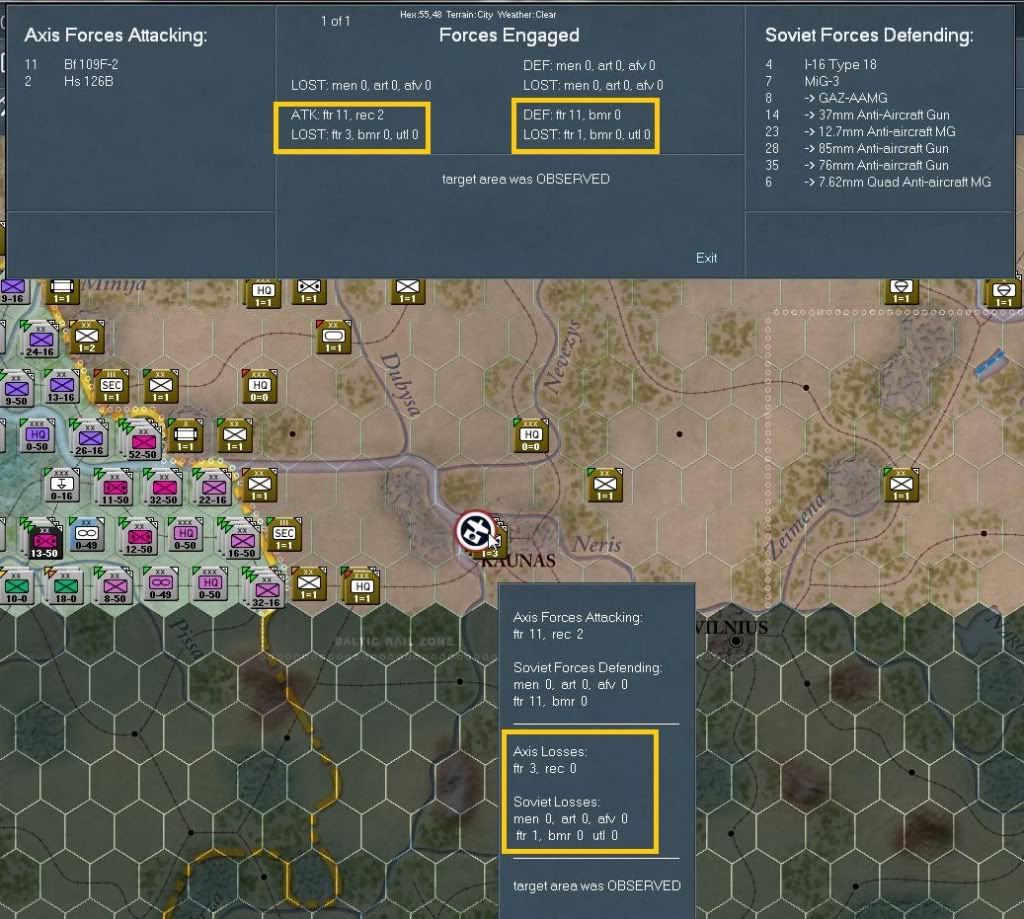
Now it's time to knock down some of the Soviet planes, to do so were are going to use the Bomb airfield mode.

When you click on this button any and all air bases will have a red back ground, you should see something like this:
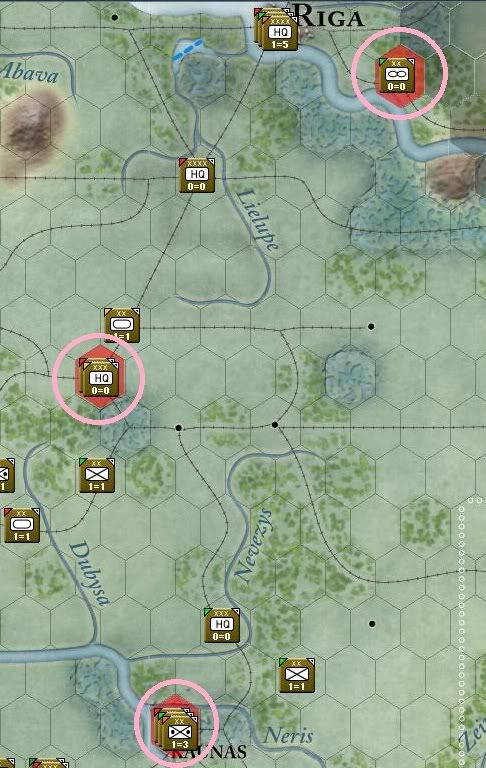
Darn it! Before we started our bombing run I wanted to show you something. Take a quick break and look at the Losses Screen. Our air recon mission cost us 3 fighters and only cost the Soviets 1. We'll rectify that soon.
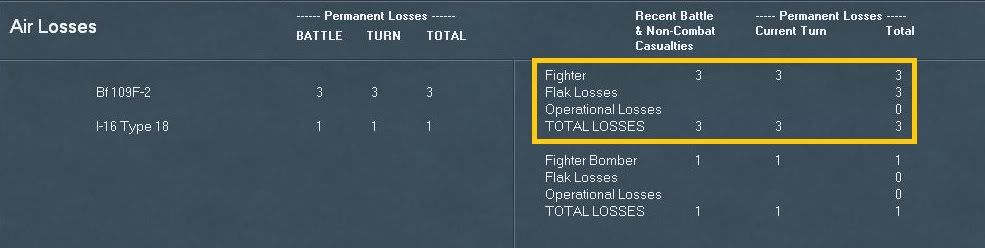
Okay sorry about that, back to our program, now hover the mouse over Kaunas you'll see:
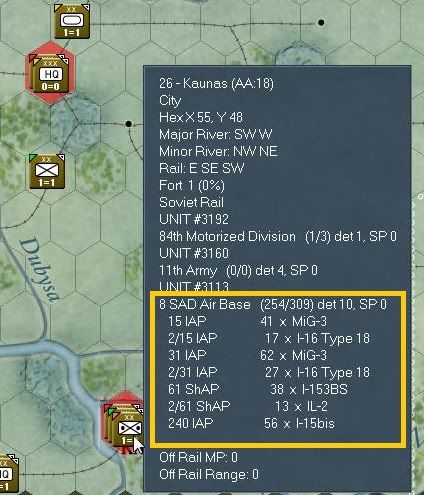
We can see we need to hit the 8 SAD Air Base, it has over 250 aircraft there. Okay, now scroll up and hover the mouse over Siauliai you'll see about 140 aircraft.
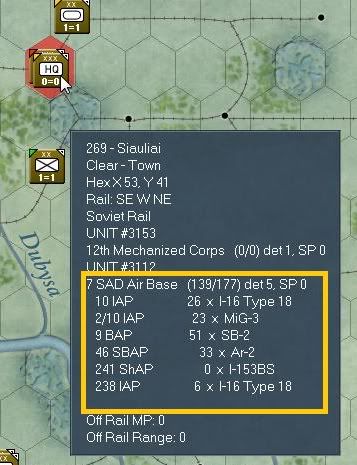
Scroll to Orge and take note that 39 SB-2 are here.
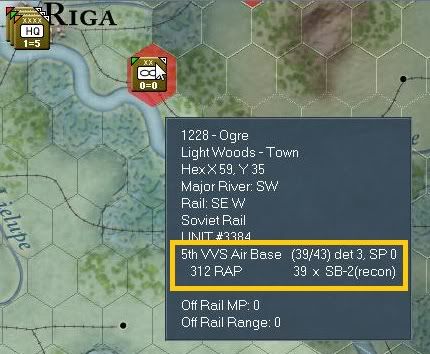
Keep going and look at Cesis, 211 aircraft here.
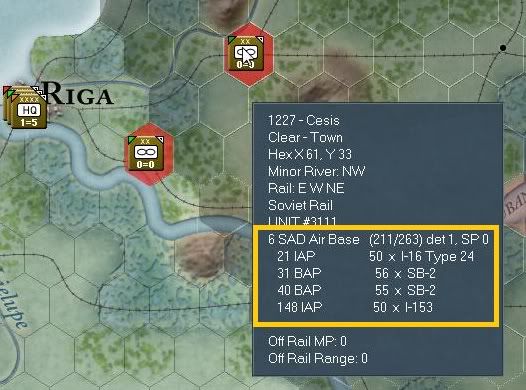
Now head up towards Talinn and check there around 140 aircraft plus shipping.

Okay, since we have FOW off we have the luxury of seeing all this wealth of information (I am so used to playing with FOW on that I am shocked by how much is show, usually I see ??? a lot, lol).
Okay now I want you to hover back over Kaunas and then right click to bomb it. As soon as the combat results window displays click on the Pause text link. When the mission is done you can see the results. Your results may vary but this is what my bomb run looks like:
As you can see the Axis first turn surprise rules are kicking in, don't expect to see these types of results after the first turn or so.
I went ahead and bombed Siauliai but did not catch that in a screen shot, but my results were; Axis lost 1 fighter and 2 bombers and the Soviets lost 58 fighters and 88 bombers.
Now, go back into move mode (F1 or the move mode button) and select hex [x47, y48] and click on the 2nd LW Air Base and bring up the unit detail window.
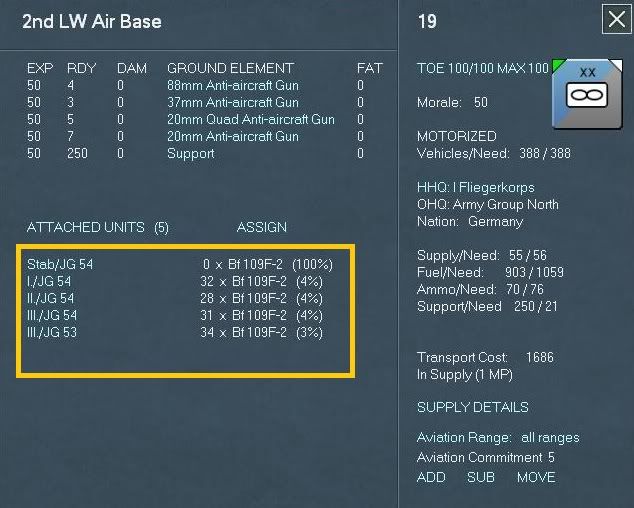
Notice the outlined air groups and you can see each attached air group; for example, I./JG 54 has 32 x Bf109-F2 and a number in parenthesis, most are values at 4% but one the Stab/JG 54 is at 100% since it has no aircraft. These number represent the air miles flown.
Since were in great shape as far as air miles flown and have only made two bombing lets continue on. Instead of a screen shot for each air bombing mission, I'll provide a list of airbase to bomb. I don't like the looks of Kaunas and it's airbase there still is too many planes there so let's begin by bombing it again. I got about 90 Soviet aircraft this time although there still is 32 left, let's bomb Orge and Cesis . I went ahead and bombed Cesis twice and then the map turned red this means that with our current air doctrine the bombers are out of range. Find and select the 2nd LW Air base again and you'll see the percentages of miles flown has increase.
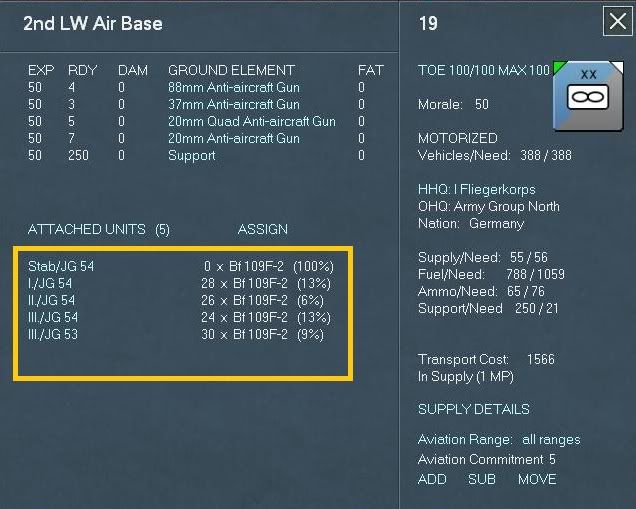
Now locate the 3rd LW Air Base (at hex [44x, y48]) to bring up the unit detail display.
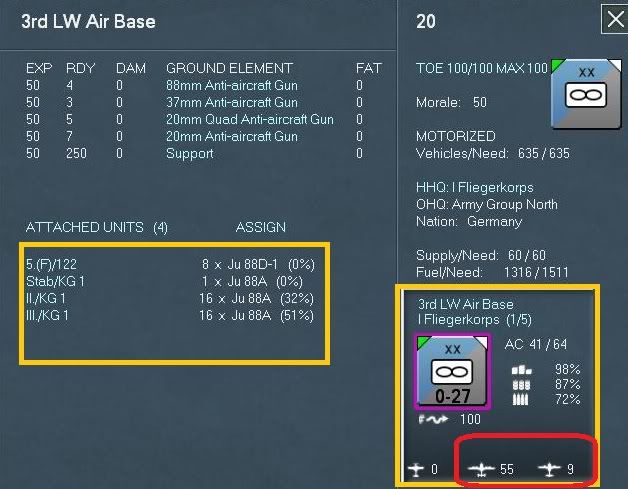
Looking at the air groups we see these aircraft have flown between 0% and up to 51% in air miles.
Over on the right of this screen shot I inserted the graphic from the right hand side unit bar panel. Here we can see that 2% of the supplies had been expended, 13% of the fuel and 28% of the ammo. Also, on the bottom we can see that no fighters are at this base but 55 bombers and 9 other aircraft. The layout is fighter, bomber, and utility (transport and recon) aircraft.
Again, we are looking at the air loss screen to see the final results of our missions so far. Not too bad we lost 19 aircraft, 10 of which are fighters and nine level bombers to the Soviets losses of 458 aircraft. Also, as you can see on the left hand side is a further breakdown of the losses by aircraft elements for both sides.
Now we are ready for some action, but wait I'd like to suggest something to you, it's a very good idea at the start of your turn after you have reviewed yours and your opponents disposition of forces, and examined and setup analyzed your interface and forces to perform Air Recon as part of your first action. For this exercise I told you to deselect FOW, but even with no FOW or with it on and you can physically see the unit that is adjacent to your units, your actually units may not be so fortunate.
If we were to reference section 13 of the manual we would discover what Detection Level (DL) is. Without going into too much detail I am just going to quote the manual here:
"Each unit on the map is automatically assigned a detection level from one to ten, based on factors to include distance from enemy units, covering terrain (6.2.1) and the results of air reconnaissance. A higher detection level will increase the effectiveness of ground and air combat against that unit.
Unit detection levels will change over time and can be influenced by player actions. During the logistics phase, an airbase unit will have its DL decline by one, while non-airbase units will have their DL decline by Die(5). The DL levels of enemy combat units that are adjacent may then increase. Adjacent enemy combat units compare scouting values for the different units to determine changes in DL levels."
So how do we do this? Well what you need to do is to select the Air Recon button (or F5) and then to the left of the AI button click the button with the aircraft on it, part of the screen looks like this:
Red circle means click that first, red square means click that to review the air doctrine, close that when you're done looking at the default levels, if you want more info please check the manual at this point.
Now for our purposes just take a mental note of that gold square around that AI button were going to come back to him in a moment. For now we need to analyze the general situation. To do so click on the Info Screens and then select the OOB, the screen shot below is just a cut-away so we can at a glance see what were up against.
Since this is just a small scenario and were are basically in charge of AGN we can see we only have about 633 total planes with 490 of these ready. There are some in Finland but Finland is frozen right now.
Our Soviet GAI player has 2,624 of which only 1,923 are ready.
Are you ready for some fun? Almost there, first close out the OOB screen and double check the Losses Screen to make sure there are no air losses yet, yours should look like this:
Okay, good no losses now we can begin. Remember the previous screens shot (remember to get back there you need to click the Map Information tab) and once Air Recon is selected go ahead and click on the AI button to let the AI figure out the best usage of the air recon units.
Well that was anti climatic wasn't it? I don't know about you but I only got one mission. Really this makes sense because we are playing with FOW off. Now it’s time to take over the reins. To manually conduct these types of mission all you need to do is be in Air Recon mode and then scan the map and right click on the hex you want to air recon.
Go ahead and hover your mouse over Kaunas and right click to perform an Air Recon mission. Once it's done all the Soviet areas should have turn a darker grey indicating usually (but not always) that the air doctrine is kicking in and no more units can be flown to the target.
Now, go ahead and select the normal mode move (F1) and then click the Show battles report (F11).
Once you click that button the map will display all the battles so far, in this case we have two the air recon missions showing:
Now take your mouse and hover over the battle marker and a pop-up window will display with a summary and if you click on the battle marker then a combat resolution window will display. In the following screen show you can see both show the losses of the missions.
Now it's time to knock down some of the Soviet planes, to do so were are going to use the Bomb airfield mode.
When you click on this button any and all air bases will have a red back ground, you should see something like this:
Darn it! Before we started our bombing run I wanted to show you something. Take a quick break and look at the Losses Screen. Our air recon mission cost us 3 fighters and only cost the Soviets 1. We'll rectify that soon.
Okay sorry about that, back to our program, now hover the mouse over Kaunas you'll see:
We can see we need to hit the 8 SAD Air Base, it has over 250 aircraft there. Okay, now scroll up and hover the mouse over Siauliai you'll see about 140 aircraft.
Scroll to Orge and take note that 39 SB-2 are here.
Keep going and look at Cesis, 211 aircraft here.
Now head up towards Talinn and check there around 140 aircraft plus shipping.
Okay, since we have FOW off we have the luxury of seeing all this wealth of information (I am so used to playing with FOW on that I am shocked by how much is show, usually I see ??? a lot, lol).
Okay now I want you to hover back over Kaunas and then right click to bomb it. As soon as the combat results window displays click on the Pause text link. When the mission is done you can see the results. Your results may vary but this is what my bomb run looks like:
As you can see the Axis first turn surprise rules are kicking in, don't expect to see these types of results after the first turn or so.
I went ahead and bombed Siauliai but did not catch that in a screen shot, but my results were; Axis lost 1 fighter and 2 bombers and the Soviets lost 58 fighters and 88 bombers.
Now, go back into move mode (F1 or the move mode button) and select hex [x47, y48] and click on the 2nd LW Air Base and bring up the unit detail window.
Notice the outlined air groups and you can see each attached air group; for example, I./JG 54 has 32 x Bf109-F2 and a number in parenthesis, most are values at 4% but one the Stab/JG 54 is at 100% since it has no aircraft. These number represent the air miles flown.
Since were in great shape as far as air miles flown and have only made two bombing lets continue on. Instead of a screen shot for each air bombing mission, I'll provide a list of airbase to bomb. I don't like the looks of Kaunas and it's airbase there still is too many planes there so let's begin by bombing it again. I got about 90 Soviet aircraft this time although there still is 32 left, let's bomb Orge and Cesis . I went ahead and bombed Cesis twice and then the map turned red this means that with our current air doctrine the bombers are out of range. Find and select the 2nd LW Air base again and you'll see the percentages of miles flown has increase.
Now locate the 3rd LW Air Base (at hex [44x, y48]) to bring up the unit detail display.
Looking at the air groups we see these aircraft have flown between 0% and up to 51% in air miles.
Over on the right of this screen shot I inserted the graphic from the right hand side unit bar panel. Here we can see that 2% of the supplies had been expended, 13% of the fuel and 28% of the ammo. Also, on the bottom we can see that no fighters are at this base but 55 bombers and 9 other aircraft. The layout is fighter, bomber, and utility (transport and recon) aircraft.
Again, we are looking at the air loss screen to see the final results of our missions so far. Not too bad we lost 19 aircraft, 10 of which are fighters and nine level bombers to the Soviets losses of 458 aircraft. Also, as you can see on the left hand side is a further breakdown of the losses by aircraft elements for both sides.
Beta Tester for: War in the East 1 & 2, WarPlan & WarPlan Pacific, Valor & Victory, Flashpoint Campaigns: Sudden Storm, Computer War In Europe 2
SPWW2 & SPMBT scenario creator
RE: Operational Boot Camp (tutorial)
We are now ready for combat (or it's about freaking time!)
Like I have said earlier there is always more ways to skin a cat, and everybody will have their own style of play. I like to do all of the preceding to prep for my turn and get ready for the best part of the game “Ground warfare”.
Since this is a large and detailed game, and since I developed a habit way back in the late seventies when playing paper board war games, I have always started in one direction and moved in the opposite direction, usually this is north to south. War in the East is no exception; however we have a wealth of tools to assist us in analyzing the map, forces and units to achieve final victory.
First let’s open up the Victory Points screen to get a clue of what it takes to win this scenario.
This display tells us a lot of information, first we need to capture Talinn, Pskov, Velikie Luki, Novgorod, Pushkin, Leningrad, Ladeynoe Pole, Vyshny Volocheck and Rzhev to gain victory points for the Axis side. We also have to bear in mind that the longer the Soviets hold Leningrad, NW Leningrad and Pavlovo they gain victory points for the Soviet side. On top of all this the more losses we inflict on the Soviets the more victory points we gain, which is offset by the losses the Soviets inflict on us.
So far all we have done is run Air Recon and bombed a few airbases, but as you can see we already have scored 18 points to the Soviet's 1 victory point. Essentially the way this works is for each side the scenario designer setup the losses per victory points, so in this screen we can see that for the Axis to gain a victory point they need to cause 1000 men to be lost, or for every 100 guns destroyed they gain a victory point, for every 10 AFV eliminated the Axis gains a victory point. and finally for every 5 aircraft destroyed a victory point is achieved. Now look to the right and view what the Soviets gain for causing Axis casualties, it's pretty even for this scenario but others may have victory points assigned per loss.
Beta Tester for: War in the East 1 & 2, WarPlan & WarPlan Pacific, Valor & Victory, Flashpoint Campaigns: Sudden Storm, Computer War In Europe 2
SPWW2 & SPMBT scenario creator
RE: Operational Boot Camp (tutorial)
The Big Picture (or what the hell did not start here in the first place?)
Okay, for this next section some people might be scratching their heads and asking why the heck was this portion not up front? That's a valid question and it's really just a personal preference of mine, I guess you can blame it on board war games where we had to learn the rules via a rule book to understand how to move and fight before really looking at the map and understanding or discovering strategies and tactics and how to win. First of all take a look at the map and visually look at some of the distances we need to cover, to do this uncheck all the visual clues we had previously checked and zoom the map out and finally click the Toggle victory locations button.

In this screen shot, the pink is just showing which buttons to deselect and the red is to show you which button to select, in this case the toggle button. Also, in this shot is a gold rectangle that you can click to hide all on map units.
With all those settings cleared and zoomed out we can now see at a glance where we have to go and how far. If we zoom in a level and place the units back on the map we know see this:
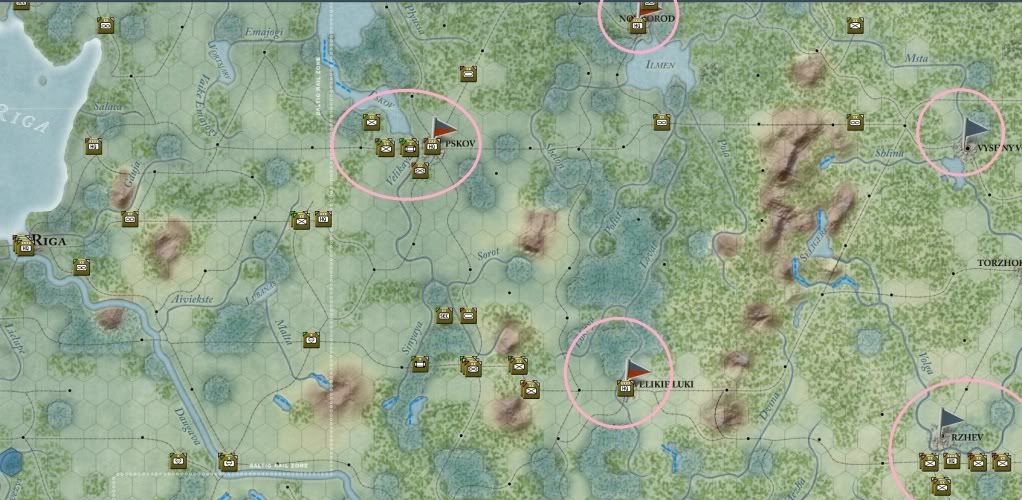
I selected in pink the areas we need to capture to win victory points.
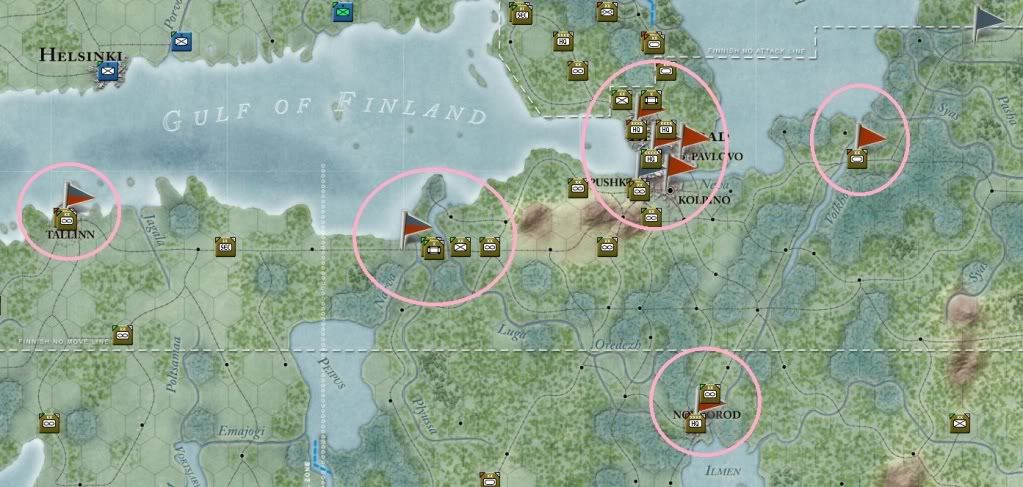
This is just more of the same further north, or where the real victory points lie.
Okay, now that we have the big picture of what we need to do and where we need to go it's time to start getting there.
Okay, for this next section some people might be scratching their heads and asking why the heck was this portion not up front? That's a valid question and it's really just a personal preference of mine, I guess you can blame it on board war games where we had to learn the rules via a rule book to understand how to move and fight before really looking at the map and understanding or discovering strategies and tactics and how to win. First of all take a look at the map and visually look at some of the distances we need to cover, to do this uncheck all the visual clues we had previously checked and zoom the map out and finally click the Toggle victory locations button.
In this screen shot, the pink is just showing which buttons to deselect and the red is to show you which button to select, in this case the toggle button. Also, in this shot is a gold rectangle that you can click to hide all on map units.
With all those settings cleared and zoomed out we can now see at a glance where we have to go and how far. If we zoom in a level and place the units back on the map we know see this:
I selected in pink the areas we need to capture to win victory points.
This is just more of the same further north, or where the real victory points lie.
Okay, now that we have the big picture of what we need to do and where we need to go it's time to start getting there.
Beta Tester for: War in the East 1 & 2, WarPlan & WarPlan Pacific, Valor & Victory, Flashpoint Campaigns: Sudden Storm, Computer War In Europe 2
SPWW2 & SPMBT scenario creator
RE: Operational Boot Camp (tutorial)
Forward March (or Halt or I'll Shoot)
Okay, you may or may not have turned on all the visual clues that I suggested above but all my screen shots will have them on from here on.
Now this next subject is open to debate no matter which way you cut it. Everyone will have their own preferences on how to run the show and others will have more or less experience on the correct way to handle these things. But from my perspective these tips, tricks, and suggestions should help any newbie get the basics of this game down. Hopefully there is enough meat in here for medium to advanced players.
What I like to do in this section of the front is to open up a hole in the Soviet lines so I can get the panzer and motorized units through the gap to pocket (encircle) as many Soviets units as possible. Other testers probably have much more efficient ways of doing things and I don't claim to be a top German player. 1943 combat that is another story.
I am going to try to open up a hole by clobbering the Soviet line with a series of Deliberate Attacks. For much more detail take a look at section 15 in your field manual.
What I suggest is that you hover your mouse over the map across the Soviet front lines, what you're looking for is the type of terrain the unit(s) are in, the fort level and what kind of units are defending that hex, also I cycle through the soft factors to get an idea of the supply and or fuel levels as well. For a new beginner it is also probably a good idea to cycle through all the soft factors to really read the map and units to get a good understanding of things.
Okay, all across the line the Soviets are really weak, but we need a hole to get the panzers through so let's start with that. One obvious places is in hex [x48, y45] where the Soviet 125th Rifle Division (from now on RD) is located. This hex is clear terrain and the fort level is 2 at (0%). As per the manual (15.3.2) this indicates that this unit is at fort level 2 with 0% construction completed to get to fort level 3. See the following screen shot.
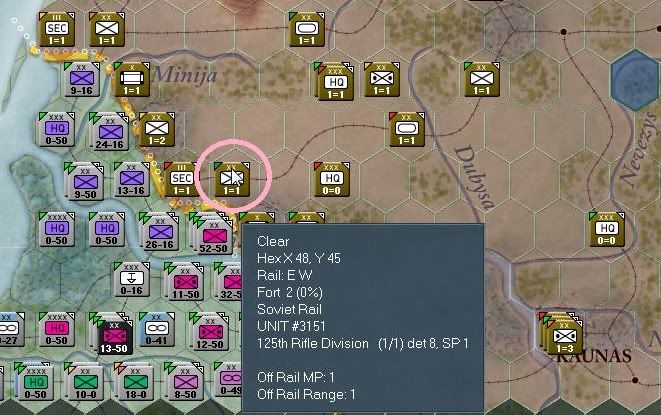
Okay, a side note here, the combat model is very detailed and I don't think I can do justice in trying to explain it so I am just going to quote the manual from page 209 or section 15.6.1.
"Ground combat is conducted by an automated tactical combat system that consists of a variable number of rounds where ground elements engage each other. In general, the computer first determines the opening range at which combat will take place. This is largely based on defending terrain, with battles in city and urban hexes commencing at shorter initial ranges."
and
"The next step is to determine which ground elements will be able to fire. There are multiple factors involved, to include the type of attack (hasty or deliberate), enemy unit detection level (DL), defending fortification modifier, attacking unit morale and supply status (especially ammo), individual ground element experience, fatigue, ammo usage and range of their equipped devices, and leader initiative and ground combat rating (mech or infantry) checks (11.3)."
There are four more paragraphs so for much greater information please reference 15.6 in the manual.
First, go ahead and select the stack at hex x48, y46 (the gold circle) that contains the 269th ID, 6th PzD and 1st PzD (the pink circle is the Soviet 125th RD).
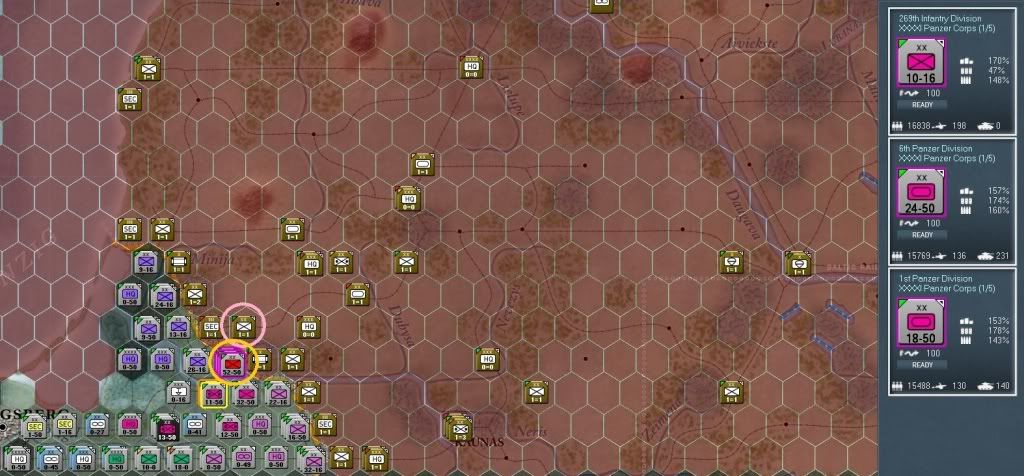
Now deselect the two PzD, to do this you left click an empty space within the unit bar (on the right) for the unit you don't want to move or attack with. Okay, the reason we don't want to include the panzer divisions is because we don't want to eat up their fuel nor take any unnecessary tank losses.
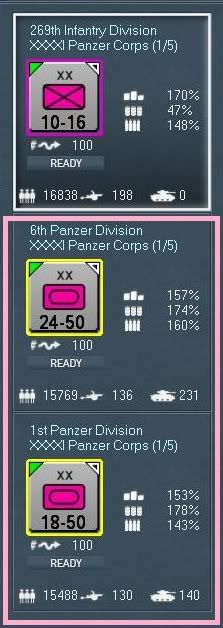
You can tell that a unit is deselected because the white bar disappears and the background lightens, in the screen shot above I placed a pink rectangle around the units to show that they are deselected.
Now before we make the attack, on the unit bar click on the selected 269th ID name to bring up the unit detail display.
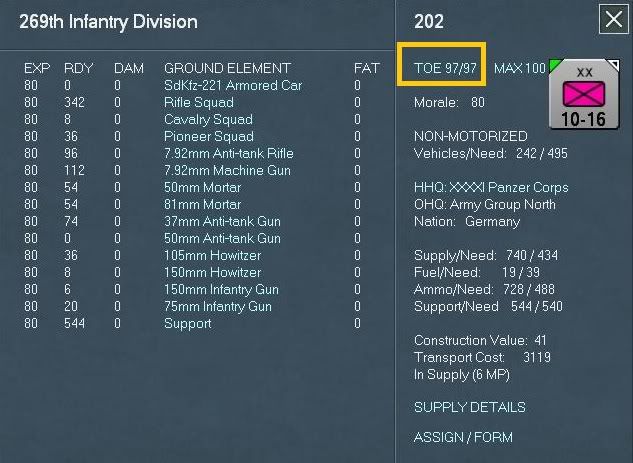
Look at the TOE it shows 97/97 which is pretty good, every ground element has 0 fatigue and there are no damaged elements. Now click the text link for TOE to bring up the TOE detail display.
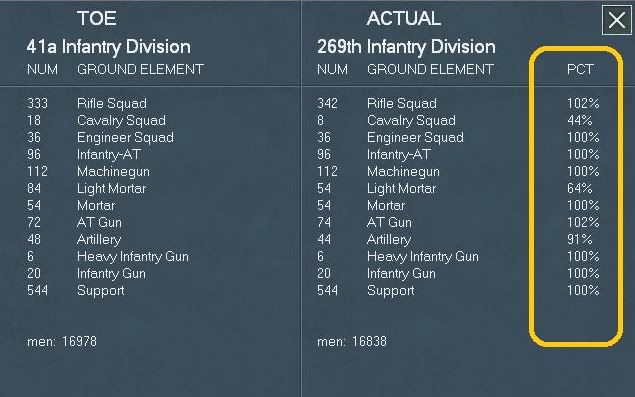
Here we are just confirming the details for the percent of ground elements actually in the TOE. As you can see some units are at 100%, others below 100% and two are above 100%, close those displays till you get back to the 269th ID and select Assign/Form to see what support units might be available.
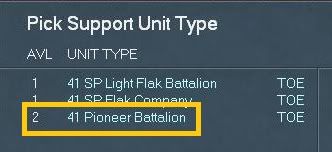
As we can see we have two Pioneer battalions we could assign to the 269th ID. Click on the Pioneer TOE text link to view the TOE of a unit of this type.
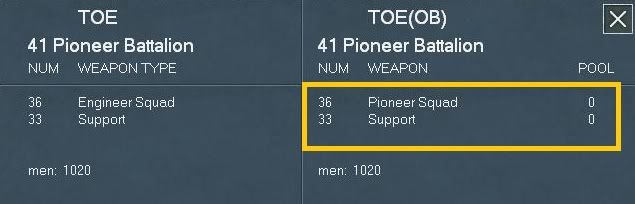
Here we can see the TOE is 36 Pioneer squads and 33 Support squads. For now let's not assign this battalion directly to the 269th ID. When we choose to do that, then the HQ of the Corps will, if it can pass certain checks and then allocate the support units to those combat units that are its command range.
The default attack method in move mode is the Hasty Attack (15.2.1) see the screen shot to see the icon for a hasty attack. Essentially this is a attack on the march or without any preparation.

Okay, now in order to perform a Deliberate Attack (15.2.2), which essentially is a pre-planned attack, you can do one of two things:
1. You can click the menu item for this up on the menu bar:
2. You can hold down the shift key while hovering over the hex you want to attack with the mouse.
When using either method a proper deliberate attack icon will show like this:
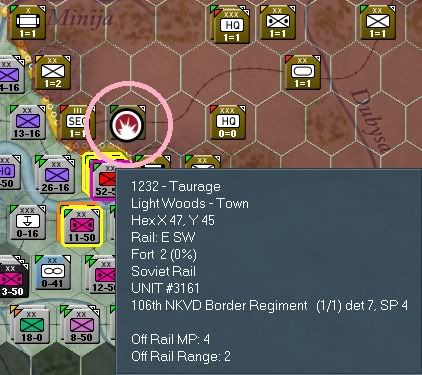
I personally prefer the shift key method over clicking on the toggle button.
Okay go ahead and use which ever method your most comfortable with and perform a deliberate attack on the 125th Soviet RD hex. Try to click the Pause text in the combat resolution display (5.4.11) so you can view and analyze this or use my screen shot if you don't catch it in time.
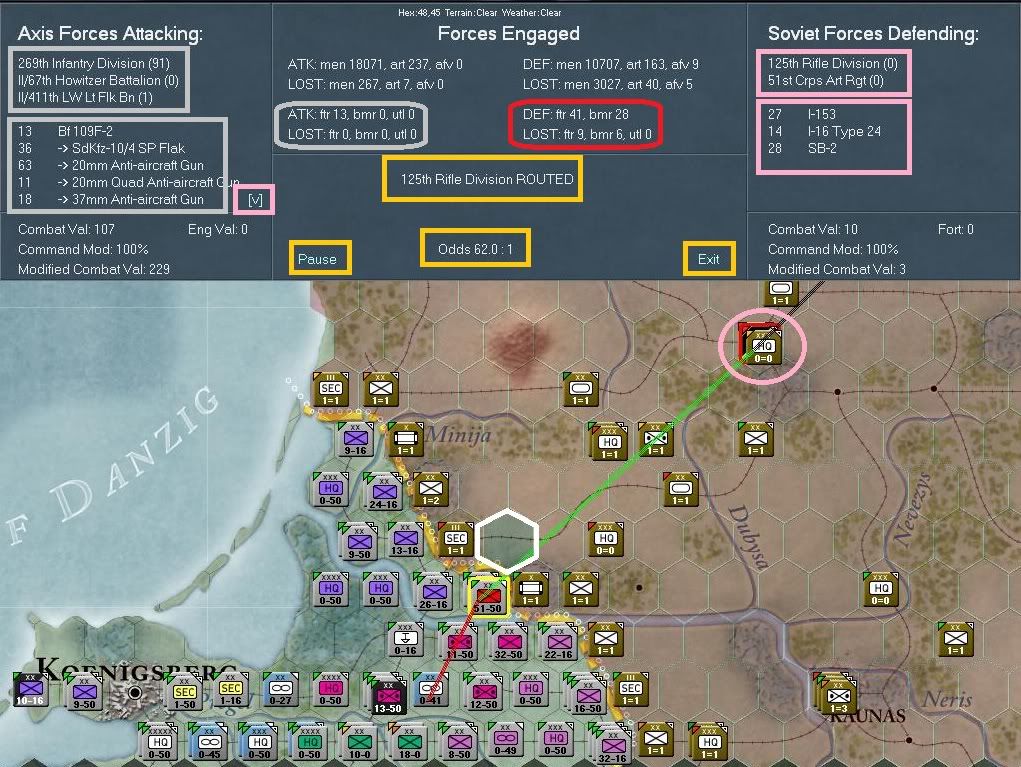
Depending on a bunch of factors you may or may not have gotten the same results as I did (Routed, see 15.9.4). As you can see from my screen shot there is a lot going on here. The default red line from the 3rd LW Airbase to the target hex and the green line going from the Soviet line into the target hex are performed by the air support system. The rest is my horrid art work.
Let's go through various items shall we? We'll start at the top and work our way across and down.
Beginning with the Combat Resolution Report (5.4.11) there are three main sections, the Axis panel on the left, the forces engaged info panel in the middle and the Soviet panel on the right. The grey rectangles in the Axis panel show the attacking ground and air units, the total combat value , the command modifier and the final modified combat value. The Soviet panel is exactly the same but with regards to the Soviet units involved. Sometimes if the list of units is too long a down/up arrow will display as indicated by the pink square in the Axis panel.
In the Forces Engaged panel this is also split between the Axis on the left and the Soviets on the right and then first two lines are the ground units involved and the last two are the air units involved in the battle. So in effect this will give you a high level combat results table in one screen. Now if you set the preferences to show the actually squad and artillery units firing you could be here for quite some time watching the battle go on.
Underneath the engaged units is the results list outlined in a gold rectangle of mine, ad it shows the 125th RD has been Routed. Directly underneath that is the odds, to the left of which is the Pause text link and to the right is the Exit text link.
On the map you can see a white hexagon and a pink circle, the white hexagon is where the 125th RD used to be and the pink circle is where the unit routed to 70 miles away.
As I said earlier the red and green lines are where the airbases were sending air support from. Hopefully the rest of this screen shot is pretty understandable.
Let's pause briefly and closely examine the 269th ID and how this one deliberate attack effected it, his supply and the resulting losses to this point. Please select the same hex we just attacked from and click on the 269th ID text link in the unit bar to bring up the unit details display.
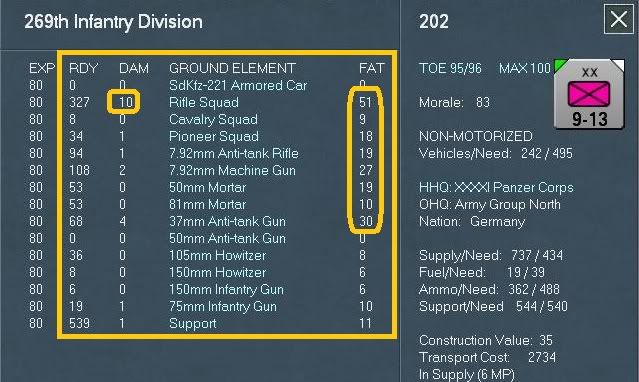
Examine this unit and notice the gold rectangles showing the damaged units and their fatigue. Also note in the upper left of the counter a soft fact which is green. When done click on the Supply/Details text link to bring up the Supply Detail display.
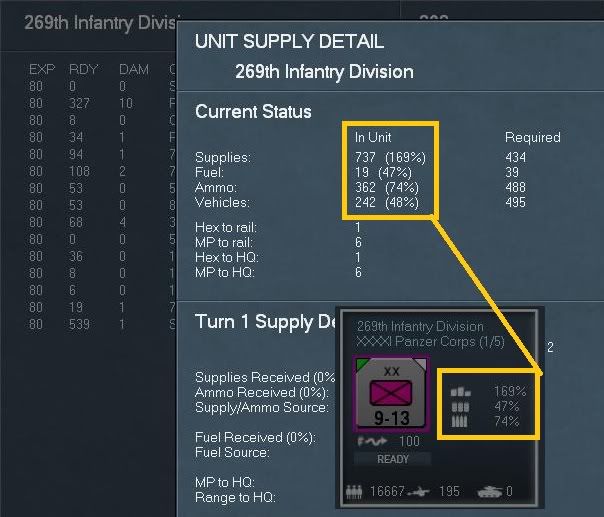
Examine the in unit, required and notice on the unit bar (on the right side) these numbers reflect what is placed there. When done click on the Info Screen tab and select the Show Losses to bring up the Losses Display.
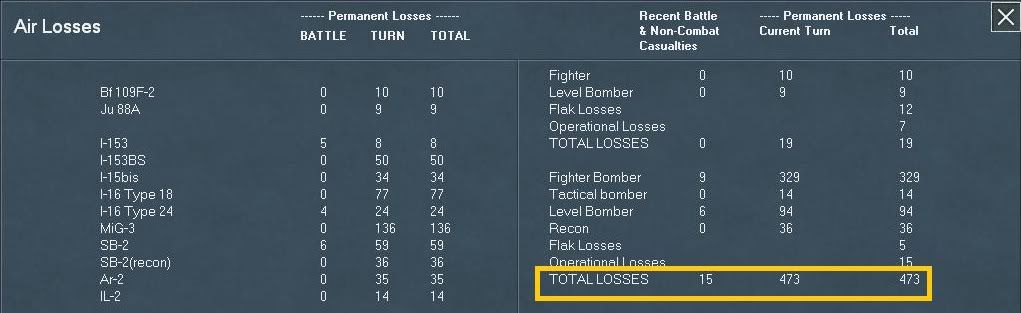
Notice that from just this one battle a few more Soviet planes were intercepted and destroyed. Now toggle to select the ground losses.
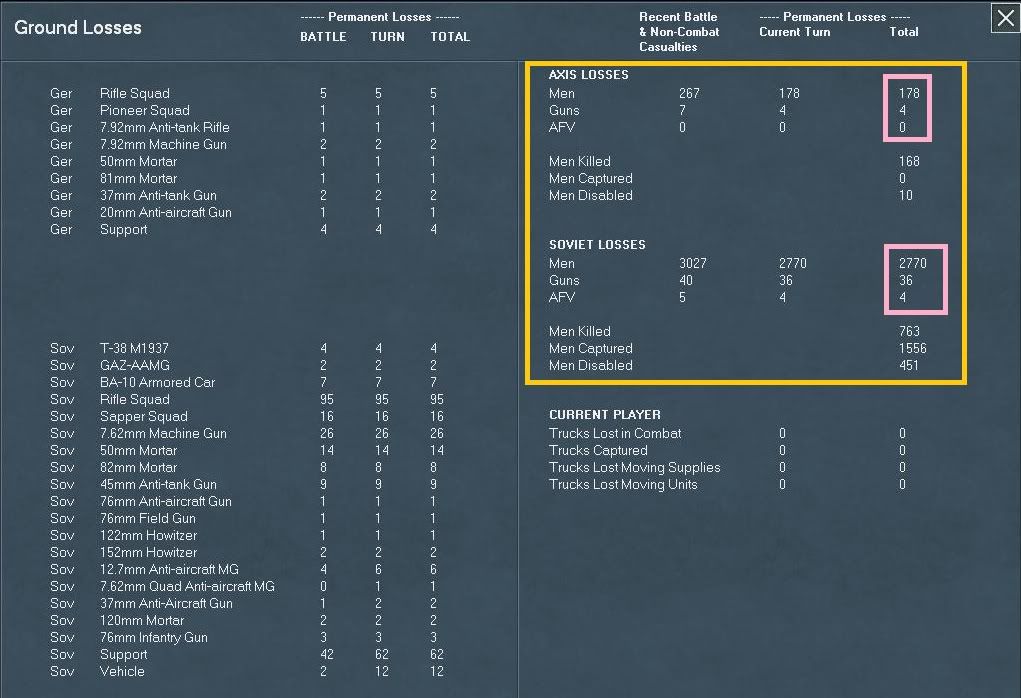
Examine the losses for the battle just waged in the pink rectangles.
Now, we really need to clear that rail line hex x47, y45 that has the 106th NKVD Border Regiment in it. The reason for this is we are going to use that rail line eventually for one of main supply spurs going into Riga and since we only have 17 turns we need to get a move on this as quickly as possible, therefore we need to clear that rail line ASAP.
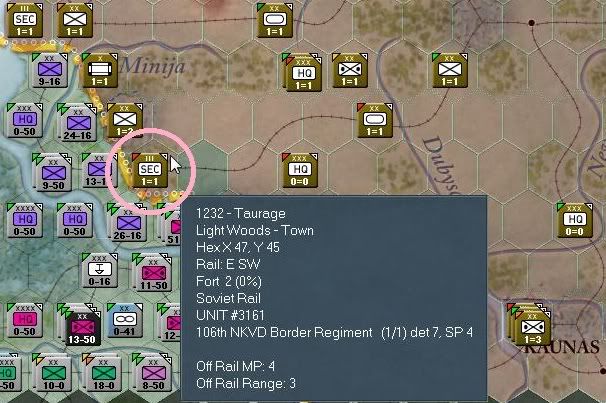
Okay, the above hex can be attacked from three directions, so how do you know which one to use? Good question, what I have found is that the 1st and 6th PzD will be out moving the 269th ID really soon and we need to keep the HQ that is managing the supplies and fuel and our C2 within five hexes of those fast movers, so eventually we we'll reassign the 269th ID to an infantry formation, since we know that you guessed were the attack will come from.
Go ahead and select our first hex we attacked from (x48, y46) and deselect the two PzD again and perform a deliberate attack.
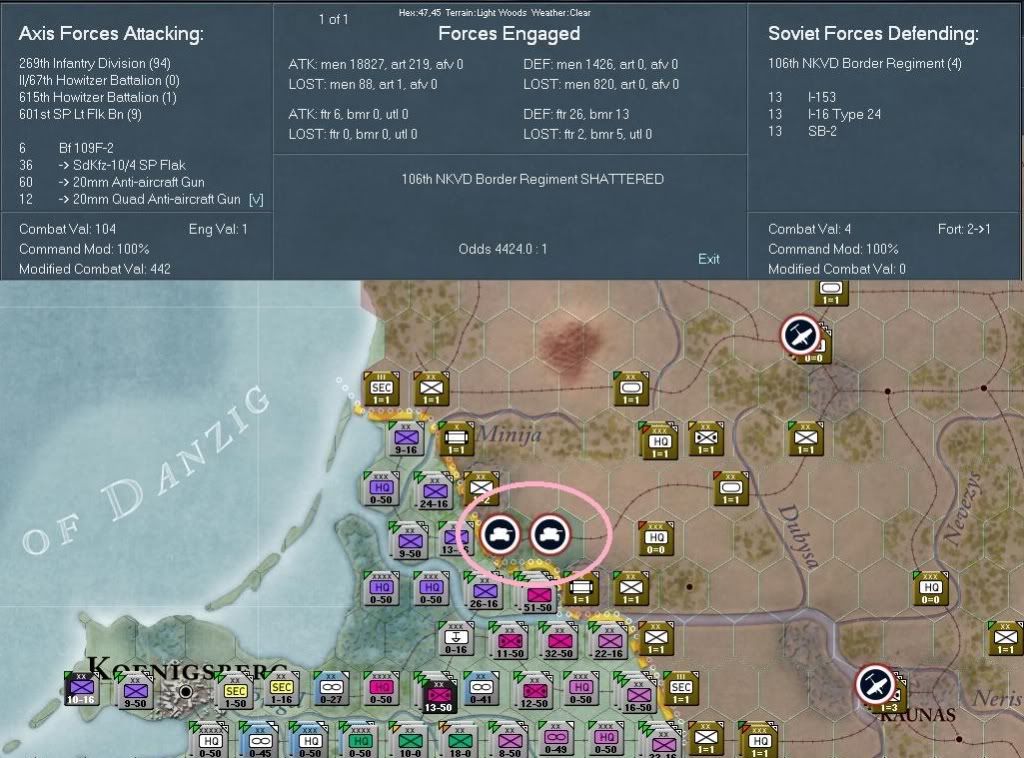
Ops, I thought I clicked pause but I did not, so like I have said there is always more ways to skin a cat, just hit either the F11 button or on the menu click the Show battles sites toggle. Well we cleared the hex and this time our result was Shattered (15.9.2). I'll show you where this unit went to in a little bit.
Okay, now we have a 20 mile gap in the Soviet line this is a good start.
Before we proceed further lets analyze the 269th ID once more after two battles. You should have the routine down by now so bring up the unit detail display for the 269th ID.
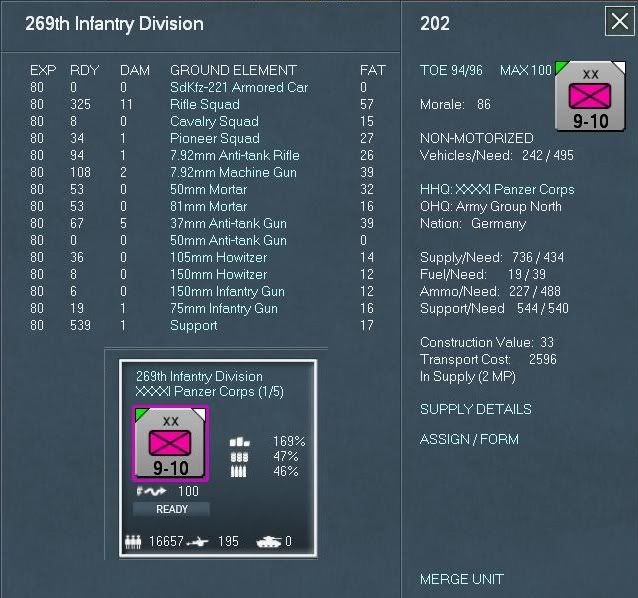
Here we can see that the 269th ID is not starting to suffer from fatigue and a few loses, note the supply, fuel and ammo expended in these two attacks.. When done click on the TOE text link to bring up the TOE detail display.

As before the items on the left are the TOE and on the right what the unit actually has. So far just the cavalry squads and light mortars have taken some hits. Also, as the gold rectangle on the bottom of the panel shows the men at full TOE and current.
Before we continue on lets briefly review. Click on the Info Screen and select the Loss Report, yours should look something like:
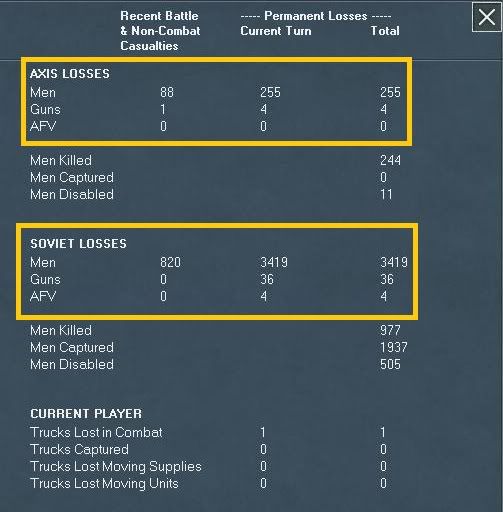
As you can see losses are starting to mount. Go ahead and click the air loss toggle button (down at the bottom of this display).
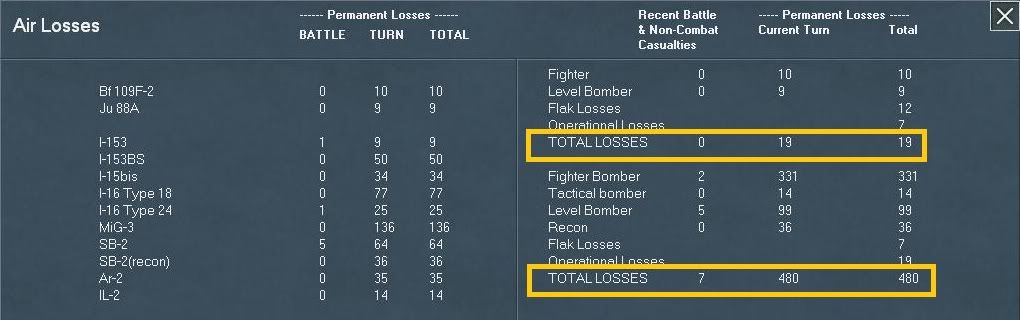
And so are the aircraft losses.
Now, remember when we attacked the 106th NKVD Border Regiment and we did not see where it relocated? If you toggle the Destroy Units button and then click the blue plus sign (+) then the mystery is solved:
Okay, you may or may not have turned on all the visual clues that I suggested above but all my screen shots will have them on from here on.
Now this next subject is open to debate no matter which way you cut it. Everyone will have their own preferences on how to run the show and others will have more or less experience on the correct way to handle these things. But from my perspective these tips, tricks, and suggestions should help any newbie get the basics of this game down. Hopefully there is enough meat in here for medium to advanced players.
What I like to do in this section of the front is to open up a hole in the Soviet lines so I can get the panzer and motorized units through the gap to pocket (encircle) as many Soviets units as possible. Other testers probably have much more efficient ways of doing things and I don't claim to be a top German player. 1943 combat that is another story.
I am going to try to open up a hole by clobbering the Soviet line with a series of Deliberate Attacks. For much more detail take a look at section 15 in your field manual.
What I suggest is that you hover your mouse over the map across the Soviet front lines, what you're looking for is the type of terrain the unit(s) are in, the fort level and what kind of units are defending that hex, also I cycle through the soft factors to get an idea of the supply and or fuel levels as well. For a new beginner it is also probably a good idea to cycle through all the soft factors to really read the map and units to get a good understanding of things.
Okay, all across the line the Soviets are really weak, but we need a hole to get the panzers through so let's start with that. One obvious places is in hex [x48, y45] where the Soviet 125th Rifle Division (from now on RD) is located. This hex is clear terrain and the fort level is 2 at (0%). As per the manual (15.3.2) this indicates that this unit is at fort level 2 with 0% construction completed to get to fort level 3. See the following screen shot.
Okay, a side note here, the combat model is very detailed and I don't think I can do justice in trying to explain it so I am just going to quote the manual from page 209 or section 15.6.1.
"Ground combat is conducted by an automated tactical combat system that consists of a variable number of rounds where ground elements engage each other. In general, the computer first determines the opening range at which combat will take place. This is largely based on defending terrain, with battles in city and urban hexes commencing at shorter initial ranges."
and
"The next step is to determine which ground elements will be able to fire. There are multiple factors involved, to include the type of attack (hasty or deliberate), enemy unit detection level (DL), defending fortification modifier, attacking unit morale and supply status (especially ammo), individual ground element experience, fatigue, ammo usage and range of their equipped devices, and leader initiative and ground combat rating (mech or infantry) checks (11.3)."
There are four more paragraphs so for much greater information please reference 15.6 in the manual.
First, go ahead and select the stack at hex x48, y46 (the gold circle) that contains the 269th ID, 6th PzD and 1st PzD (the pink circle is the Soviet 125th RD).
Now deselect the two PzD, to do this you left click an empty space within the unit bar (on the right) for the unit you don't want to move or attack with. Okay, the reason we don't want to include the panzer divisions is because we don't want to eat up their fuel nor take any unnecessary tank losses.
You can tell that a unit is deselected because the white bar disappears and the background lightens, in the screen shot above I placed a pink rectangle around the units to show that they are deselected.
Now before we make the attack, on the unit bar click on the selected 269th ID name to bring up the unit detail display.
Look at the TOE it shows 97/97 which is pretty good, every ground element has 0 fatigue and there are no damaged elements. Now click the text link for TOE to bring up the TOE detail display.
Here we are just confirming the details for the percent of ground elements actually in the TOE. As you can see some units are at 100%, others below 100% and two are above 100%, close those displays till you get back to the 269th ID and select Assign/Form to see what support units might be available.
As we can see we have two Pioneer battalions we could assign to the 269th ID. Click on the Pioneer TOE text link to view the TOE of a unit of this type.
Here we can see the TOE is 36 Pioneer squads and 33 Support squads. For now let's not assign this battalion directly to the 269th ID. When we choose to do that, then the HQ of the Corps will, if it can pass certain checks and then allocate the support units to those combat units that are its command range.
The default attack method in move mode is the Hasty Attack (15.2.1) see the screen shot to see the icon for a hasty attack. Essentially this is a attack on the march or without any preparation.
Okay, now in order to perform a Deliberate Attack (15.2.2), which essentially is a pre-planned attack, you can do one of two things:
1. You can click the menu item for this up on the menu bar:
2. You can hold down the shift key while hovering over the hex you want to attack with the mouse.
When using either method a proper deliberate attack icon will show like this:
I personally prefer the shift key method over clicking on the toggle button.
Okay go ahead and use which ever method your most comfortable with and perform a deliberate attack on the 125th Soviet RD hex. Try to click the Pause text in the combat resolution display (5.4.11) so you can view and analyze this or use my screen shot if you don't catch it in time.
Depending on a bunch of factors you may or may not have gotten the same results as I did (Routed, see 15.9.4). As you can see from my screen shot there is a lot going on here. The default red line from the 3rd LW Airbase to the target hex and the green line going from the Soviet line into the target hex are performed by the air support system. The rest is my horrid art work.
Let's go through various items shall we? We'll start at the top and work our way across and down.
Beginning with the Combat Resolution Report (5.4.11) there are three main sections, the Axis panel on the left, the forces engaged info panel in the middle and the Soviet panel on the right. The grey rectangles in the Axis panel show the attacking ground and air units, the total combat value , the command modifier and the final modified combat value. The Soviet panel is exactly the same but with regards to the Soviet units involved. Sometimes if the list of units is too long a down/up arrow will display as indicated by the pink square in the Axis panel.
In the Forces Engaged panel this is also split between the Axis on the left and the Soviets on the right and then first two lines are the ground units involved and the last two are the air units involved in the battle. So in effect this will give you a high level combat results table in one screen. Now if you set the preferences to show the actually squad and artillery units firing you could be here for quite some time watching the battle go on.
Underneath the engaged units is the results list outlined in a gold rectangle of mine, ad it shows the 125th RD has been Routed. Directly underneath that is the odds, to the left of which is the Pause text link and to the right is the Exit text link.
On the map you can see a white hexagon and a pink circle, the white hexagon is where the 125th RD used to be and the pink circle is where the unit routed to 70 miles away.
As I said earlier the red and green lines are where the airbases were sending air support from. Hopefully the rest of this screen shot is pretty understandable.
Let's pause briefly and closely examine the 269th ID and how this one deliberate attack effected it, his supply and the resulting losses to this point. Please select the same hex we just attacked from and click on the 269th ID text link in the unit bar to bring up the unit details display.
Examine this unit and notice the gold rectangles showing the damaged units and their fatigue. Also note in the upper left of the counter a soft fact which is green. When done click on the Supply/Details text link to bring up the Supply Detail display.
Examine the in unit, required and notice on the unit bar (on the right side) these numbers reflect what is placed there. When done click on the Info Screen tab and select the Show Losses to bring up the Losses Display.
Notice that from just this one battle a few more Soviet planes were intercepted and destroyed. Now toggle to select the ground losses.
Examine the losses for the battle just waged in the pink rectangles.
Now, we really need to clear that rail line hex x47, y45 that has the 106th NKVD Border Regiment in it. The reason for this is we are going to use that rail line eventually for one of main supply spurs going into Riga and since we only have 17 turns we need to get a move on this as quickly as possible, therefore we need to clear that rail line ASAP.
Okay, the above hex can be attacked from three directions, so how do you know which one to use? Good question, what I have found is that the 1st and 6th PzD will be out moving the 269th ID really soon and we need to keep the HQ that is managing the supplies and fuel and our C2 within five hexes of those fast movers, so eventually we we'll reassign the 269th ID to an infantry formation, since we know that you guessed were the attack will come from.
Go ahead and select our first hex we attacked from (x48, y46) and deselect the two PzD again and perform a deliberate attack.
Ops, I thought I clicked pause but I did not, so like I have said there is always more ways to skin a cat, just hit either the F11 button or on the menu click the Show battles sites toggle. Well we cleared the hex and this time our result was Shattered (15.9.2). I'll show you where this unit went to in a little bit.
Okay, now we have a 20 mile gap in the Soviet line this is a good start.
Before we proceed further lets analyze the 269th ID once more after two battles. You should have the routine down by now so bring up the unit detail display for the 269th ID.
Here we can see that the 269th ID is not starting to suffer from fatigue and a few loses, note the supply, fuel and ammo expended in these two attacks.. When done click on the TOE text link to bring up the TOE detail display.
As before the items on the left are the TOE and on the right what the unit actually has. So far just the cavalry squads and light mortars have taken some hits. Also, as the gold rectangle on the bottom of the panel shows the men at full TOE and current.
Before we continue on lets briefly review. Click on the Info Screen and select the Loss Report, yours should look something like:
As you can see losses are starting to mount. Go ahead and click the air loss toggle button (down at the bottom of this display).
And so are the aircraft losses.
Now, remember when we attacked the 106th NKVD Border Regiment and we did not see where it relocated? If you toggle the Destroy Units button and then click the blue plus sign (+) then the mystery is solved:
Beta Tester for: War in the East 1 & 2, WarPlan & WarPlan Pacific, Valor & Victory, Flashpoint Campaigns: Sudden Storm, Computer War In Europe 2
SPWW2 & SPMBT scenario creator
RE: Operational Boot Camp (tutorial)
Place holder
for
Shifting Gears (or What happened to Forward March?)
for
Shifting Gears (or What happened to Forward March?)
Beta Tester for: War in the East 1 & 2, WarPlan & WarPlan Pacific, Valor & Victory, Flashpoint Campaigns: Sudden Storm, Computer War In Europe 2
SPWW2 & SPMBT scenario creator

RE: Operational Boot Camp (tutorial)
dlazov66,
Thank you very much for your hard, instructive and amazing work !.. Keep up, the newbies like me will be in debt with you.
Best of wishes
Ramón
Thank you very much for your hard, instructive and amazing work !.. Keep up, the newbies like me will be in debt with you.
Best of wishes
Ramón
WITP-AE, WITE
RE: Operational Boot Camp (tutorial)
I also want to extend my BIG BIG thanks for this great tutorial! It was more than I could have hoped for and really opened up the game for me. Looking forward to the next part [:)]

RE: Operational Boot Camp (tutorial)
Terrific tutorial! Can I trouble you with a couple questions?
1. In the ground attacks you just conducted, you chose not to assign the Pioneer Battalion or Flak Battalion units directly to the 269th ID. Nonetheless, I notice a pioneer and a couple flak battalions did participate in the battle. Presumably that's because the HQ passed its "checks" and assigned them automatically. What's the advantage of having the HQ do the assignment rather than attaching these directly to the 269th? Is the idea that the battalions could be assigned to other battle by the HQ too? If now some other ID attached to the same HQ makes an attack, it could also benefit from those battalions? Does the game track the battalions' ammo/supply/movement too?
2. What's the difference between "lock" and "add" support? Does Lock lock the number at 3 or at zero? For that matter, what does add mean? If you choose "1" and the unit already has 3 support items, does it get a fourth, or does it drop you down to one?
3. I assume "support" has different meanings. The ground element "support" refers to cooks, medics, etc (as in War in the Pacific). But a "support unit" might be a flak unit, say?
Thanks for a great learning tool.
RE: Operational Boot Camp (tutorial)
1. In the ground attacks you just conducted, you chose not to assign the Pioneer Battalion or Flak Battalion units directly to the 269th ID. Nonetheless, I notice a pioneer and a couple flak battalions did participate in the battle. Presumably that's because the HQ passed its "checks" and assigned them automatically. What's the advantage of having the HQ do the assignment rather than attaching these directly to the 269th? Is the idea that the battalions could be assigned to other battle by the HQ too? If now some other ID attached to the same HQ makes an attack, it could also benefit from those battalions? Does the game track the battalions' ammo/supply/movement too?
The battalions arrived because the HQ passed its checks. Having the support units attached to HQ's means the support units can participate in all battles units belonging that HQ are involved in. It's flexible, but there's a chance of a no show. Attaching them directly to divisions means they always fight alongside that division, but won't help out in battles where the division it's attached to isn't present.
The support battalions have no movement rating as they're not on-map units. They do have their own supply state, but I'm not sure how they're affected by ammo or supply reductions. If they don't somehow replenish ammo or supplies in between battles and in that sense work like normal combat units, their combat potential should decrease as ammo and supply stocks decrease. However, I'm not entirely sure how it works for support units.
2. What's the difference between "lock" and "add" support? Does Lock lock the number at 3 or at zero? For that matter, what does add mean? If you choose "1" and the unit already has 3 support items, does it get a fourth, or does it drop you down to one?
"Lock" locks a HQ, preventing any kind of automated support unit movement, as well as automated support unit movement for lower level HQ's attached to that HQ. Add and Sub simply add or substract one number from the support level.
3. I assume "support" has different meanings. The ground element "support" refers to cooks, medics, etc (as in War in the Pacific). But a "support unit" might be a flak unit, say?
Support squads are indeed the cooks and so on, support units are off map units that you are always attached to a HQ or directly to units of a certain size, divisions for the Axis and corps for the Soviets, or their broken down regiments/brigades. Note that braking down a Soviet Rifle or cavalry corps will mean support units are not attached to the divisions it breaks down to, as support units can't be attached to Soviet divisions. If a Tank or mechanized corps has support units attached to it, those will be attached to the brigades it splits up in with a maximum of 1 per brigade if the corps has 3 support units attached to it. Similarly, if an Axis division splits up, the support units will be split up between the regiments at a maximum of 1 per regiment if the division has 3 support units attached to it.
SSG tester
WitE Alpha tester
Panzer Corps Beta tester
Unity of Command scenario designer
WitE Alpha tester
Panzer Corps Beta tester
Unity of Command scenario designer
RE: Operational Boot Camp (tutorial)
[font="courier new"]Thank you and yes I'll try my best to answer any questions.[/font]
1. In the ground attacks you just conducted, you chose not to assign the Pioneer Battalion or Flak Battalion units directly to the 269th ID. Nonetheless, I notice a pioneer and a couple flak battalions did participate in the battle. Presumably that's because the HQ passed its "checks" and assigned them automatically.
[font="courier new"]Correct. [/font]
What's the advantage of having the HQ do the assignment rather than attaching these directly to the 269th?
[font="courier new"]One advantage of assigning a support unit directly to a combat unit is that it will increase the combat units capabilities in attack and defense (may also add construction abilities and obviously increase the rail or sea transport costs) and the commitment is automatic, further this does not effect the HQ unit from providing more support as per below.
One advantage of not assigning support units directly to combat units is that HQ can commit a maxim of 6 to a single battle (the exception is urban heavy hexes where up to 18 can be committed when defending). First the leader of the HQ has to pass an initiative check and then the support unit must pass some checks.
So sometimes a balance between the two is ideal. Reference (15.4.1) in the field manual.[/font]
Is the idea that the battalions could be assigned to other battle by the HQ too?
[font="courier new"]See next answer.[/font]
If now some other ID attached to the same HQ makes an attack, it could also benefit from those battalions?
[font="courier new"]Off the top of my head and memory I can't recall this or not, most of my heavy extensive testing was in 1943-45 and I do know that units in reserve may be committed to more then one battle and in the foggy recesses of my mind I want to say yes support units can be committed to more then one battle to units that are subordinate to that HQ, but I may be wrong.
[/font]Does the game track the battalions' ammo/supply/movement too?
[font="courier new"]Yes.[/font]
2. What's the difference between "lock" and "add" support?
[font="courier new"]
Add means to increase the support level, subtract means to subtract the level and lock means to lock it where it's at now. So for example (IIANM) at the start of any scenario/campaign all support levels are locked at either 0 or 3 (they used to be set to 3 IIRC but it seems they are not set to 0). Essentially, this means if you have it set to three (3) then the system will try to send 3 artillery, 3 engineers, 3 AT, 3 Mortar, etc to the HQ.
[/font]Does Lock lock the number at 3 or at zero?
[font="courier new"]At 3 if the support level was set to 3.[/font]
For that matter, what does add mean?
[font="courier new"]See above.[/font]
If you choose "1" and the unit already has 3 support items, does it get a fourth, or does it drop you down to one?
[font="courier new"]It should return those in excess back up the HQ chain.[/font]
3. I assume "support" has different meanings. The ground element "support" refers to cooks, medics, etc (as in War in the Pacific). But a "support unit" might be a flak unit, say?
[font="courier new"]Not exactly, from the manual (7.4):[/font]
[font="microsoft sans serif"]Support units are single purpose independent battalions, brigades and regiments of various types, to include artillery, howitzer, mortar, rocket, anti-tank, anti-aircraft, ski, engineer, sapper, tank, tank destroyer, construction, and labor groups.[/font]
[font="courier new"]No problem, I learn something new every day with this game hopefully all of this helps you gain an better understanding of the greatest east front game system (board or PC).[/font]
Beta Tester for: War in the East 1 & 2, WarPlan & WarPlan Pacific, Valor & Victory, Flashpoint Campaigns: Sudden Storm, Computer War In Europe 2
SPWW2 & SPMBT scenario creator
-
ignikharion
- Posts: 9
- Joined: Tue Dec 07, 2010 7:22 pm
RE: Operational Boot Camp (tutorial)
Superb walkthrough [:)]
You pretty much sold me the game [:D]
You pretty much sold me the game [:D]
RE: Operational Boot Camp (tutorial)
Thank you for answering all my questions! Now I'm feeling guilty for cluttering up your thread with them. But I do appreciate the answers.
RE: Operational Boot Camp (tutorial)
You guys are all very welcome no need to feel guilty. I plan on refining this document and making a PDF later on.
Beta Tester for: War in the East 1 & 2, WarPlan & WarPlan Pacific, Valor & Victory, Flashpoint Campaigns: Sudden Storm, Computer War In Europe 2
SPWW2 & SPMBT scenario creator

RE: Operational Boot Camp (tutorial)
Many thanks! Sorely needed