


The Battle Under: Japan looks to the South
Moderators: wdolson, Don Bowen, mogami
-
SierraJuliet

- Posts: 2319
- Joined: Mon Feb 23, 2009 9:40 pm
- Location: Brisbane, Australia
Miri falls
05 January 1942[align=left] [/align] [/b][align=left] [/align]Malaya[align=left] [/align]Air: 18 Zero fly a sweep over Singapore, meet 3 Buffalo and down 2.[align=left] [/align]East of Malacca 15 Nell strike the retreating 12th Indian Brigade and cause 37 casualties and 1 gun lost. 15th Indian Brigade also in the same area is bombed by 9 Nell and loses 14 casualties.[align=left] [/align] [align=left] [/align]Burma[align=left] [/align]Air: Well to the west of Rangoon 10 Nell and 6 Sally target 1st Burma Brigade and cause 8 casualties.[align=left] [/align]Land: Japanese troops (2 divisions) force the river and shock attack the allied forces on the other side. Japanese forces report 350 casualties, 5 guns lost and 1 vehicle lost to allied loses of 286 casualties and 10 guns lost. The allied troops retreat into Rangoon.[align=left] [/align] [align=left] [/align]DEI[align=left] [/align]Land: The 11th and 12th NLF finally finishes their trek from Brunei to Miri and launches an assault on the British forces that had retreated from Brunei a few weeks ago. The assault goes to plan with the surrender of the British and the resource and oil complex captured without any damage. Japanese forces lose 4 casualties and 1 gun and capture 889 prisoners.[align=left] [/align] [align=left] [/align]China[align=left] [/align]Land: Bombardment attack at Changsa causes 66 casualties and 2 guns lost.[align=left] [/align]South of Canton a bombardment attack on Chinese troops causes 309 casualties and 6 guns lost.[align=left] [/align]Air: [/b]At Changsa 10 Sonia bomb 51st Chinese Corps and cause 22 casualties and 1 gun lost. 7 Ann follow up and hit 89th Chinese Corps causing 14 casualties.[align=left] [/align] [align=left] [/align][align=left] [/align]Philippines [align=left] [/align]Land: Troops are ashore at San Jose.[align=left] [/align] [align=left] [/align]South East Pacific[align=left] [/align]Land: Tabar is occupied.[align=left] [/align] [align=left] [/align]Subs[align=left] [/align]No reported activity.[align=left] [/align] [align=left] [/align]Naval Losses for the Day[align=left] [/align]Nil[align=left] [/align] [align=left] [/align]Comments[align=left] [/align]Forces are now poised to enter Rangoon and attempt to capture the town. It took a while but Miri has fallen and most importantly the oil and resource facilities are intact.
Kido Butai, although powerful, was a raiding force, and this is exactly how the Japanese understood its usage. 'Shattered Sword'
-
SierraJuliet
- Posts: 2319
- Joined: Mon Feb 23, 2009 9:40 pm
- Location: Brisbane, Australia
Plans for Borneo
Here is my immediate plan for the next stage of the invasion of Borneo.

Kido Butai, although powerful, was a raiding force, and this is exactly how the Japanese understood its usage. 'Shattered Sword'

RE: Plans for Borneo
Good AAR, another reader.[:)] I'm amazed Pearl Harbour never happened.. will probably have some repercussions.
-
SierraJuliet
- Posts: 2319
- Joined: Mon Feb 23, 2009 9:40 pm
- Location: Brisbane, Australia
Mindanao secured
06 January 1942[align=left] [/align] [/b][align=left] [/align]Malaya[align=left] [/align]Air: North of Johore Bharu 11 Nell target 28th Indian Brigade and cause 52 casualties. Later in the day 10 more Nell also locates the same Brigade and this time register 19 casualties.[align=left] [/align]North of Kuantan 6 Swordfish and 3 Blenheim IV attempt to get at a transport task force. 13 Oscar patrolling in the area claim 3 Swordfish destroyed.[align=left] [/align]At Johore Bharu 11 Sally fall upon 6th Indian Brigade and cause 23 casualties and 1 gun lost.[align=left] [/align]Land: The Imperial Guards arrive in the hex to the north of Johore Bharu only to find the allied troops have beat a hasty retreat and now appear to be holed up at Johore Bharu. It will take a number of days to move everything into place but it would seem that the siege of Johore Bharu is about to begin.[align=left] [/align] [align=left] [/align]Burma[align=left] [/align]Air: At Rangoon the Rangoon Force is attacked by 15 Nell and 19 Sally and cause 34 casualties.[align=left] [/align]Land: The two divisions spearheading the drive into Burma are ordered to move in on Rangoon.[align=left] [/align] [align=left] [/align] [align=left] [/align]China[align=left] [/align]Land: At Changsa the bombardment attack claims 230 casualties and 6 guns lost.[align=left] [/align]The Japanese forces south of Canton are ordered to attack the Chinese forces there. Unfortunately the Chinese had decided that 7 January was the day to retreat from this hex so the ordered attack did not take place.[align=left] [/align]Air: [/b]South of Canton 24 Sonia target 83rd Chinese Corps and report 34 casualties.[align=left] [/align] [align=left] [/align]Philippines[align=left] [/align]Land: Troops are ashore at Jolo.[align=left] [/align]At Cotabato Japanese troops make a shock attack after fording the river outside the township. Even with the handicap of crossing the river the Japanese prove to be an irresistible force as the garrison of 7416 and 34 guns surrender. On the Japanese side 94 casualties and 2 guns lost are reported. At the end of the action 119th USN Base Force, 118th and 110th USAAF Base Forces and 101st PA Division have surrendered into a life of captivity. This was a pleasing result as I had feared how the battle would unfold after the river crossing had been completed. The majority of Mindanao is now controlled by Japanese forces.[align=left] [/align]At undefended San Jose the base is captured by the Japanese.[align=left] [/align] [align=left] [/align]South East Pacific[align=left] [/align]Air: South of Rabaul 18 Nell bomb NGVR Battalion and cause 57 casualties and 1 gun lost.[align=left] [/align]Land: Troops are ashore at Gasmata.[align=left] [/align]Sea: Subs have snuck in a laid a minefield at Truk. DDs Kasumi and Shiranuhi locate the field and destroy a couple of mines.[align=left] [/align] [align=left] [/align]Subs[align=left] [/align]North of Kwajalein SS S-40 locates a convoy returning to the HI and scores 1 torpedo hit on AP Montevideo Maru causing 33 38 14 damage. Flotation not too good and she has a long way to go. The captain is going to give it a go to make the HI before the flooding claims the ship.[align=left] [/align] [align=left] [/align]Naval Losses for the Day[align=left] [/align]Nil[align=left] [/align] [align=left] [/align]Comments[align=left] [/align]As stated above the capture of the allied troops at Cotabato was particularly pleasing and now frees up a number of offensive units for other duties.
Hi JonReb. Glad to have you on board. As for Pearl Harbour you can only imagine the myriad of feelings that zip through your mind when you realize that the vaunted KB fluffed the opening attack. Certainly has had one big repercussion..... tocaff now has a fully intact fleet and coupled with his general pull back it is difficult to make any inroads. I fear that unless I decide to try and hunt something down he will come at me somewhere with one mighty fleet.... The hunting down a quarry is something I'm not really confident about implementing though.
Hi JonReb. Glad to have you on board. As for Pearl Harbour you can only imagine the myriad of feelings that zip through your mind when you realize that the vaunted KB fluffed the opening attack. Certainly has had one big repercussion..... tocaff now has a fully intact fleet and coupled with his general pull back it is difficult to make any inroads. I fear that unless I decide to try and hunt something down he will come at me somewhere with one mighty fleet.... The hunting down a quarry is something I'm not really confident about implementing though.
Kido Butai, although powerful, was a raiding force, and this is exactly how the Japanese understood its usage. 'Shattered Sword'
-
SierraJuliet
- Posts: 2319
- Joined: Mon Feb 23, 2009 9:40 pm
- Location: Brisbane, Australia
China Plans
With the withdrawal of Chinese forces from south of Canton I have decided to initiate action with forces based at Nanning supported by some of the Canton forces to clear and secure the rail line from Nanning to Hanoi. The division based at Hanoi will also join in the action. Whilst this is under way the forces at Changsa will continue the bombardment attacks to keep attention focused there. A division plus supporting forces have been stationed at Canton to forestall any renewed interest in this city. Once the rail lline is secure the focus will return to Changsa with attacks being made at Changsa with a view to ultimately capturing the city.

Kido Butai, although powerful, was a raiding force, and this is exactly how the Japanese understood its usage. 'Shattered Sword'
-
SierraJuliet
- Posts: 2319
- Joined: Mon Feb 23, 2009 9:40 pm
- Location: Brisbane, Australia
Jolo and Gasmata Captured
07 January 1942[align=left] [/align] [/b][align=left] [/align]Malaya[align=left] [/align]Air: At Johore Bharu 10 Sally hit 111 RAF Base Force and cause 12 casualties. A number of small raids threaten Japanese shipping off the coast of Malaya but do no damage until late in the day 6 Vildebeest pay a visit on the troop ships unloading at Mersing. They call at a good time as the CAP seems to have called it a day and they have the skies to themselves and more targets than planes. AP Gosei Maru is hit by 1 torpedo causing 36 51 22 damage. AP Miike Maru is also hit by 1 torpedo and reports 49 42 15 damage. 55 casualties are also reported on board the ships.[align=left] [/align]Land: Despite the success of the torpedo bombers troops do get ashore and establish themselves at Mersing.[align=left] [/align] [align=left] [/align]Burma[align=left] [/align]Air: At Rangoon 23 Nell and 17 Sally hit Rangoon Force and cause 52 casualties.[align=left] [/align] [align=left] [/align] [align=left] [/align]China[align=left] [/align]Land: At Changsa the bombardment attack causes loses to the Chinese of 213 casualties and 4 guns lost.[align=left] [/align]Air: [/b]At Wuchow 24 Sonia target 65th Chinese Corps and cause 35 casualties.[align=left] [/align]At Changsa 10 Sonia bomb 51st Chinese Corps and cause 12 casualties. [align=left] [/align] [align=left] [/align]Philippines[align=left] [/align]Land: Jolo is captured by the Japanese forces after 119th USAAF Base Force of 393 men surrenders.[align=left] [/align] [align=left] [/align]South East Pacific[align=left] [/align]Air: At Clark Field 42 Betty bomb USAAF Base Force and report 136 casualties, 4 guns lost and 1 vehicle lost. 13 Betty hit 71st PA Division and cause 37 casualties and 2 guns lost.[align=left] [/align]At Jolo 32 Kate bomb 119th USAAF Base Force and cause 100 casualties.[align=left] [/align]Land: The troops that landed the previous day at Gasmata capture the undefended base. The unit here will assist in the eventual clear up of the allied forces fleeing from Rabaul.[align=left] [/align]Finschafen is occupied by Japanese forces.[align=left] [/align] [align=left] [/align]Subs[align=left] [/align]SS 1-26 operating offshore from San Francisco is located by DD Kane and 5 other DDs and suffers 6 hits causing 53 64 00 damage. She has some serious flooding to control if she is to make it back to a friendly port.[align=left] [/align] [align=left] [/align]Naval Losses for the Day[align=left] [/align]Nil[align=left] [/align] [align=left] [/align]Comments[align=left] [/align] [align=left] [/align]The capture of Jolo completes the first phase of immediate operations in the Borneo area. Jolo will now be used as a forward base to organize the assault upon Tarakan. Sandakan is also in the in line for an assault within the next few days. In Burma land forces are focused on moving in on Rangoon and within a few days the lead elements should be entering the town itself. In Malaya the focus is on securing Mersing which only has a small allied presence and more importantly Johore Bharu which has significant numbers of allied troops. It will take a little while for all available forces to move on Johore as quite a number are resting in Kuala Lumpur to bring down disruption and fatigue levels. In the Philippines land forces are moving towards Clark Field and within days action should commence there too.
Kido Butai, although powerful, was a raiding force, and this is exactly how the Japanese understood its usage. 'Shattered Sword'
-
SierraJuliet
- Posts: 2319
- Joined: Mon Feb 23, 2009 9:40 pm
- Location: Brisbane, Australia
Mersing Captured
08 January 1942[align=left] [/align] [/b][align=left] [/align]Malaya[align=left] [/align]Air: 17 Zero come up against 4 Buffalo over Singapore and shot down 1 Buffalo.[align=left] [/align]At Johore Bharu 18 Nell bomb SSVF Brigade and cause 13 casualties.[align=left] [/align]Off shore and north of Mersing a mixed flight of 3 Swordfish, 6 Vildebeest and 3 Blenheim escorted by 3 Buffalo tangle with a CAP of 7 Oscar over the surface task force covering the landing at Mersing. By the end of the action the flak supported by Oscar fighters has claimed 2 Swordfish and 1 Vildebeest destroyed. Some torpedoes, however, make it into the water and start their runs. BB Yamashiro is hit by 1 torpedo and suffers 04 00 09 damage. (Lucky result there)[align=left] [/align]Land: At Mersing 4th Division launches a deliberate attack and for the loss of 2 casualties forces the surrender of No. 109 RAF Base Force and the capture of 966 casualties and 8 guns.[align=left] [/align] [align=left] [/align]Burma[align=left] [/align]Air: At Rangoon 13th Indian Brigade is bombed by 19 Nell and 14 Sally for 93 casualties.[align=left] [/align]Land: At Rangoon bombardment causes 102 casualties and 2 guns lost.[align=left] [/align] [align=left] [/align]DEI[align=left] [/align]Land: Troops are ashore at Sandakan.[align=left] [/align] [align=left] [/align]China[align=left] [/align]Land: Bombardment at Changsha causes 175 casualties and 1 gun lost.[align=left] [/align]Air: [/b]Southwest of Wuchow 15 Sonia bomb 66th Chinese Corps and cause 20 casualties.[align=left] [/align]At Changsa 89th Chinese Corps reports 2 casualties after a bombing attack by 7 Ann.[align=left] [/align] [align=left] [/align]Philippines[align=left] [/align]Air: 25 Betty bomb 118th USN Base Force at Clark Field and cause 130 casualties and 1 vehicle lost for the loss of 1 Betty. 21 Betty follows up and cause 28 casualties and 1 gun lost on 71st PA Division.[align=left] [/align] [align=left] [/align]South East Pacific[align=left] [/align]Air: South of Rabaul 18 Nell bomb 101 RAAF Base Force and cause 35 casualties and 1 gun lost.[align=left] [/align]Near Gasmata 3 Hudson run into a 6 Zero CAP and lose 1 of their number without result on the targeted warships.[align=left] [/align] [align=left] [/align]Subs:
SS I-19 is hit 7 times by DDs Kane and King + at least 3 other DDs operating off shore from San Francisco. I-19 becomes a total loss.[align=left] [/align] [align=left] [/align]Naval Losses for the Day[align=left] [/align]SS I-19[align=left] [/align] [align=left] [/align]Comments[align=left] [/align]The capture of Mersing means that all attention in Malaya will now be focused on the capture of Johore Bharu preparatory to invading Singapore. An assault on Rangoon is expected next turn. The troop movements from Canton to Nanning seem to have caused some excitement in the Chinese armies with a number of corps appearing to be on the move to provide some defense in depth against any move I might make. Another sub lost off the coast of the USA. Perhaps it is time to leave this piece of hot ocean alone for a while.
SS I-19 is hit 7 times by DDs Kane and King + at least 3 other DDs operating off shore from San Francisco. I-19 becomes a total loss.[align=left] [/align] [align=left] [/align]Naval Losses for the Day[align=left] [/align]SS I-19[align=left] [/align] [align=left] [/align]Comments[align=left] [/align]The capture of Mersing means that all attention in Malaya will now be focused on the capture of Johore Bharu preparatory to invading Singapore. An assault on Rangoon is expected next turn. The troop movements from Canton to Nanning seem to have caused some excitement in the Chinese armies with a number of corps appearing to be on the move to provide some defense in depth against any move I might make. Another sub lost off the coast of the USA. Perhaps it is time to leave this piece of hot ocean alone for a while.
Kido Butai, although powerful, was a raiding force, and this is exactly how the Japanese understood its usage. 'Shattered Sword'
-
SierraJuliet
- Posts: 2319
- Joined: Mon Feb 23, 2009 9:40 pm
- Location: Brisbane, Australia
Fall of Rangoon
09 January 1942[align=left] [/align] [/b][align=left] [/align]Malaya[align=left] [/align]Air: 19 Zero over Singapore mess with 4 Buffalo with 2 Buffalo claimed as kills.[align=left] [/align]Land: The allied forces at Johore Bahru are bombarded and lose 9 casualties and 1 gun.[align=left] [/align] [align=left] [/align]Burma[align=left] [/align]Land: A shock attack is launched at Rangoon. The small garrison made up of 13th Indian Brigade and Rangoon Force surrenders 8104 prisoners and 16 guns lost for the price to the Japanese of 210 casualties, 10 guns and 1 vehicle lost. None of the infrastructure is damaged with Oil at (0) 50, Resources (0) 100 and Manpower (0) 2. The base contains 54 158 supply, 90 348 fuel and 8 837 oil. [align=left] [/align] [align=left] [/align]DEI[align=left] [/align]Land: The undefended base at Sandakan is captured.[align=left] [/align] [align=left] [/align]China[align=left] [/align]Land: Bombardment attack at Changsha causes 81 casualties 4 guns lost.[align=left] [/align]Air: [/b]Southwest of Wuchow 22 Sonia bomb 66th Chinese Corps and cause 10 casualties and 1 gun lost.[align=left] [/align] [align=left] [/align]South East Pacific[align=left] [/align]No activity to report.[align=left] [/align] [align=left] [/align]Philippines[align=left] [/align]Air: 37 Betty bomb 71st PA Division at Clark Field and for the loss of 1 Betty cause 63 casualties and 1 gun lost.[align=left] [/align] [align=left] [/align]Subs: [align=left] [/align]No significant activity.[align=left] [/align] [align=left] [/align]Naval Losses for the Day[align=left] [/align]Nil[align=left] [/align] [align=left] [/align]Comments[align=left] [/align]The capture of Rangoon in such good condition is far more than I expected when I started out. Todd has left only minimal forces to defend and this is in fact the first place he has actually left forces to make a stand if IRC. I will be sending one division, shortly to be reinforced by a tank regiment, to move into the interior with a view to eventually taking Mandalay. One further division will remain in Rangoon for some rest and refit for a short time before moving on to support the other division. I’m expecting that Todd has had his troops busy preparing defensive lines somewhere up ahead and the going will soon be getting tough. Still the capture of Rangoon some 2 months ahead of RL is a pleasant surprise. I’ve also had a fleeting glimpse of some Tomahawk fighters on CAP patrol when recon flights have penetrated the interior so I expect the AVG must be lurking around here somewhere as well.[align=left] [/align] [align=left] [/align]Forgot to mention also last turn my first ace was confirmed. The honour went to 1 Lt R. Shibata of 59th Fighter Sentai flying a Ki-43-Ib Oscar out of Kuantan.[align=left] [/align]
Kido Butai, although powerful, was a raiding force, and this is exactly how the Japanese understood its usage. 'Shattered Sword'
-
SierraJuliet
- Posts: 2319
- Joined: Mon Feb 23, 2009 9:40 pm
- Location: Brisbane, Australia
1st Attack at Changsa
10 January 1942[align=left] [/align] [/b][align=left] [/align]Malaya[align=left] [/align]Air: 21 Zero take on the Singapore CAP of 1 Buffalo and bring it down. Another flight of 18 Zero finds another lone Buffalo and bring it down as well.[align=left] [/align] [align=left] [/align]China[align=left] [/align]Land: At Changsa a shock attack is ordered. Japanese ground losses are reported as 5 031 casualties, 75 guns and 3 vehicles lost. Allied ground losses are reported as 1 299 casualties and 42 guns lost. The Japanese achieved assault odds of 3 to 1 and the assault reduced the fortifications to 3. [align=left] [/align]With more forces moving in on Nanning a new bombardment attack is ordered here. This time around the Japanese lose 6 casualties and 2 guns lost to the Chinese 127 casualties and 1 gun lost.[align=left] [/align]Air: [/b]Southwest of Wuchow 23 Sonia attack 66th Chinese Corps and cause 13 casualties.[align=left] [/align] [align=left] [/align]Philippines[align=left] [/align]Land: Ground units are moving in on Clark Field and a bombardment attack is ordered here. Without loss to them the Japanese inflicted the following reported losses on the allied force – 98 casualties, 3 guns lost and 1 vehicle lost.[align=left] [/align] [align=left] [/align]Subs: [align=left] [/align]At Wake Island an anti submarine task force, sent there from Kwajalein to deal with reports of 2 submarines in the area, locates SS S-35. PC Shonon Maru #10, PG Toyotsu Maru and DDs Kisaragi, Yayoi and Mutski combine forces and score 10 hits on S-35. The attack continues and when the target is reacquired a further 5 hits are recorded. S-35 is reported sunk a short time later.[align=left] [/align] [align=left] [/align]Naval Losses for the Day[align=left] [/align]SS S-35, AK Tetsuzan Maru (sinks at Kuching a few days after being torpedoed during the Kuching invasion)[align=left] [/align] [align=left] [/align]Comments[align=left] [/align]Things appear to be a little in lull, however; the land campaign at Changsa has entered a new round with inroads made in the fortifications and in the Philippines the first round in the assault on Clark Field has commenced.
Kido Butai, although powerful, was a raiding force, and this is exactly how the Japanese understood its usage. 'Shattered Sword'
-
SierraJuliet
- Posts: 2319
- Joined: Mon Feb 23, 2009 9:40 pm
- Location: Brisbane, Australia
Tawi Tawi occupied
11 January 1942[align=left] [/align] [/b][align=left] [/align]Malaya[align=left] [/align]Land: The bombardment attack here results in reported allied casualties of 89 and 2 guns lost.[align=left] [/align]Air: 20 Zero flying sweep over Singapore bring down the 1 Buffalo in the sky.[align=left] [/align] [align=left] [/align]DIE[align=left] [/align]Land: Troops are ashore at Pontianak.[align=left] [/align]Sea: Coastal guns at Pontianak find the range on AP Meiten Maru and with 1 hit cause 28 00 18 damage and 101 casualties.[align=left] [/align]Air: At Singkawang 4 Blenheim and 13 Martin 139 strikes at the surface covering force. Without causing any damage they lose 1 Blenheim.[align=left] [/align]Near Pontianak 3 Martin 139 and 6 Brewster 339D make an attempt on the invasion fleet. They are met by a 16 Zero CAP and 4 Brewster 339D are shot from the sky.[align=left] [/align] [align=left] [/align]China[align=left] [/align]Land: The bombardment of Changsa causes 406 casualties and 6 guns lost from the Chinese forces.[align=left] [/align]At Nanning the newly arrived forces from the Canton sector launch a deliberate attack on the Chinese forces that have been menacing the city. For the loss of 888 casualties and 11 guns lost the Japanese forces inflict 211 casualties and 5 guns lost and cause the Chinese forces to retreat in the direction of Wuchow.[align=left] [/align]Air: [/b]At Changsa 8 Ann and 15 Sally bomb 51st Chinese Corps and cause 76 casualties and 2 guns lost. [align=left] [/align] [align=left] [/align]Philippines[align=left] [/align]Land: At Clark Field a bombardment attack obtains 105 casualties and 9 guns lost on the allied forces.[align=left] [/align]Tawi Tawi is occupied by Japanese forces.[align=left] [/align]Air: 44 Betty bomb 71st PA Division at Clark Field and cause 100 casualties and 2 guns lost.[align=left] [/align] [align=left] [/align]South East Pacific[align=left] [/align]Land: Troops are ashore at Gili Gili.[align=left] [/align]Sea: Destroyers in the invasion fleet at Gili Gili locate and start to deal with a mine field. DD Yunagi, however, sails right into a mine and suffers 42 43 13 damage. The fight is on for the crew to save the ship.[align=left] [/align]Air: Near Gili Gili 3 Hudson make a run on the invasion fleet. 3 Zero on patrol brings down one Hudson and the fleet is remains unscathed.[align=left] [/align] [align=left] [/align]Subs: [align=left] [/align]At Mersing a mine warfare fleet made up of 4 MSW is located by SS Truant. Truant picks out MSW Choun Maru # 6 and sends her to the bottom with 1 torpedo strike.[align=left] [/align] [align=left] [/align]Naval Losses for the Day[align=left] [/align]MSW Choun Maru # 6[align=left] [/align] [align=left] [/align]Comments[align=left] [/align]Mines…. Ouch. Truant continues to make her presence felt. Softening up continues on the land war fronts.
Kido Butai, although powerful, was a raiding force, and this is exactly how the Japanese understood its usage. 'Shattered Sword'
-
SierraJuliet
- Posts: 2319
- Joined: Mon Feb 23, 2009 9:40 pm
- Location: Brisbane, Australia
Screen Shot - China Situation
Here is the latest position in China. Nanning has been cleared but the line between Nanning and Hanoi is still infested with Chinese forces. For the time being I have elected to leave the Hanoi based division in a holding position.
The bulk of the forces used to clear Nanning are returning to the Canton area where they will join with other Canton based forces and make a move on Wuchow at the same time that proper assaults are being launched on Changsa. The goal is Changsa in the short term and if I can draw off some forces at Wuchow so much the better.

Kido Butai, although powerful, was a raiding force, and this is exactly how the Japanese understood its usage. 'Shattered Sword'
-
SierraJuliet
- Posts: 2319
- Joined: Mon Feb 23, 2009 9:40 pm
- Location: Brisbane, Australia
Gili Gili captured
12 January 1942[align=left] [/align] [/b][align=left] [/align]Malaya[align=left] [/align]Land: Land bombardment attack at Johore Bahru causes 129 allied casualties and 3 guns lost.[align=left] [/align]Air: 23 Zero fly a sweep over Singapore and again down the 1 Buffalo that comes up to meet them.[align=left] [/align] [align=left] [/align]DEI[align=left] [/align]Sea: The coastal guns at Pontianak find the range on the invasion fleet off shore and land 2 hits on AP Kaihei Maru causing 39 00 18 damage.[align=left] [/align]Air: Near Pontianak 6 Martin 139 and 6 Brewster 339D take on 19 Zero flying LRCAP. 4 Brewster and 2 Martin are claimed as destroyed for the loss of 1 Zero. Enough of the strike makes it through for 1 bomb to hit AP Hakuskia Maru which suffers 21 24 17 damage.[align=left] [/align] [align=left] [/align]China[align=left] [/align]Land: Ground bombardment at Changsa causes 217 allied casualties and 3 guns lost.[align=left] [/align]Air: [/b]North West of Canton 24 Sonia attack 64th Chinese Corps and cause 7 casualties.[align=left] [/align]At Changsa 10 Sonia target 57th Chinese Corps and cause 7 casualties while 7 Ann and 12 Sally hit 89th Chinese Corps and cause 35 casualties.[align=left] [/align]Sea: At Hong Kong a mine field is located. All goes well until TK Amatsu Maru hits not 1 but 2 mines. She sustains 85 71 38 damage. Amatsu Maru is going to be difficult to save but at least she is at a big harbour so things might work out. [align=left] [/align] [align=left] [/align]Philippines[align=left] [/align]Land: Bombardment of allied forces at Clark Field causes 130 casualties and 3 guns lost.[align=left] [/align] [align=left] [/align]South East Pacific[align=left] [/align]Land: Troops are ashore at Madang.[align=left] [/align]The undefended allied base at Gili Gili is attacked and captured by Japanese forces.[align=left] [/align]Air: Near Gili Gili 2 Hudson make a run on the invasion fleet there. They are met by 2 Zero on LRCAP and the end result is one Hudson destroyed and no ships damaged.[align=left] [/align] [align=left] [/align]Subs: [align=left] [/align]No action reported today.[align=left] [/align] [align=left] [/align]Naval Losses for the Day[align=left] [/align]Nil[align=left] [/align] [align=left] [/align]Comments[align=left] [/align]More mines - nasty damage at Hong Kong and a bad effort there cleaning up mines planted by the allies. Nice results in the air off of Pontianak, however, my flyboys managed to lose a Zero (silly pilot) and a shame about the courage of those pilots getting through to land a bomb on one of my transports. Softening up continues at Johore Bahru, Changsa and Clark Field…. Stayed tuned for some actual assaults at these locations very soon.
Kido Butai, although powerful, was a raiding force, and this is exactly how the Japanese understood its usage. 'Shattered Sword'
-
SierraJuliet
- Posts: 2319
- Joined: Mon Feb 23, 2009 9:40 pm
- Location: Brisbane, Australia
Madang captured
13 January 1942[align=left] [/align] [/b][align=left] [/align]Malaya[align=left] [/align]Land: At Johore Bahru a bombardment attack causes 128 casualties to the allied garrison.[align=left] [/align] [align=left] [/align]DEI[align=left] [/align]Sea: After an orders mess up last turn my bombardment force turns up at Pontianak. Atago, Takao and Kongo let loose and reports come in of 329 casualties, 1 vehicle lost, 2 airbase hits, 5 airbase supply hits, 19 runway hits, 1 port hit, 1 port fuel hit and 1 port supply hit.[align=left] [/align]An invasion fleet is approaching Menado for a proper assault on this bastion of Dutch power. 4 coastal guns open up and target PC Showa Maru # 3 with reports received of 2 shell hits. Amazingly the after action inspection of the ship found zip in the way of damage. # 3 lives on to fight another day.[align=left] [/align]Land: Troops are ashore at Menado. The garrison launches a bombardment attack causing 8 casualties to the invading Japanese force.[align=left] [/align]At Pontianak the lead elements of the Japanese invasion force launches a bombardment attack on the garrison and causes 12 casualties.[align=left] [/align] [align=left] [/align]China[align=left] [/align]Land: At Changsa the Japanese forces launch a deliberate attack. 146 847 troops supported by 1481 guns and 297 vehicles take on 52 304 defending troops supported by 268 guns. Assault odds only made 0 to 1 with a result of Japanese casualties of 3 121, 60 guns and 7 vehicles lost to the Chinese 630 casualties and 28 guns lost. Most importantly the engineers did their job and reduced the forts to level 2. Some more bombardment is in order before another attack is launched.[align=left] [/align]Air: [/b]At Changsa 12 Sally bomb 89th Chinese Corps causing 24 casualties.[align=left] [/align] [align=left] [/align]Philippines[align=left] [/align]Land: Land bombardment at Clark Field causes 59 allied casualties and 2 guns lost.[align=left] [/align] [align=left] [/align]South East Pacific[align=left] [/align]Land: The undefended base at Madang is captured.[align=left] [/align] [align=left] [/align]Subs [align=left] [/align]No action reports today
[align=left] [/align]Naval Losses for the Day[align=left] [/align]Nil[align=left] [/align] [align=left] [/align]Comments[align=left] [/align]Results at Menado and Pontianak so far look good. Changsa looks promising too at present. The softening up continues at Johore Bahru and Clark Field.
[align=left] [/align]Naval Losses for the Day[align=left] [/align]Nil[align=left] [/align] [align=left] [/align]Comments[align=left] [/align]Results at Menado and Pontianak so far look good. Changsa looks promising too at present. The softening up continues at Johore Bahru and Clark Field.
Kido Butai, although powerful, was a raiding force, and this is exactly how the Japanese understood its usage. 'Shattered Sword'
-
SierraJuliet
- Posts: 2319
- Joined: Mon Feb 23, 2009 9:40 pm
- Location: Brisbane, Australia
Menado captured
14 January 1942[align=left] [/align] [/b][align=left] [/align]Malaya[align=left] [/align]Land: A deliberate attack is ordered at Johore Bahru. 64 419 Japanese troops supported by 801 guns and 119 vehicles assault the defending troops made up of 18 550 troops supported by 159 guns. Assault odds of 1 to 1 are achieved and the forts reduced to level 5. Japanese loses are 795 casualties, 28 guns and 6 vehicles lost to 706 allied casualties and 5 guns lost.[align=left] [/align] [align=left] [/align]Burma[align=left] [/align]Air: 17 Helen escorted by 18 Zero make an attack on the airfield at Mandalay. A CAP of 6 Tomahawk is present and is enough to deter the bombers and claim 1 Zero destroyed without loss.[align=left] [/align] [align=left] [/align]DEI[align=left] [/align]Air: 13 Nell operating out of Davao bomb Tarakan and obtain 3 runway hits.[align=left] [/align]Mini KB launches an attack of 20 Val and 32 Kate on the airfield at Tarakan causing 15 casualties, 5 airbase hits, 5 airbase supply hits and 25 runway hits. Some of the planes are damaged but no reports are received of any out right loses.[align=left] [/align]2 Martin 139 locate a 3 ship AP convoy transporting troops to Jolo and land 1 bomb on board AP Shiny Maru causing 21 00 09 damage and 10 casualties. [align=left] [/align]At Pontianak 6 Martin 139 and 6 Brewster 339 targets the surface fleet in attendance. They are met by 8 Zero on CAP duties. 2 Brewster and 1 Martin are claimed destroyed and the attack on the warships is broken up.
[align=left] [/align]Land: At Pontianak Japanese forces launch a shock attack. Inroads are made by engineers who reduce the forts to level 1. Assault odds of 2 to 1 are then achieved and the forts further reduced to level 0. Japanese losses amount to 23 casualties and 1 gun lost for allied losses of 87 casualties and 1 gun lost. A renewed attack tomorrow should see this base fall to Japan.[align=left] [/align]Japanese shock attack at Menado gains odds of 4 to 1 and the base with a fort level of 2 is captured. A good result considering the fort level and 2 277 Japanese troops were facing off against 2 187 Dutch troops. Japanese losses reported as 152 casualties and 6 guns lost for 3 746 prisoners and 14 guns and 1 vehicle lost to for the Dutch.[align=left] [/align] [align=left] [/align]China[align=left] [/align]Land: Land bombardment at Changsa causes 222 Chinese casualties and 5 guns lost.[align=left] [/align]Air: [/b]At Changsa 14 Sally bomb 51st Chinese Corps and cause 55 casualties and 1 gun lost. 10 Sonia also hit 57th Chinese Corps causing 32 casualties.[align=left] [/align]Sea: Off shore from Shanghai a PC ASW task force sent to investigate a submarine report locates SS Saury and launches a full attack. The submarine is reported to have been hit 4 times.[align=left] [/align] [align=left] [/align]Philippines[align=left] [/align]Land: A deliberate attack is launched at Clark Field. 65 380 Japanese troops supported by 812 guns and 126 vehicles take on 29 411 defenders supported by 274 guns and 10 vehicles. Assault odds only achieve 0 to 1 and the forts remain at level 5. The Japanese lose 1317 casualties, 38 guns and 14 vehicles lost to the allied 1077 casualties, 30 guns and 1 vehicle lost.[align=left] [/align] [align=left] [/align]Home Islands[align=left] [/align]Sea: At Matsuyama ML Katsuriki hits a mine and is damaged 41 21 12.[align=left] [/align] [align=left] [/align]Subs [align=left] [/align]SS Trusty locates a MSW task force coming into Mersing. MSW Banshu Maru #52 is hit by 2 torpedoes and is lost to the war effort.[align=left] [/align] [align=left] [/align]Naval Losses for the Day[align=left] [/align]MSW Banshu Maru #52[align=left] [/align] [align=left] [/align]Comments[align=left] [/align]A good result at Johore Bahru. The superior Japanese numbers will tell and there are still 2 more divisions in the wings awaiting the assault on Singapore proper. The result at Clark Field was to be expected and is really only a holding action whilst forces to the south sort out a couple of Philippine Divisions at Naga. Menado was a great result albeit a battle on a small scale and Pontianak is not far from falling. I fear the aerial attack at Mandalay is a sign of some tough opposition to come in the Burma theatre.
[align=left] [/align]Land: At Pontianak Japanese forces launch a shock attack. Inroads are made by engineers who reduce the forts to level 1. Assault odds of 2 to 1 are then achieved and the forts further reduced to level 0. Japanese losses amount to 23 casualties and 1 gun lost for allied losses of 87 casualties and 1 gun lost. A renewed attack tomorrow should see this base fall to Japan.[align=left] [/align]Japanese shock attack at Menado gains odds of 4 to 1 and the base with a fort level of 2 is captured. A good result considering the fort level and 2 277 Japanese troops were facing off against 2 187 Dutch troops. Japanese losses reported as 152 casualties and 6 guns lost for 3 746 prisoners and 14 guns and 1 vehicle lost to for the Dutch.[align=left] [/align] [align=left] [/align]China[align=left] [/align]Land: Land bombardment at Changsa causes 222 Chinese casualties and 5 guns lost.[align=left] [/align]Air: [/b]At Changsa 14 Sally bomb 51st Chinese Corps and cause 55 casualties and 1 gun lost. 10 Sonia also hit 57th Chinese Corps causing 32 casualties.[align=left] [/align]Sea: Off shore from Shanghai a PC ASW task force sent to investigate a submarine report locates SS Saury and launches a full attack. The submarine is reported to have been hit 4 times.[align=left] [/align] [align=left] [/align]Philippines[align=left] [/align]Land: A deliberate attack is launched at Clark Field. 65 380 Japanese troops supported by 812 guns and 126 vehicles take on 29 411 defenders supported by 274 guns and 10 vehicles. Assault odds only achieve 0 to 1 and the forts remain at level 5. The Japanese lose 1317 casualties, 38 guns and 14 vehicles lost to the allied 1077 casualties, 30 guns and 1 vehicle lost.[align=left] [/align] [align=left] [/align]Home Islands[align=left] [/align]Sea: At Matsuyama ML Katsuriki hits a mine and is damaged 41 21 12.[align=left] [/align] [align=left] [/align]Subs [align=left] [/align]SS Trusty locates a MSW task force coming into Mersing. MSW Banshu Maru #52 is hit by 2 torpedoes and is lost to the war effort.[align=left] [/align] [align=left] [/align]Naval Losses for the Day[align=left] [/align]MSW Banshu Maru #52[align=left] [/align] [align=left] [/align]Comments[align=left] [/align]A good result at Johore Bahru. The superior Japanese numbers will tell and there are still 2 more divisions in the wings awaiting the assault on Singapore proper. The result at Clark Field was to be expected and is really only a holding action whilst forces to the south sort out a couple of Philippine Divisions at Naga. Menado was a great result albeit a battle on a small scale and Pontianak is not far from falling. I fear the aerial attack at Mandalay is a sign of some tough opposition to come in the Burma theatre.
Kido Butai, although powerful, was a raiding force, and this is exactly how the Japanese understood its usage. 'Shattered Sword'
-
SierraJuliet
- Posts: 2319
- Joined: Mon Feb 23, 2009 9:40 pm
- Location: Brisbane, Australia
Pontianak captured
15 January 1942[align=left] [/align] [/b][align=left] [/align]Malaya[align=left] [/align]Land: At Johore Bahru a second Japanese deliberate attack in 2 days is ordered. This attack is not as successful as the previous day. Today the Japanese only achieve odds of 0 to 1 and fail to reduce the fortifications. Japanese loses are reported as 1042 casualties, 27 guns and 3 vehicles lost. Allied loses are 425 casualties and 6 guns lost.[align=left] [/align] [align=left] [/align]DEI[align=left] [/align]Air: 12 Nell escorted by 25 Zero from Davao strike at Tarakan and cause 1 airbase hit and 2 runway hits and destroy 1 Martin 139.[align=left] [/align]Mini KB launches another strike of 18 Val and 31 Kate at Tarakan which causes 24 runway hits.[align=left] [/align]11 Martin 139 and 3 CW-21B Demon attack the surface task force off shore of Pontianak and score 1 bomb hit on Kongo. An afternoon strike by 3 Demon and 14 Martin scores another bomb hit on Kongo. Kongo reports fires at level 02 as a result. [align=left] [/align]Land: Shock attack at Pontianak achieves odds of 5 to 1 and the base is captured. West Borneo Garrison, No. 108 RN Base Force and 11th DAF Base Force surrender. Japanese loses are reported at 266 casualties and 7 guns lost with the allies surrendering 2802 prisoners and losing 3 guns.[align=left] [/align] [align=left] [/align]China[align=left] [/align]Land: Land bombardment at Changsa results in reported loses to the Chinese garrison of 325 casualties and 5 guns lost.[align=left] [/align]Air: [/b]Northwest of Canton 24 Sonia attack 64th Chinese Corps and cause 24 casualties.[align=left] [/align]At Changsa 8 Ann attack 51st Chinese Corps and cause 23 casualties.[align=left] [/align] [align=left] [/align]Philippines[align=left] [/align]Land: Troops are ashore at Puerto Princesa.[align=left] [/align]Bombardment at Clark Field results in allied loses of 30 casualties and 1 gun lost.[align=left] [/align] [align=left] [/align]Subs[align=left] [/align]No action reported today. [align=left] [/align] [align=left] [/align]Naval Losses for the Day[align=left] [/align]Nil[align=left] [/align] [align=left] [/align]Comments[align=left] [/align]Johore Bahru did not work as well as anticipated. The bombardments at Clark Field and Changsa though have continued to yield good results while assault troops are preparing for the next assault.[align=left] [/align] [align=left] [/align]Recon has revealed what appears to be some serious shipping concentrated at Amboina. If reports are accurate there could be up to 7 cruisers lurking there. Question is are they supporting carriers or is this Houston and company???? If there are carriers there I have some serious allied warships in my midst, however, given Todd’s reluctance up to this point to expose his warships to the Japanese war machine I’d be surprised if carriers do turn up there. He has been happy to send Houston and company out to mix it up so I’m expecting that Houston and friends are the forces likely to be found here.[align=left] [/align] [align=left] [/align]Mini KB has been tasked to attend to this group of warships. If the ships do make a move the Nell bombers at Davao will be reinforced with more Nell bombers. Two battleships escorted by destroyers are also moving in to help out.

Kido Butai, although powerful, was a raiding force, and this is exactly how the Japanese understood its usage. 'Shattered Sword'
-
flaggelant

- Posts: 262
- Joined: Sun Jan 25, 2009 7:00 pm
- Location: Netherlands
RE: Pontianak captured
Hey, new reader from now on
i like the screenshots added
would the mystery ships be estimated as "force Z", houston/boise group or as the allied carriers (last is not very likely, since the CV's would be in a land hex)? all have been missing for a while i believe?
on China;
I'm playing stock as well, in my game there are so many Chinese around Nanning/Hanoi that its really hard to force a breaktrough..
both pushing against Changsa, Wuchow AND Hanoi may be a bit overstretching your forces (surely the situations are different, but the troops are all there for the action ). So thats definetly a field of interest to me
-
ny59giants

- Posts: 9883
- Joined: Mon Jan 10, 2005 12:02 pm
RE: Pontianak captured
At Johore Bahru a second Japanese deliberate attack in 2 days is ordered. This attack is not as successful as the previous day. Today the Japanese only achieve odds of 0 to 1 and fail to reduce the fortifications.
When you attack a well fortified base, unless you get 1:1 odds and the forts are close to gone, a well use method is to attack ever third day and use your artillery to bombard on the other two days. Your troops will need those two days to recover disruption and fatigue from the prior attacks. Use your LBA to attack his AF to prevent him rebuilding the forts. As another novice Japanese player, I am missing the vast number of Allied engineers (and engineer vehicles) to build things up quickly.
HQ question - Do you have an Army HQ with your troops at Johore Bahru?? You need excessive support to get the full AV (Assault Value). The Southern Army HQ (command range 9) should be prepping for Singapore and already on the Malayan peninsula (it starts prepped for a base on Luzon while it starts at Saigon which is always a little strange to me). I would double check your HQs to ensure they are aiding you in your conquest. They can be easily overlooked by players.
[center] [/center]
[/center]-
SierraJuliet
- Posts: 2319
- Joined: Mon Feb 23, 2009 9:40 pm
- Location: Brisbane, Australia
Carrier strike at Wake Island
Guys.
Todd has sent at least 1 carrier off on a so far successful strike against Wake Island. At this stage there are only warships in this area as my limited recon has not picked up any transport TF nor any has any landing been made at this stage. The situation was of my own making as I picked up Wake Island on the 1st day of the war and then failed to build it up. The recent sub interest in the area alerted me to this failure and I have been in the process of building up the base. Just as a transport TF arrives with a base force so does the US carrier/s. The force was 2 DD and 4 AP from memory and so far 1 DD has gone under and the rest are in poor condition.[align=left] [/align] [align=left] [/align]The question now is can I do something with KB to redress this situation. As you can see from the screen shot the US carrier/s are very near to Wake Island. KB is just off the bottom of the page and had been heading toward Palmyra possibly for the same reason that Todd sent his strike force to Wake. At any rate it would appear that I should be able to get KB into a good intercept position and deal with this task force some distance away from Pearl. Problem is I will have to pass Johnston Island and no doubt will telegraph the presence of KB to Todd. I suppose going ultra quiet at this time could be beneficial. I’m also wary of Todd fading to the south and having a go at shipping around Kwajalein but I guess I’ve been given warning to do something about them.[align=left] [/align] [align=left] [/align]In summary my thinking is that if I can keep KB between Pearl and this task force I should be able to manufacture an engagement.[align=left] [/align] [align=left] [/align]Any thoughts on how I should react. Also should KB be set to a high speed run to get quickly into the best position? I won’t be sending this turn for about another 5 hours so any responses in that time will be greatly appreciated.
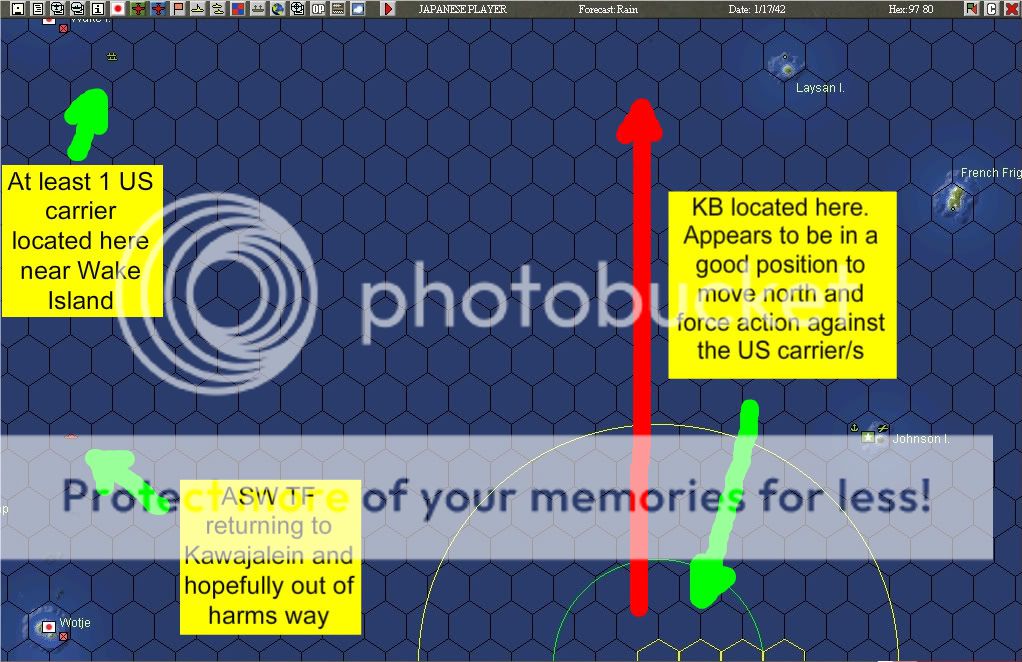
Todd has sent at least 1 carrier off on a so far successful strike against Wake Island. At this stage there are only warships in this area as my limited recon has not picked up any transport TF nor any has any landing been made at this stage. The situation was of my own making as I picked up Wake Island on the 1st day of the war and then failed to build it up. The recent sub interest in the area alerted me to this failure and I have been in the process of building up the base. Just as a transport TF arrives with a base force so does the US carrier/s. The force was 2 DD and 4 AP from memory and so far 1 DD has gone under and the rest are in poor condition.[align=left] [/align] [align=left] [/align]The question now is can I do something with KB to redress this situation. As you can see from the screen shot the US carrier/s are very near to Wake Island. KB is just off the bottom of the page and had been heading toward Palmyra possibly for the same reason that Todd sent his strike force to Wake. At any rate it would appear that I should be able to get KB into a good intercept position and deal with this task force some distance away from Pearl. Problem is I will have to pass Johnston Island and no doubt will telegraph the presence of KB to Todd. I suppose going ultra quiet at this time could be beneficial. I’m also wary of Todd fading to the south and having a go at shipping around Kwajalein but I guess I’ve been given warning to do something about them.[align=left] [/align] [align=left] [/align]In summary my thinking is that if I can keep KB between Pearl and this task force I should be able to manufacture an engagement.[align=left] [/align] [align=left] [/align]Any thoughts on how I should react. Also should KB be set to a high speed run to get quickly into the best position? I won’t be sending this turn for about another 5 hours so any responses in that time will be greatly appreciated.
Kido Butai, although powerful, was a raiding force, and this is exactly how the Japanese understood its usage. 'Shattered Sword'
RE: Carrier strike at Wake Island
It seems you have a good opportunity. You should try you best to avoid detection for the time being and not get too close to Johnson Island. If he decides to linger or move south it would be good to get between him and Pearl Harbour undetected, and maintain surprise. However if he starts dashing north or east, perhaps then you should move full speed and more likely sacrifise surprise in order to get between him and Pearl Harbour, thereby having the ability to hunt him or force an engagement.
Another idea would be to split your KB into two wings in order to pincer him in, but since you don't seem to know where the other US carriers are this may be too dangerous.
Another idea would be to split your KB into two wings in order to pincer him in, but since you don't seem to know where the other US carriers are this may be too dangerous.
-
SierraJuliet
- Posts: 2319
- Joined: Mon Feb 23, 2009 9:40 pm
- Location: Brisbane, Australia
RE: Carrier strike at Wake Island
Thanks JohReb. This is good and I have modified my plan of attack slightly. I was thinking of sending KB directly to the north but will now send KB on something of a NNW heading which should have it about 8 hexes out from Johnston Island when it passes. This will cut down the angle of attack if the carrier/s do move south and at the same time doesn't take KB too far away from a northerly direction to react if the carrier/s attempt to scoot back to Pearl. I've opted for a high speed run for the time being in order to get in to position as quick as I can. I've also kept the KB planes very close to home to avoid detection as best I can. Will have to wait a couple of days and see how this turns out.ORIGINAL: JonReb
It seems you have a good opportunity. You should try you best to avoid detection for the time being and not get too close to Johnson Island. If he decides to linger or move south it would be good to get between him and Pearl Harbour undetected, and maintain surprise. However if he starts dashing north or east, perhaps then you should move full speed and more likely sacrifise surprise in order to get between him and Pearl Harbour, thereby having the ability to hunt him or force an engagement.
Another idea would be to split your KB into two wings in order to pincer him in, but since you don't seem to know where the other US carriers are this may be too dangerous.
I'll keep the KB together as I don't feel confident with the idea of splitting it up. I'd much rather have all 6 together whatever might come of this.
Kido Butai, although powerful, was a raiding force, and this is exactly how the Japanese understood its usage. 'Shattered Sword'