Leadership Variant AAR or how to shovel noodles uphill
Goodaye,
This AAR is based around a variant of AT that I knocked up for my own personal use in Random Games. In a nutshell it puts another decision layer over the top of the normal AT operations that revolves around managing a staff of generals that carry out your orders.
I did this not because I see any deficiency in the design of AT (I like it a lot) but because I enjoy this kind of stuff and find it a lot of fun. It does involve a bit of fiddling around and a small amount of bookkeeping but, for me, the effort/return equation is well and truly in the black. It also makes for an entertaining AAR.
[center]
 [/center]
If you’re interested in how it works read on, if not then just skip the explanation and go straight to the AAR below as you can enjoy it without having recourse to a detailed knowledge of the ‘Leadership Variant’.
Oh, before you proceed further you should read my legal disclaimer.
If you’ve waded through my other AAR on the forum, ‘El Supremo Goes to War’, then you are up to speed on my views re: not causing offence, persons of restricted growth, Klingons and lawyers. Same thing applies here expect for the fact that my crack legal team have since abandoned me and I’ve had to revert to threats of extreme physical violence. Best not to take offence as none is intended.
How it Works – under the hood with grease up to here
You are the overall commander and ordering individual units around is beneath you. There are a team of underlings to take care of this. Your job is to manage the underlings. (Kind of. You still move units but you need to do this properly through your chain of command which may or may not respond to your ‘requests’.)
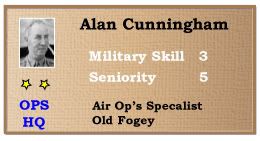
Each Headquarters unit is assumed to be commanded by a General. You command the overall base Headquarters unit. You have the rank of a 5 star General. All other subsequent headquarter units have lower ranked Generals commanding them that answer to your good self. Promptly. And with a proper bloody salute.
Note that for the purposes of simplicity the term General encompasses Air Commodores and Naval Admirals.
[center]
 [/center]
Your subordinate Generals have certain characteristics. The key one being their Military rating. This is a direct measure of their ability to command. It ranges from 1 to 6, with a six being a military superstar and one a rolled gold dud. At the start of each turn you roll a dice (1D6) for each headquarters unit. You need to roll the Generals Military rating or less in order for that headquarters to be ‘activated’. (I’ve borrowed ideas from all kinds of games here and make no claims to originality)
[center]
[/center]An activated HQ can move and fight its attached units normally.
An HQ that fails its activation roll can still shuffle units around but none of its units can initiate any form of combat or enter hostile territory.
Now the overall commander, yourself, has available, each turn, a number of ‘Command Points’ which he can use for various purposes such as rerolling failed activation die rolls, transferring generals around, promoting and demoting generals etc.
That’s the basic concept. The refinements are as follows.
General Characteristics – The make of the man
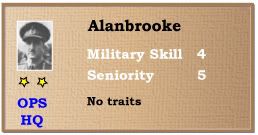
Roll a few dice to generate the following characteristics. All Generals start at two star rank. No rerolls. It is as it is.
1.Military Rating (1D6) Higher the better
2.Senority (1D6) Higher being the more senior
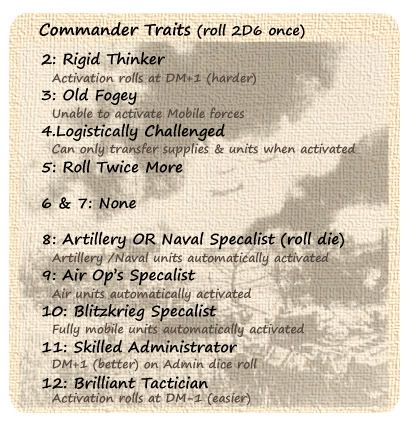
3.Special Traits (2D6) Roll once on the below table
[center]
 [/center]
Note: Any General with a specialist attribute can move and instigate combat with the relevant units regardless of whether they have been activated or not. The Blitzkrieg attribute can allow the General to attack with any unit provided it is fully motorised. Rattling around on the back of a horse doesn’t count unless it farts petrol fumes.
The Old Fogey is the opposite and can’t initiate combat with anything other than fully non-motorised units (provided he is activated). For this fossil tanks can never be ordered into battle. Conversely if you are on a horse it’s sabres out and tally ho!
Logistically challenged is self explanatory. How bad this trait actually is to your war effort is largely determined by whether you play with the ‘hardcore logistics’ option (I do). In which case it’s a shocker.
Rolling twice means just that. If you fluke it and roll identical traits then – for specialists – treat it as having rolled just one. For attributes that involve a DM to a die roll, eg. Brilliant Tactician, then double the effect. For Old Fogey or Logistically Challenged then cancel them out. Eg. They no longer exist.
Initial Leadership Pool – Still waters run deep, go stagnant and fester
Roll a bunch of dice until you have six generals. Give them all a name and note them down along with their stats. This is your initial pool of carefully trained and nurtured leadership talent. Important note: Give your initial (only) pool of generals a DM+1 on their Military Ratings and Seniority die rolls.
You can cherry pick whomever you want from the pool for as long as you want. As the game progresses and your need for generals increases you are faced with a dilemma. Do you pick the worst of whatever motley talent is left in the pool or do you go outside the pool and risk taking on a random general (roll the dice and take whomever turns up) ?
The idea is that you have a known pool of talent (a mixture but skewed towards good) at the start and if you choose to go outside of that pool essentially a random general will be imposed on you by your political masters. Your influence only goes so far.
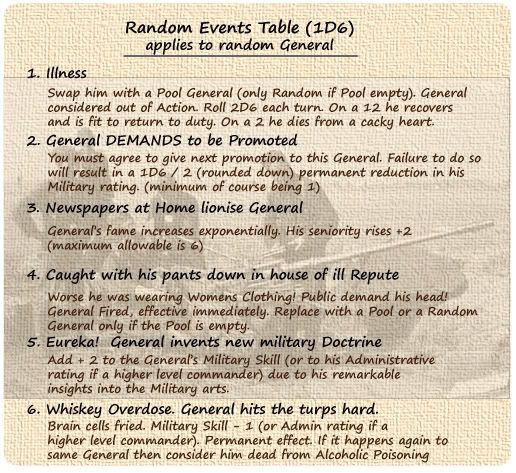
Command Points – And that, son, is why I’m in charge!
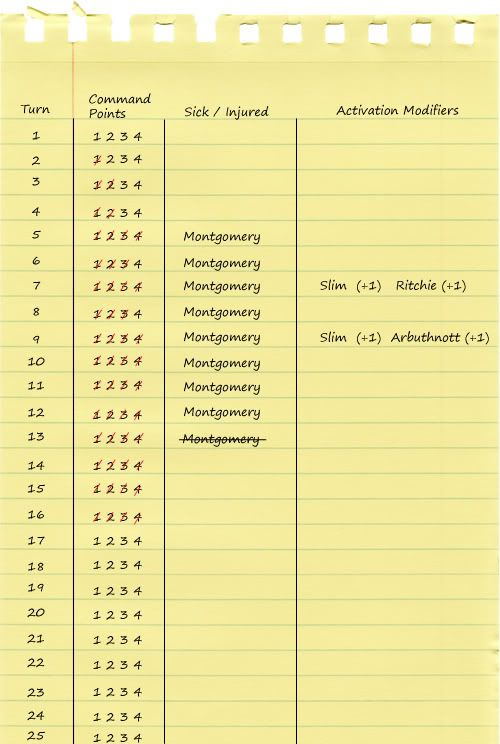
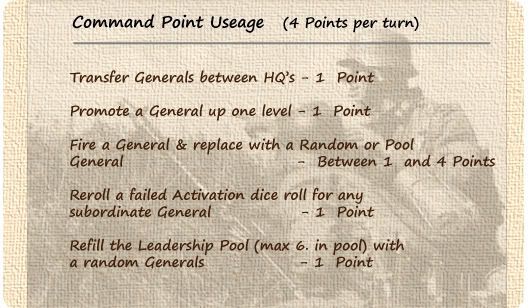
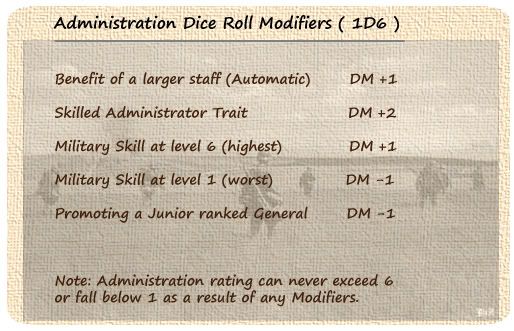
Each turn you, as overall commander, can exert executive authority. As there is only one of you and the demands on your time are many, there is a limit to what you can do. You have 4 Command points a turn. Use ‘em or lose ‘em.
[center]
[/center]
Transferring Generals – A Generals gotta go where a Generals gotta go
Sometimes you don’t have the right man in the right place. Prior to the start of any turn you can swap a general with any other general (of the same rank) in a different headquarters. The only downside – apart from the Command point cost – is that each general’s activation die roll (for this turn only) have a DM+1 (harder) to reflect the disruption inherent in any change of command. So a General with a command rating of 4 who is transferred will effectively need to roll a 3 or less this turn to be ‘activated’.
Fire a General – Pink slip the big fella
Plainly some generals don’t perform as you would like them to. Bastards. You have the right to fire and replace them with a General from whatever’s left of your leadership pool or a random General.
However real life is unfortunately not this cut and dried. Some Generals are easier to fire than others. Think of Douglas McArthur and the impressive PR machine that stood behind him.
A Generals’ seniority determines how hard they are to fire.
To fire them you have to roll (1D6) their seniority or more. Every attempt you make at firing them costs one Command point. Funnily enough not many Generals enjoy being shafted. Nor do they appreciate having to continue to take orders from the a**h*le who tried to do so. If you try and fire them and fail in the attempt then their Military rating drops by one permanently (it can’t go lower than one).
This is done to reflect the political difficulty in firing a popular or well connected general. Getting rid of a dud general who has high seniority can be awkward. Fail and you are lumbered with a cranky dud who is out to get you. This puts a premium on putting the right general in the right job right from the word go. It also makes taking a random general more of a risk. What if he turns out to have a command rating of 1 and a seniority of 6? You could be stuck with him forever.
There is one saving grace, however. Any General who fails to activate three turns in a row gets a DM-1 (easier) on his firing dice reflecting your greater chance of terminating somebody who sat on his ass for the last 3 months and who has done three fifths of bugger all.
Performance – the Good, the Bad and the Ugly
A Generals ability and fame tend to rise and fall roughly in parallel with their perceived success on the battlefield.
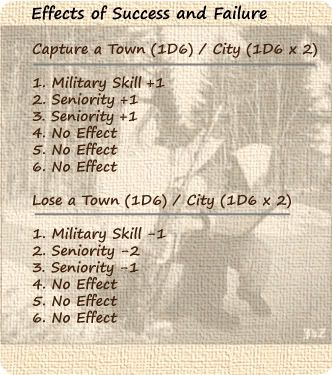
Every time a village/town or city is captured or lost, the General whose troops are involved (if multiple use the one with the most units engaged) must roll to see if he has been affected by this. I roll once for a village/town and twice for a city (I play with the ‘optimise for AI’ setting so there are lots of villages/towns and I generally have few cities on the map).
For the purposes of Performance rolls I only count cities and villages/towns that have been captured from the enemy and not from the Peoples Republic.
[center]
 [/center]
Note: Both Military Skill and Seniority have to stay within their 1 to 6 outer limits as a result of any adjustments.
As can be seen from the tables above the potential downside of failure outweighs the benefits of success. This is done deliberately as whenever there is a success every man and his dog put their hand up to claim the glory, thus diluting the benefits whereas failure usually results in a sad and lonesome scapegoat.
 [/center]
 [/center]
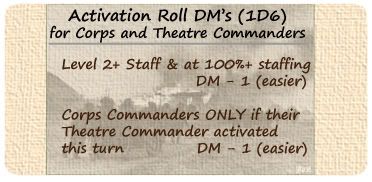 [/center]
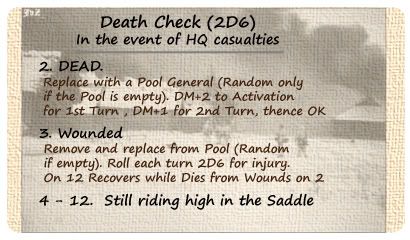
 [/center]
 [/center]
 [/center]
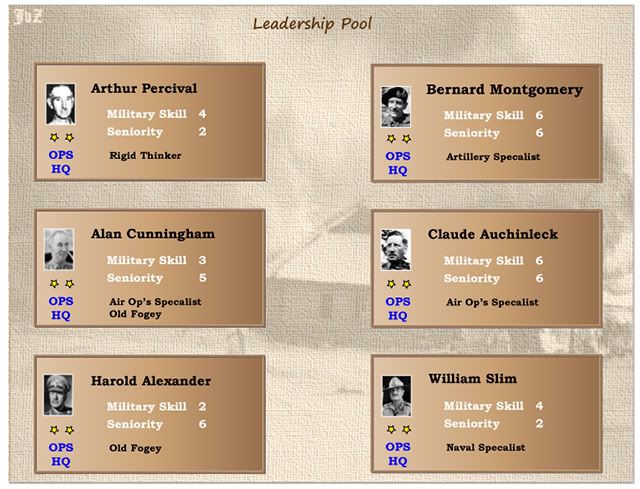 [/center]